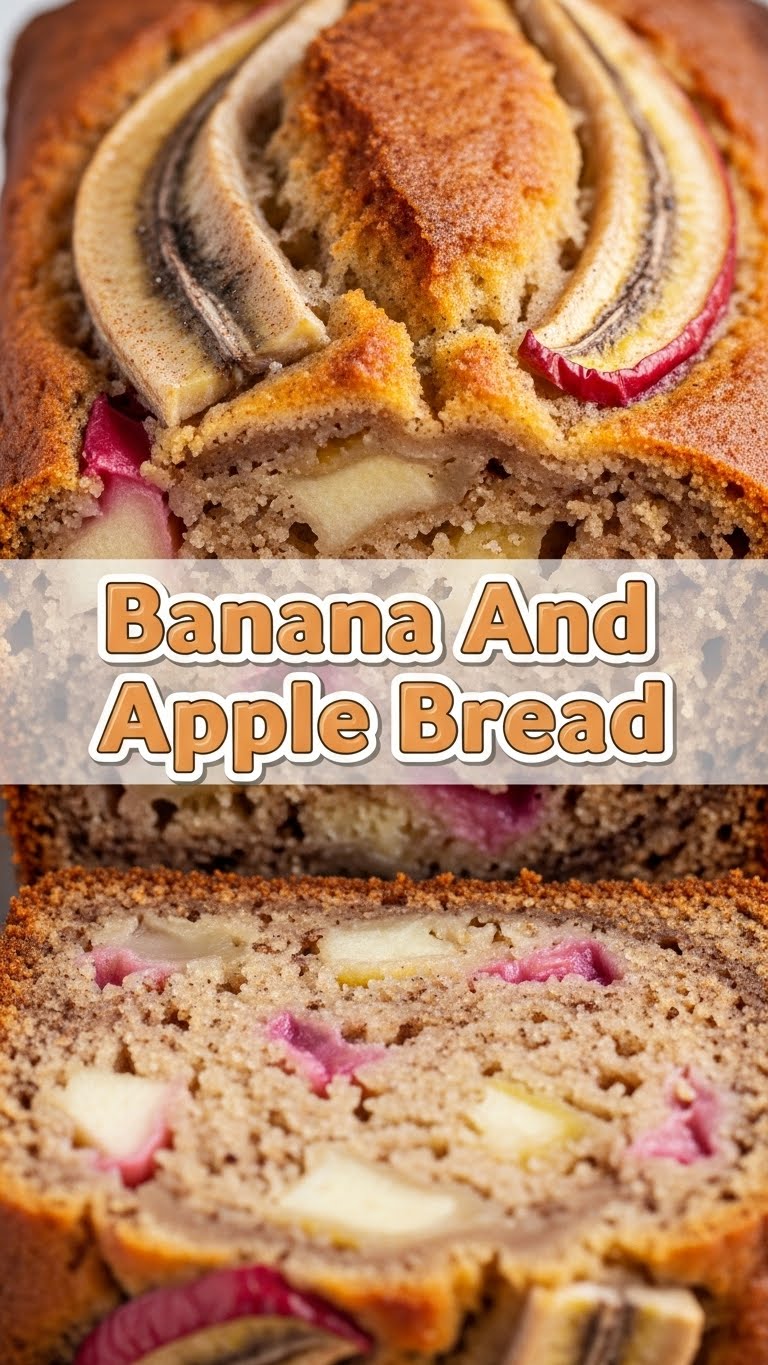
So, you’ve got a couple of suspiciously brown bananas lurking on your counter, some apples chilling in the fruit bowl, and a sudden, undeniable urge for something warm, cozy, and utterly delicious? Same, friend, same. You’re not looking for a culinary marathon, just a sweet victory. And guess what? We’re about to make it happen without breaking a sweat or your spirit. Welcome to the wonderful world of Banana and Apple Bread!
Why This Recipe is Awesome
Okay, let’s be real. In the grand scheme of kitchen adventures, this banana and apple bread is basically the equivalent of a comfy Netflix binge. It’s **super forgiving**, meaning even if you’re a little distracted (hello, social media scroll), you’re probably still going to nail it. It’s a genius way to use up those bananas that are practically begging to be baked, and it throws in apples for a delightful texture and an extra zing. Plus, the smell? Oh, the smell alone is worth the minimal effort. Your home will transform into a bakery without you having to wear a chef’s hat. It’s comforting, it’s delicious, and it makes you look like a domestic god/goddess with very little actual work. What’s not to love?
Ingredients You’ll Need
Gather ’round, my fellow lazy gourmands! Here’s your hit list for deliciousness. Don’t worry, nothing too exotic here.
- Flour (1½ cups, all-purpose): The foundation of our delicious empire.
- Baking Soda (1 teaspoon): Our little lift-off agent. Don’t skip it, unless you want a flat sad pancake.
- Salt (½ teaspoon): Just a pinch to make everything else sing.
- Cinnamon (1 teaspoon): Because banana bread without cinnamon is just… a missed opportunity.
- Nutmeg (¼ teaspoon): Optional, but it’s like cinnamon’s cool, mysterious cousin. Adds depth!
- Ripe Bananas (3 medium, very ripe): The browner, the better! We’re talking practically black. Don’t fear the spots, they’re flavor bombs!
- Granulated Sugar (½ cup): For that sweet, sweet goodness. Adjust if your bananas are mega-sweet.
- Egg (1 large): Our binder, our glue, our reason for being.
- Unsalted Butter (¼ cup, melted): Adds richness and makes everything moist. Don’t try to substitute with weird oils unless you absolutely must.
- Vanilla Extract (1 teaspoon): A splash of magic.
- Apple (1 medium, peeled, cored, and finely diced): Any crisp apple works well here – Granny Smith for a tart kick, Fuji for sweetness. Your choice!
Step-by-Step Instructions
- Preheat & Prep: First things first, get your oven to 350°F (175°C). Then, grease and flour a standard loaf pan. Nobody likes a bread that’s stuck in its pan, right?
- Dry Mix Magic: In a medium bowl, whisk together your flour, baking soda, salt, cinnamon, and nutmeg (if using). Give it a good whisk until everything is friendly with each other.
- Banana Mash Bash: In a separate, larger bowl, mash those gloriously ripe bananas. A fork works perfectly here. Leave a few small lumps if you like a little texture in your bread.
- Wet Mix Wonder: To your mashed bananas, add the sugar, egg, melted butter, and vanilla extract. Stir it all together until it’s just combined. Don’t overmix! We’re aiming for happy, not overworked.
- Combine & Conquer: Now, gently fold the dry ingredients into the wet ingredients. Mix until *just* combined. Seriously, don’t overmix. A few streaks of flour are totally fine; overmixing leads to tough bread, and we want tender love.
- Apple Time: Gently fold in your diced apple. Distribute it evenly so every slice gets a little apple goodness.
- Pan It Up: Pour your glorious batter into your prepared loaf pan. Give it a gentle tap on the counter to settle.
- Bake It Baby: Pop that pan into your preheated oven. Bake for **50-60 minutes**, or until a wooden skewer or toothpick inserted into the center comes out clean. If the top starts browning too fast, you can lightly tent it with foil.
- Cool Down: Once baked, let it cool in the pan for about 10 minutes before turning it out onto a wire rack to cool completely. Or, you know, attack it while it’s still warm. Your house, your rules!
Common Mistakes to Avoid
Listen, we all make mistakes, but let’s try to avoid the obvious ones, shall we?
- Overmixing the Batter: This is the cardinal sin of quick breads. Once you add the wet to the dry, stir *just* until combined. Lumpy is good. Tough bread is sad bread.
- Using Under-Ripe Bananas: See those green-yellow bananas? They’re not invited to this party. You need the brown, spotty, even black ones for maximum sweetness and banana flavor. Patience, young padawan.
- Not Greasing Your Pan Properly: Thinking you can skip this step? Rookie mistake! You’ll end up with a delicious brick that’s stubbornly attached to your pan.
- Impatience: Pulling it out of the oven too early. Use that toothpick test! Nobody wants a gooey center (unless it’s a molten lava cake, which this is not).
Alternatives & Substitutions
Feeling adventurous? Or just missing an ingredient? Here are some ideas:
- Flour Power: You can swap out a quarter or half of the all-purpose flour for whole wheat flour if you’re feeling virtuous. It’ll be a bit denser, but still tasty! Gluten-free all-purpose blend can also work, just make sure it’s one designed for baking.
- Spice it Up: Add a pinch of allspice or ground ginger for an extra layer of warmth. Or even a touch of cardamom if you’re feeling fancy.
- Nutty Fun: Fold in ½ cup of chopped walnuts or pecans with the apples for a delightful crunch. My personal opinion? Nuts are always a good idea in quick breads!
- Chocolate Chip Heaven: Let’s be honest, everything is better with chocolate. A ½ cup of chocolate chips is never a bad call.
- Dairy Swap: If you’re out of butter, a neutral oil like canola or vegetable oil can work, though it will change the flavor slightly. For a richer taste, some people use applesauce, but I’m a butter purist for this recipe.
FAQ (Frequently Asked Questions)
- Can I use frozen bananas? Absolutely! Just thaw them completely and drain any excess liquid before mashing. They’ll be even mushier, which is perfect!
- How do I know when it’s perfectly baked? Well, besides the toothpick test, the edges should be nicely golden brown, and the top will spring back slightly when gently pressed. Also, your kitchen will smell like pure heaven, FYI.
- Can I add more apples? You can add a little more, but don’t go overboard, or it might make the bread too moist and heavy. Stick to around one large or two small apples.
- How long does it last? This bread is usually devoured within 24 hours, but if you manage to resist, it’ll stay fresh at room temperature, tightly covered, for 2-3 days. In the fridge, it lasts up to a week.
- Can I freeze this bread? You bet! Let it cool completely, then wrap it tightly in plastic wrap and then foil. It’ll be good in the freezer for up to 3 months. Just thaw at room temp when cravings strike.
- Margarine instead of butter? Well, technically yes, but why hurt your soul like that? Butter just provides a richer flavor and better texture, IMO. If you must use margarine, choose one that’s high quality for baking.
Final Thoughts
See? That wasn’t so hard, was it? You just whipped up a glorious loaf of banana and apple bread, and your kitchen smells like a dream. Now go impress someone—or yourself—with your new culinary skills. Slice it thick, maybe slather on some extra butter (because why not?), and enjoy your well-deserved treat. You’ve earned it! Happy baking, my friend!
