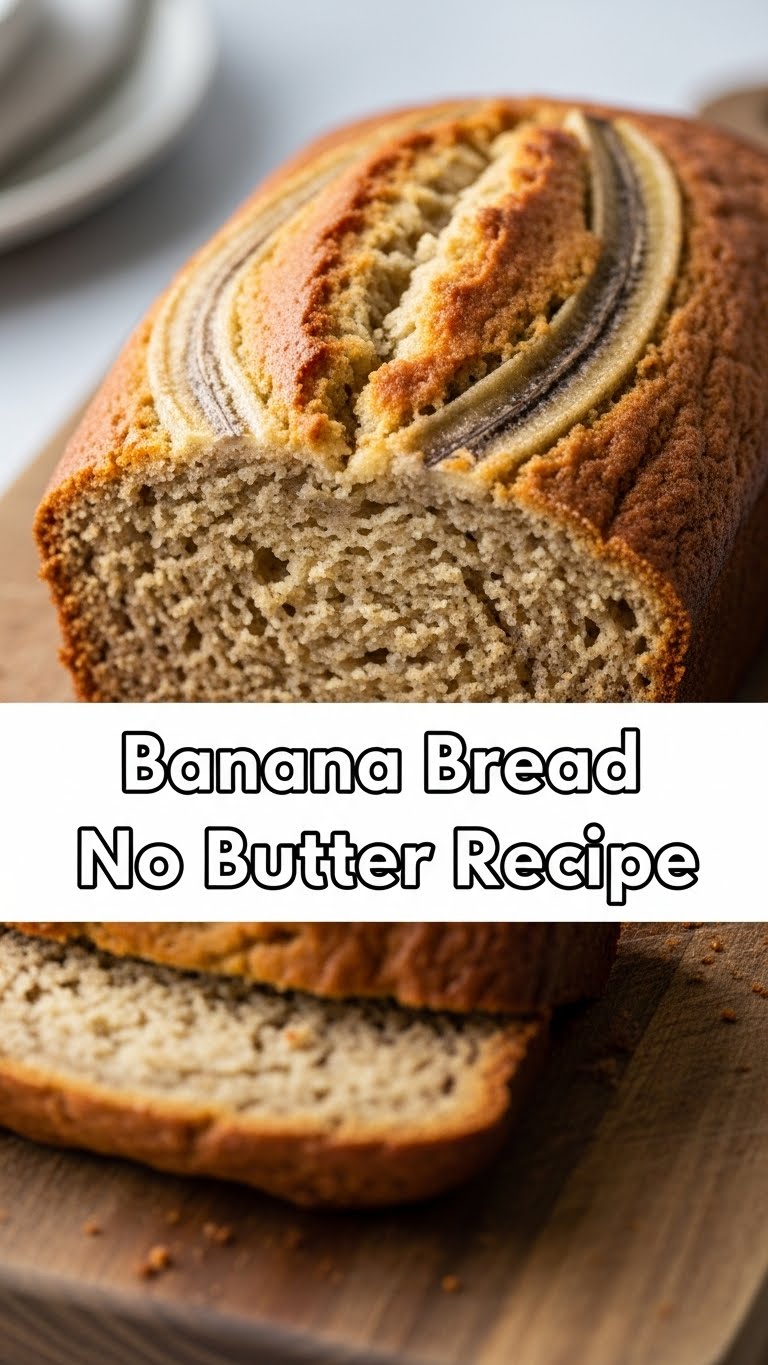
So you’re craving something warm, comforting, and utterly delicious but also staring into your fridge, realizing your butter supply is… non-existent? Or maybe you’re just trying to be *a little* healthier without sacrificing all the joy in life? Same, friend, same. Fear not, because we’re about to dive into the magical world of **banana bread without butter**, and trust me, it’s going to be epic.
Why This Recipe is Awesome
Okay, let’s be real. This isn’t just *any* banana bread recipe; it’s the kind that makes you wonder why you ever bothered with butter in the first place. First off, it’s **ridiculously moist** thanks to our secret (not-so-secret) butter replacement. Think about it: fewer saturated fats, lighter texture, still all the banana-y goodness. It’s practically health food… if you squint. 😉
Secondly, it’s genuinely idiot-proof. Seriously, I’ve had mornings where my brain cells were running on fumes, and even I didn’t mess this up. It comes together quickly, requires minimal fuss, and smells like pure heaven baking in your oven. Plus, it’s an amazing way to use up those super-ripe bananas that are screaming, “Bake me! Before I turn into fruit fly bait!” **Win-win-win!**
Ingredients You’ll Need
Gather ’round, my fellow lazy-but-hungry chefs. Here’s what you’ll need to make this magic happen:
- **3-4 Overripe Bananas:** The browner, the better! We’re talking mottled, spotty, almost-black bananas. Don’t be shy; they’re the superstars here.
- **1/3 Cup Vegetable Oil:** Or canola, melted coconut oil (if you’re feeling fancy), or even applesauce if you want to go super light. This is our butter stand-in, and it does a phenomenal job.
- **1 Large Egg:** Room temp is best, but if you forgot to take it out, don’t sweat it. Your bread will still love you.
- **1 Teaspoon Vanilla Extract:** Because everything tastes better with a splash of vanilla.
- **1 1/2 Cups All-Purpose Flour:** Just regular old flour. Nothing complicated.
- **1 Teaspoon Baking Soda:** Our leavening agent, making sure your bread isn’t a dense brick.
- **1/2 Teaspoon Salt:** Balances all the sweetness and brings out the flavors. Don’t skip it!
- **1/2 Cup Granulated Sugar:** Adjust to your sweetness preference. If your bananas are extra ripe, you might even use a little less.
- **Optional Add-ins:** A handful of chocolate chips (because, duh), chopped nuts (walnuts or pecans are classic), or a sprinkle of cinnamon for extra warmth.
Step-by-Step Instructions
Ready? Let’s get baking! This is going to be super simple, promise.
- **Preheat Your Oven:** Set it to **350°F (175°C)**. Grease a 9×5-inch loaf pan with a little oil or cooking spray. Nobody wants their bread to stick!
- **Mash the Bananas:** In a medium bowl, take those gloriously brown bananas and mash them up with a fork. You want some lumps for texture, so don’t go crazy.
- **Wet Ingredients Unite!** To the mashed bananas, add the vegetable oil, egg, and vanilla extract. Stir it all together until just combined. Don’t overmix; we’re making bread, not a science experiment.
- **Dry Ingredients Party:** In a separate, larger bowl, whisk together the flour, baking soda, salt, and granulated sugar. Give it a good whisk to make sure everything is evenly distributed.
- **Combine Gently:** Pour the wet banana mixture into the dry ingredients. **Fold gently** until just combined. A few streaks of flour are totally fine. This is key to a tender loaf, so **do not overmix!** If you’re adding chocolate chips or nuts, now’s the time to fold them in.
- **Into the Pan:** Pour the batter into your prepared loaf pan. You can sprinkle a little extra sugar or a few chocolate chips on top for a pretty finish, if you’re feeling fancy.
- **Bake It Up:** Pop it into your preheated oven and bake for **50-65 minutes**. The exact time will depend on your oven, so start checking around 50 minutes. You know it’s done when a toothpick inserted into the center comes out clean or with a few moist crumbs.
- **Cool Down:** Let your beautiful banana bread cool in the pan for about 10-15 minutes before carefully removing it and transferring it to a wire rack to cool completely. Or, you know, slice into it while it’s still warm because who can resist that?
Common Mistakes to Avoid
We’ve all been there, staring at a baking disaster. Here’s how to dodge those bullets with this recipe:
- **Using Under-Ripe Bananas:** Seriously, those green-ish yellow bananas are not your friends here. They won’t give you the sweetness or the moisture you need. **Patience, young grasshopper!** Wait for the brown spots.
- **Overmixing the Batter:** This is probably the biggest banana bread sin. Overmixing develops the gluten in the flour, leading to a tough, rubbery bread. We want tender and soft, remember? So, **mix until just combined**.
- **Not Preheating the Oven:** Rookie mistake! A properly preheated oven ensures even baking from the start. Otherwise, your bread might not rise correctly and could end up dense.
- **Opening the Oven Door Too Early:** Resist the urge! Opening the oven door in the first 30-40 minutes can cause your loaf to deflate. Let it do its thing.
Alternatives & Substitutions
Feeling creative? Or just out of an ingredient? Here are some friendly swaps:
- **Oil Alternatives:** If you don’t have vegetable oil, canola oil, melted coconut oil, or even a light olive oil will work. For an even healthier, lower-fat option, **unsweetened applesauce** is a fantastic 1:1 substitute for the oil. It makes for an incredibly moist loaf!
- **Sugar Swaps:** Brown sugar can replace white sugar for a deeper, more molasses-like flavor. You could also try maple syrup or honey, though you might need to slightly reduce other liquids to compensate.
- **Flour Power:** Want to go whole grain? Substitute up to half of the all-purpose flour with whole wheat flour. Just be aware it might make the bread a tad denser. Gluten-free 1:1 baking flour blends usually work great too!
- **Spices:** A pinch of cinnamon, nutmeg, or even a tiny bit of allspice can really elevate the flavor profile.
- **Mix-Ins Mania:** Get wild! Beyond chocolate chips and nuts, try dried cranberries, raisins, shredded coconut, or even a swirl of cream cheese frosting on top after it cools (okay, maybe not the “no butter” vibe, but still delicious!).
FAQ (Frequently Asked Questions)
Got questions? I’ve got (casual, humorous) answers!
- **Q: Can I use margarine instead of butter?** A: Well, technically yes, but why hurt your soul like that? This recipe is specifically designed to skip *any* solid fat, so stick with oil or applesauce for the best results and intended texture.
- **Q: My bananas aren’t super ripe. Can I still use them?** A: You *can*, but it won’t be as sweet or moist, and the banana flavor won’t be as intense. **Pro tip:** You can ripen bananas quickly by baking them on a sheet pan at 300°F (150°C) for 15-30 minutes until soft and dark. Mind blown, right?
- **Q: How long does this banana bread last?** A: In my house? About 24 hours, if I’m lucky. Realistically, it lasts at room temperature for 3-4 days wrapped tightly, or in the fridge for up to a week. It also freezes beautifully for up to 3 months.
- **Q: Can I make this into muffins instead?** A: Absolutely! Just fill muffin liners about two-thirds full and bake for 20-25 minutes. Check for doneness with a toothpick. Muffin power!
- **Q: My banana bread always comes out dry. What am I doing wrong?** A: Chances are, you’re either overmixing the batter (making it tough) or overbaking it (sucking out all the moisture). Stick to gentle mixing and pull it out as soon as the toothpick comes clean.
- **Q: Is this considered healthy?** A: Let’s call it “healthier-ish” than traditional butter-laden versions. It’s still got sugar, but it’s a delicious treat! Everything in moderation, right?
Final Thoughts
So there you have it! A banana bread recipe that’s easy, delicious, and doesn’t require a single stick of butter. Go forth, conquer those overripe bananas, and bask in the glory of your homemade masterpiece. Share it with friends, devour it yourself, or just enjoy the fact that you made something awesome from scratch without too much effort. Now go impress someone—or yourself—with your new culinary skills. You’ve earned it!
