
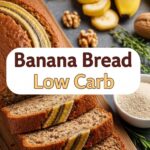
So you’re craving something tasty but too lazy to spend forever in the kitchen, huh? Same. Like, can we just get straight to the good stuff without a mountain of dishes or a degree in baking science? If your answer is a resounding “YES, PLEASE!”, then you, my friend, are in the right place. We’re about to whip up some banana bread magic, and guess what? It’s completely flour-free. Mind-blown, right?
Why This Recipe is Awesome
Let’s be real, most banana bread recipes involve flour, and sometimes, you just don’t have it, or you’re trying to be a bit mindful, or you’re just plain curious. This recipe is your new best friend because:
- It’s **idiot-proof**. Seriously, even I didn’t mess it up, and my kitchen skills sometimes involve setting off the smoke detector with toast.
- **No flour!** Which means it’s naturally gluten-free (if that’s your jam) and just feels a little lighter. Plus, fewer weird ingredients to track down.
- It uses those **sad, forgotten, overripe bananas** lurking on your counter. Finally, a noble purpose for them before they attract fruit flies!
- It comes together with minimal fuss and **minimal dishes**. We love to see it.
- The texture is surprisingly moist and delightful. It’s like a hug in bread form, but without the awkward small talk.
Ingredients You’ll Need
Gather ’round, my culinary comrades! Here’s what you’ll need for this banana bread rebellion. Keep it simple, keep it real.
- **3 very ripe medium bananas**: Like, practically black. These are the unsung heroes of flavor and natural sweetness. Don’t even *think* about using green ones.
- **2 large eggs**: The binders, the glue, the reason it doesn’t just crumble into sad banana mush.
- **1/2 cup creamy nut butter**: Peanut butter, almond butter, cashew butter—your call! This is our glorious flour substitute, providing structure, fat, and a whole lotta yum. **Pro tip: Use natural, unsweetened kind if you can!**
- **1/4 cup maple syrup or honey**: Just a kiss of sweetness, because our bananas are already doing a lot of the heavy lifting. Adjust to your sweet tooth!
- **1 teaspoon baking soda**: For that beautiful lift. Don’t skip this unless you like bricks.
- **1 teaspoon vanilla extract**: Because everything is better with a splash of vanilla. It’s science.
- **1/2 teaspoon ground cinnamon** (optional, but highly recommended): Spice things up a bit!
- **Pinch of salt**: Balances everything out. Trust me on this one.
- **1/2 cup chocolate chips or chopped nuts** (optional, but encouraged for maximum joy): Because sometimes, you just gotta.
Step-by-Step Instructions
Alright, apron on (or not, no judgment), let’s get baking! These steps are so easy, you could probably do them in your sleep.
- **Preheat Power-Up:** First things first, get that oven to 350°F (175°C). Then, grease and flour (or line with parchment paper) a standard loaf pan. Or, you know, just grease it if you’re feeling wild.
- **Banana Mash Party:** In a large bowl, mash those gloriously overripe bananas with a fork until they’re mostly smooth but still have a few small chunks for character.
- **Wet Ingredients Unite:** To your mashed bananas, add the eggs, nut butter, maple syrup (or honey), vanilla extract, and salt. Stir it all together until it’s well combined. We’re going for smooth, not lumpy, here.
- **Sprinkle in the Good Stuff:** Now, sprinkle in the baking soda and cinnamon (if using). Stir gently until just combined. **Don’t overmix!** Overmixing is the enemy of fluffy.
- **Optional Add-ins:** If you’re feeling fancy (or just love chocolate), gently fold in your chocolate chips or nuts now.
- **Pan Patrol:** Pour the batter into your prepared loaf pan. You can even sprinkle a few extra chocolate chips on top if you want it to look extra inviting.
- **Bake It ‘Til You Make It:** Pop that pan into the preheated oven and bake for about 40-50 minutes. The exact time depends on your oven and loaf pan. You’ll know it’s ready when a toothpick inserted into the center comes out clean (or with a few moist crumbs, not wet batter).
- **Cool Down, Champ:** Let the banana bread cool in the pan for about 10-15 minutes. This is crucial for it to set properly and not fall apart when you try to unleash it. Then, transfer it to a wire rack to cool completely. Or, you know, attack it warm with a spoon. Your call, I’m not judging.
Common Mistakes to Avoid
Listen, we all make mistakes. It’s part of the human condition, and sometimes, the baking condition. Here are a few traps to sidestep:
- **Using not-so-ripe bananas:** Rookie mistake! Green bananas are great for smoothies, terrible for this bread. You need the sweetness and moisture of those spotty, almost-black beauties.
- **Overmixing the batter:** Once you add the dry ingredients, mix just until combined. Aggressive mixing activates gluten (even in a flourless recipe, the protein in the eggs can get tough) and can lead to a dense, rubbery bread. Nobody wants that.
- **Not greasing your pan properly:** This is a sticky situation, literally. Don’t skip this, or your beautiful bread will be glued to the pan forever.
- **Cutting it while piping hot:** I know, the temptation is real. But waiting a bit allows it to firm up. Otherwise, it might crumble. Patience is a virtue, especially when warm banana bread is involved.
- **Forgetting the baking soda:** Unless you’re aiming for a banana frisbee, the baking soda is non-negotiable for that light, airy texture.
Alternatives & Substitutions
Feeling creative? This recipe is super flexible! Here are some ideas to shake things up:
- **Nut Butter Swap:** Don’t have peanut butter? Almond butter, cashew butter, or even sunflower seed butter (for a nut-free option!) will work just fine. Each will impart a slightly different flavor, so experiment!
- **Sweetener Switch-Up:** You could use brown sugar, coconut sugar, or even stevia (adjust amounts carefully!) instead of maple syrup or honey. Just be aware that this might slightly alter the moisture level.
- **Spice It Up!** Beyond cinnamon, a pinch of nutmeg, cardamom, or even ginger would be fantastic. Or try a pumpkin pie spice blend for autumn vibes!
- **Mix-in Madness:** Shredded coconut, dried cranberries, chopped dates, a swirl of cream cheese (before baking!), or even a handful of rolled oats can be fun additions. Go wild!
- **Make it Vegan:** Swap the eggs for flax eggs (1 tbsp ground flaxseed + 3 tbsp water per egg, let sit for 5 mins) and ensure your chocolate chips are dairy-free.
FAQ (Frequently Asked Questions)
Got questions? I’ve got answers. Mostly.
Can I skip the nut butter?
Well, technically you *could*, but why would you want to hurt its feelings? The nut butter is a star player here, providing essential fat, moisture, and structure in the absence of flour. Skipping it would result in a very different, probably less delicious, outcome. Trust the process!
My bananas aren’t ripe enough! What now?
Oh, the age-old dilemma! If you’re impatient, you can ripen them quickly by baking them in their peels on a baking sheet at 300°F (150°C) for 15-30 minutes until they’re black and soft. Or, pop them in a paper bag with an apple for a day or two. But honestly, **the riper, the better** for this recipe.
Is this really “healthy”?
Define healthy! It’s flour-free and uses natural sweeteners, which is a win for many. But it still has sugar and fat (delicious, delicious fat). Think of it as a **healthier-ish treat**, not a salad. Everything in moderation, right?
How long does this banana bread last?
If you manage not to devour it all in one sitting (impressive willpower, BTW), it’ll keep covered at room temperature for 2-3 days, or in the fridge for up to a week. It also freezes beautifully for longer storage!
Can I make muffins instead of a loaf?
Absolutely! Divide the batter into a greased or lined muffin tin. Bake for about 20-25 minutes, or until a toothpick comes out clean. Perfect for grab-and-go treats! **FYI:** Muffins bake faster.
What if I don’t have baking soda? Can I use baking powder?
Baking soda is really key here for reacting with the acidity of the bananas and nut butter to create lift. Baking powder is different. While you *could* try substituting with 3x the amount of baking powder, the results won’t be quite the same. **Stick to baking soda for the best results.**
Final Thoughts
There you have it! A ridiculously easy, unbelievably tasty, flour-free banana bread recipe that will make you feel like a kitchen wizard without all the fuss. Now go forth and impress someone—or more importantly, yourself—with your new culinary skills. You’ve earned it, and a slice of this deliciousness!
