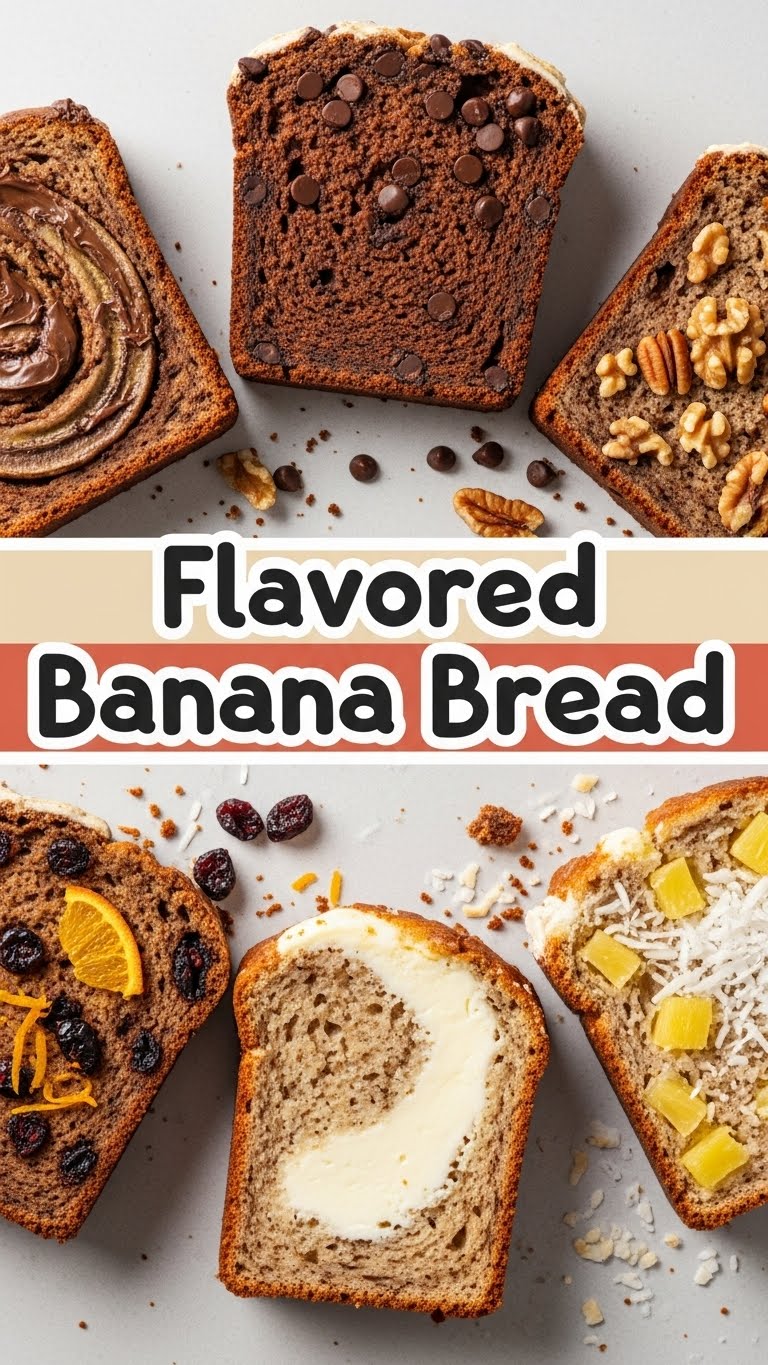
So you’re craving something tasty but too lazy to spend forever in the kitchen, huh? Same. And let’s be real, a plain old banana isn’t cutting it anymore. We need *flavor*. We need *excitement*. We need… Flavored Banana Bread! Think of it as a glow-up for your sad, spotty bananas.
Why This Recipe is Awesome
First off, it’s basically a hug in bread form. Seriously, you take one bite, and all your worries just kind of melt away. Plus, it’s so easy, even your pet goldfish could probably follow along (if it had opposable thumbs, obvs). It’s incredibly forgiving and **fool-proof.** I’ve messed up water before, but not this. That’s saying something.
And the best part? It’s customizable AF. Want chocolate? Go wild! Nuts? Be a rebel! Caramel? You get the picture. This isn’t just banana bread; it’s *your* banana bread. So, let’s get those ripe bananas ready for their big moment!
Ingredients You’ll Need
- Ripe Bananas: Like, *really* ripe. The ones that look questionable but smell like heaven. (3-4 medium)
- All-Purpose Flour: The OG. No fancy stuff needed unless you’re feeling extra. (1 ½ cups)
- Granulated Sugar: Sweetness! You do you, boo. Adjust if your bananas are basically candy. (½ cup, more or less)
- Brown Sugar: Adds that deep, molasses-y goodness. Don’t skip it! (¼ cup)
- Melted Butter: Because everything’s better with butter. Don’t even *think* about oil unless you must. (½ cup, unsalted)
- Egg: Just one. Our binder. (1 large)
- Vanilla Extract: Adds a hug to your bread. Don’t skimp on the good stuff. (1 teaspoon)
- Baking Soda: For that perfect lift. Science, baby! (1 teaspoon)
- Salt: Balances everything out. Super important, don’t forget it! (½ teaspoon)
- Your Flavor Boost! (Choose one or mix ’em up!):
- Chocolate Chips (½ – 1 cup): Because, duh.
- Chopped Nuts (walnuts, pecans) (½ cup): For crunch and sophistication.
- Cinnamon (1 teaspoon) + Nutmeg (½ teaspoon): Classic, cozy vibes.
- Caramel Bits (½ cup): Level up, buttercup!
- Orange Zest (1 tablespoon): Brighten things up, zesty pal!
Step-by-Step Instructions
- Preheat & Prep: Get that oven fired up to **350°F (175°C)**. Grease and flour a 9×5-inch loaf pan. Don’t be lazy here; future you will thank you.
- Mash ‘Em Up: In a big bowl, mash your ripe bananas with a fork. Leave some small chunks if you like texture, you rebel.
- Wet Ingredients Unite: Add the melted butter, sugars, egg, and vanilla extract to the mashed bananas. Mix until just combined. Don’t overmix, we’re not making soufflé here.
- Dry Spell: In a separate bowl, whisk together the flour, baking soda, and salt. Make sure it’s all happy and blended.
- Marry Them: Gently fold the dry ingredients into the wet ingredients. **Mix until just combined; lumps are okay!** Overmixing develops gluten and makes your bread tough. We want tender love, not tough love.
- Flavor Time! Now’s your moment. Gently fold in your chosen flavor boosts – chocolate chips, nuts, spices, whatever your heart desires.
- Pan It: Pour the batter into your prepared loaf pan. Give it a gentle tap on the counter to settle.
- Bake It Baby: Pop it in the oven for **50-65 minutes**, or until a toothpick inserted into the center comes out clean. If the top starts browning too fast, you can lightly tent it with foil.
- Cool Down: Let it cool in the pan for about 10-15 minutes before transferring it to a wire rack to cool completely. **Resist the urge to cut it hot** – it will taste better cooled. Promise.
Common Mistakes to Avoid
- Using under-ripe bananas: They’re just not sweet enough, and the texture won’t be right. **Spotty is sexy in this context.**
- Overmixing the batter: Remember that gluten thing? **Mix until *just* combined.** A few lumps are a sign of a good baker, IMO.
- Not greasing your pan properly: You want your bread to come out in one glorious piece, not stick like glue. Seriously, grease and flour.
- Cutting it too soon: Patience, grasshopper! It needs to set up. You’ll get a cleaner slice and better texture if you wait.
- Ignoring the toothpick test: Don’t just guess! **A clean toothpick means it’s done.** A gooey one means more bake time.
Alternatives & Substitutions
Feeling like a kitchen chemist? Good, because this recipe loves a good tweak!
- Sugar Swap: Feeling healthier? Reduce the sugar slightly, or use maple syrup/honey (reduce other liquids a bit if you do). For a less sweet bread, just cut down the granulated sugar.
- Butter vs. Oil: You *can* use vegetable oil instead of butter for a slightly lighter (and perhaps moister) crumb, but honestly, the flavor of butter is superior. **Team Butter all the way.**
- Flour Power: Want whole wheat? Substitute up to half the all-purpose flour with whole wheat flour for a nuttier flavor. Don’t go full whole wheat unless you’re ready for a denser bread.
- Spice It Up: Instead of just cinnamon, try a pinch of cardamom, allspice, or ginger for a different vibe. Chai spice banana bread, anyone?
- Vegan Option (sort of): For a surprisingly good vegan version, use a flax egg (1 tbsp ground flaxseed + 3 tbsp water, let sit for 5 min) and a plant-based butter. The texture will be slightly different but still delish.
FAQ (Frequently Asked Questions)
- Q: My bananas aren’t ripe enough! Can I still use them?
A: Well, you *can*, but it won’t be as sweet or flavorful. **Pro tip:** You can bake unpeeled bananas at 300°F (150°C) for 15-20 minutes until they turn black and soft. Instant ripeness!
- Q: Can I use margarine instead of butter?
A: Well, technically yes, but why hurt your soul like that? Butter just tastes better. If you must, use a good quality margarine.
- Q: How do I store leftover banana bread?
A: Ha! “Leftover.” Good one. If you somehow have any, store it tightly wrapped at room temperature for 3-4 days, or in the fridge for up to a week. It also freezes beautifully for up to 3 months.
- Q: My banana bread top cracked. Is it ruined?
A: Ruined? Honey, that’s character! A crack on top is perfectly normal and often means you’re getting a nice crust. Embrace the imperfections!
- Q: Can I add fresh fruit like berries?
A: You bet! Just toss them in a tablespoon of flour before adding to the batter to prevent them from sinking to the bottom. Raspberries or blueberries would be divine.
- Q: What kind of pan should I use?
A: A standard 9×5-inch loaf pan is best. Glass, metal, whatever you have. Just adjust baking time slightly if using a darker metal pan (might bake faster).
Final Thoughts
See? That wasn’t so scary, was it? You just made something truly delicious and totally Instagram-worthy without breaking a sweat. Now go impress someone—or yourself—with your new culinary skills. You’ve earned it! Seriously, go grab a slice and pat yourself on the back. You’re basically a professional now. **You’re welcome.**

