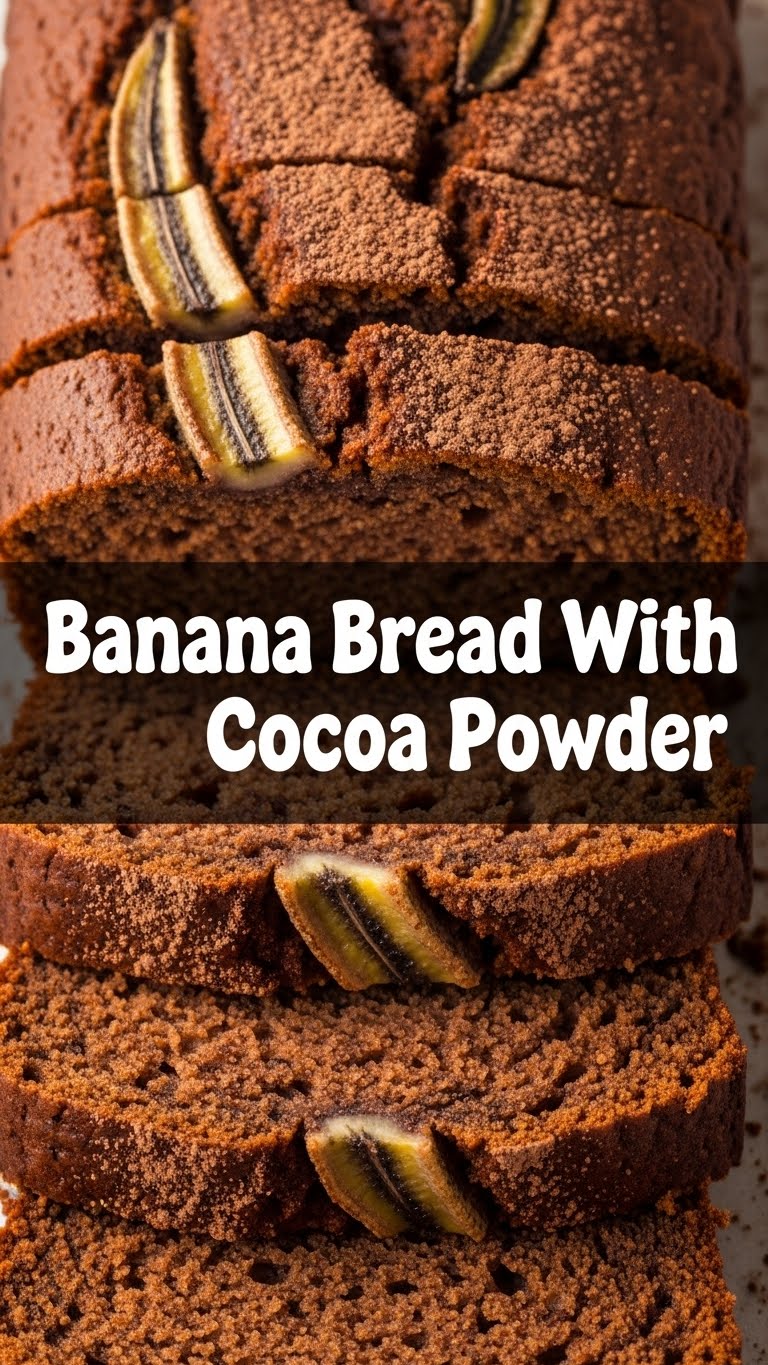
So you’ve got some sad, spotty bananas glaring at you from the counter, practically begging for a glow-up? And your sweet tooth is doing a little jig, demanding chocolate? Honey, I feel you. Let’s make magic happen, the easiest way possible, with **Chocolate Banana Bread**. Because why choose when you can have both? This isn’t just banana bread; it’s banana bread that went to art school and came back with a dark, mysterious side. 😉
Why This Recipe is Awesome
Because it’s basically a hug in bread form, but with *chocolate*. Duh. This recipe is so **ridiculously easy**, even your pet hamster could probably follow along (if it had opposable thumbs and a whisk). It’s perfect for using up those bananas that have seen better days – seriously, the spottier, the better. Don’t you dare throw them out, you monster! Plus, it makes your whole house smell like a cozy bakery, without the early morning alarms or the crippling debt.
Ingredients You’ll Need
Gather your troops, fellow kitchen adventurer! Here’s what you’ll need for this delicious escapade:
- 3-4 Medium Ripe Bananas: The spotty, almost-black ones! Don’t even *think* about using yellow ones. They’re not ready for their destiny.
- 1 ½ cups All-Purpose Flour: The OG flour. Nothing fancy needed here, unless fancy is your jam.
- ½ cup Unsweetened Cocoa Powder: This is where the magic happens. Make sure it’s unsweetened, unless you want a very, *very* sweet bread.
- ¾ cup Granulated Sugar: Sweetness! You know the drill.
- 1 teaspoon Baking Soda: Our little lift-off agent. Makes things fluffy.
- ½ teaspoon Salt: A tiny pinch to make everything pop. Don’t skip it, it balances the flavors like a pro.
- ½ cup (1 stick) Unsalted Butter: Melted, because who has time to soften butter? Not us!
- 1 Large Egg: One lonely egg, doing its binding duty.
- 1 teaspoon Vanilla Extract: Because everything is better with a splash of vanilla. IMO.
- (Optional) ½ cup Chocolate Chips: For the *extra* chocolate lovers. You know who you are. No judgment here.
Step-by-Step Instructions
Alright, let’s get down to business. Follow these simple steps and prepare to be amazed!
- Get Your Oven & Pan Ready: First things first, preheat your oven to 350°F (175°C). Then, grease and flour a standard 9×5 inch loaf pan. Or line it with parchment paper if you’re feeling extra fancy and don’t want sticking issues.
- Mash Those Bananas: In a medium bowl, mash those gloriously ripe bananas with a fork until they’re mostly smooth but still have a few little lumps. A little texture never hurt anyone!
- Wet Ingredients Unite: To your mashed bananas, add the melted butter, the egg, and the vanilla extract. Give it a good whisk until everything is well combined and looking happy.
- Dry Ingredients Party: In a separate, larger bowl, whisk together the flour, cocoa powder, granulated sugar, baking soda, and salt. Make sure there are no lumpy bits of cocoa powder lurking.
- Combine Forces (Gently!): Pour your wet banana mixture into the dry ingredients. Stir *just* until combined. A few lumps of flour are totally fine – **overmixing is the enemy of moist bread!** If you’re using chocolate chips, now’s the time to fold ’em in.
- Bake It ‘Til You Make It: Pour the batter into your prepared loaf pan. Pop it into the preheated oven and bake for about 50-60 minutes. You’ll know it’s done when a toothpick inserted into the center comes out clean or with a few moist crumbs.
- Cool Down, Buttercup: Let the banana bread cool in the pan for about 10-15 minutes before attempting to invert it onto a wire rack to cool completely. I know, I know, the smell is torture, but **patience is a virtue here!**
Common Mistakes to Avoid
Nobody’s perfect, but we can try to avoid these common banana bread blunders!
- Overmixing the Batter: It’s not a smoothie, people! Mix until *just* combined. Those little lumps of flour? They’re okay. Overmixing develops gluten too much, leading to tough, chewy bread instead of tender deliciousness.
- Using Under-Ripe Bananas: Again, NO. They won’t mash well, and your bread won’t be as moist or flavorful. The star of the show needs to be performing at its peak!
- Not Preheating the Oven: Rookie move. Your bread needs a hot start to rise properly and get that beautiful crust. Don’t cheat the heat!
- Cutting Into It Too Soon: I know, I know, it smells divine. But let it cool a bit, or it might crumble on you. Plus, the flavors continue to meld as it cools. **Resist the urge!**
Alternatives & Substitutions
Feeling adventurous? Or just missing an ingredient? Here are some ideas:
- Butter: Margarine if you *must*, but butter just hits different. Coconut oil also works for a dairy-free twist, and adds a subtle tropical note.
- Sugar: Brown sugar adds a nice molasses-y depth and extra moisture. Maple syrup or honey could work in a pinch, but might change the texture a bit and make it stickier.
- Add-ins: Go wild! Chopped nuts (walnuts, pecans!), shredded coconut, different kinds of chocolate chips (white, dark, milk!), or even a swirl of peanut butter before baking. Your kitchen, your rules.
- Gluten-Free: Use a 1:1 gluten-free flour blend. I haven’t tried it myself for this specific recipe, but usually, it works a charm for quick breads.
FAQ (Frequently Asked Questions)
Got questions? I’ve got (casual) answers!
- Can I use regular cocoa powder instead of unsweetened? Well, *technically* yes, but it’s going to be super sweet, and you’ll need to drastically reduce the granulated sugar, or you’ll end up with a sugar bomb. Just grab unsweetened, trust me, it’s worth the trip.
- How do I know if my bananas are ripe enough? If they’re more brown than yellow, and soft to the touch, you’re golden (or rather, brown!). The riper they are, the sweeter and more fragrant your bread will be.
- My banana bread came out dry! What gives? Probably overbaked it, or used too much flour (always use the ‘spoon and level’ method for flour, FYI). Also, make sure your oven temperature is accurate – an oven thermometer is a cheap kitchen MVP!
- Can I bake this in a muffin tin? Absolutely! Reduce baking time to about 20-25 minutes. Mini chocolate banana breads? Yes, please, and they’re perfect for portion control (or so we tell ourselves).
- How long does it last? Wrapped tightly, it’s good for 3-4 days at room temp, or a week in the fridge. Freezes beautifully too! Just wrap slices individually in plastic wrap, then foil, and freeze for up to 3 months.
- Can I halve the recipe? Yep! Just divide all ingredients by two and use a smaller loaf pan (like an 8×4 inch) or bake for a shorter time in your regular pan, but keep an eye on it.
Final Thoughts
See? Told you it was easy! Now you’ve got this glorious, chocolatey, banana-infused masterpiece cooling on your counter. Go on, slice yourself a thick piece, grab a cuppa, and bask in your baking glory. You totally nailed it. And FYI, sharing is optional. Your secret’s safe with me. 😉 Now go impress someone—or yourself—with your new culinary skills. You’ve earned it!
