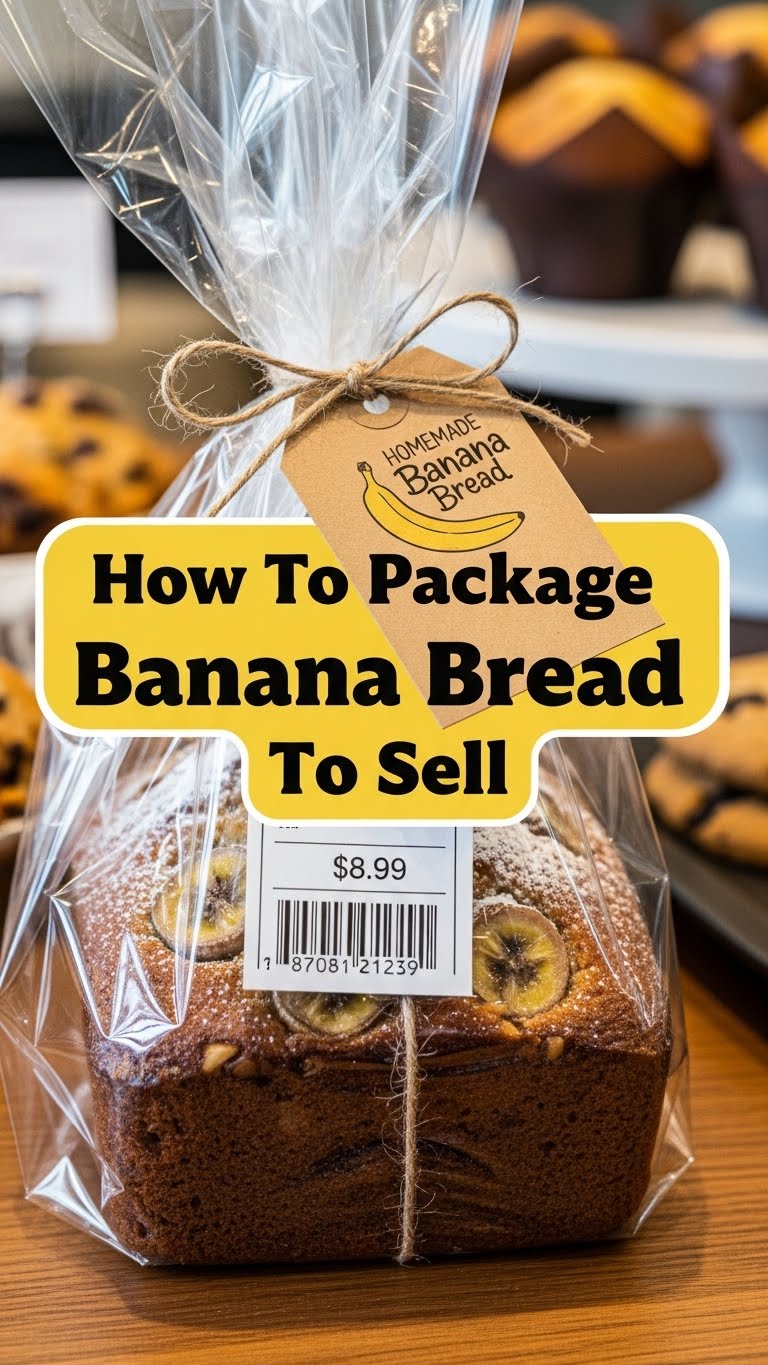
So, Your Banana Bread is a Superstar, Huh? Time to Get it Retail-Ready!
Alright, fellow baking enthusiast! You’ve mastered the art of banana bread – the perfect level of moist, that irresistible aroma, and seriously, who can say no to those chocolate chips? Your friends rave, your family begs for more, and now you’re thinking, “Hey, maybe I should actually *sell* this golden goodness!” Brilliant idea! But here’s the thing: making it is one delicious hurdle, but making it *look* sellable? That’s a whole new game. Don’t sweat it, though! I’m here to spill the beans (or rather, the best packaging tips) so your banana bread can look as amazing as it tastes. Let’s make those customers drool just from looking at it!
Why This Packaging Guide is Awesome (and You’re Welcome)
Look, let’s be real. You didn’t come here for a boring lecture on cardboard tensile strength, did you? Nah. This isn’t just a guide; it’s your secret weapon to making your banana bread irresistible from the moment someone lays eyes on it. We’re talking about taking your perfectly baked loaf from “homemade” to “artisan-chic” without breaking the bank or your sanity. It’s basically an idiot-proof roadmap to ensuring your bread stays fresh, looks gorgeous, and screams “BUY ME!” trust me, even *I* managed to make my stuff look professional, and my usual packaging strategy involves a napkin and a hopeful prayer. So yeah, you got this.
Ingredients You’ll Need (aka Your Packaging Arsenal)
Think of these as the supporting cast for your star banana bread. Get ready to gather some goodies!
- Food-Grade Plastic Wrap: Your bread’s first line of defense against the dreaded dry-out. Don’t skimp here; quality matters for freshness, duh!
- Cellophane Bags or Clear Poly Bags: These are fantastic! They let your beautiful creation shine through and keep it sealed tight. Make sure they’re food-safe, okay? We’re not wrapping fish here.
- Small, Sturdy Bakery Boxes (Optional but Recommended): If you’re going for a more premium look, these are clutch. They protect your bread from squishing and give it that “fancy store” vibe.
- Baker’s Twine or Ribbon: Adds a touch of charm and elegance. Choose colors that match your vibe or brand. Who doesn’t love a cute bow?
- Custom Labels or Stickers: This is where your brand comes alive! Include your business name, ingredients (super important for allergens!), and maybe a “made with love” message. Canva is your friend here, FYI.
- Small “Thank You” Tags or Stickers: A little appreciation goes a long way. Makes customers feel special, doesn’t it?
- Tissue Paper (Optional): If you’re using a box, a sheet of crinkled tissue paper inside adds a lovely cushioned look.
Step-by-Step Instructions (Let’s Get Wrapping!)
Time to transform your humble loaf into a retail masterpiece!
- Cool Down, Buttercup! This is probably the most crucial step. Your banana bread MUST be completely, I repeat, COMPLETELY cool before you even *think* about wrapping it. Hot bread + plastic = condensation = soggy bread. Nobody wants soggy bread. Let it chill on a wire rack for a few hours, or even overnight. Patience, young padawan.
- The Freshness Fortress: Once cool, tightly wrap your entire loaf in at least two layers of food-grade plastic wrap. Make sure there are no air gaps. This locks in moisture and keeps it fresh for longer. Think of it as a cozy, protective blanket.
- Into the Bag You Go: Carefully slide your plastic-wrapped loaf into a clear cellophane or poly bag. Smooth out any wrinkles. This adds another layer of protection and makes it look super clean and professional.
- Seal the Deal: Use a heat sealer if you have one for a super professional look. If not, a twist tie or a tight knot in the bag will do the trick just fine. You want that air outta there!
- The Glam-Up (Labels & Twine): Now for the fun part! Attach your custom label or sticker. Make sure it’s visible and doesn’t obscure the beautiful bread too much. Then, wrap some baker’s twine or ribbon around the loaf. You can tie a neat bow or a simple knot. This adds serious visual appeal.
- Box It Up (Optional Premium Touch): If you’re using bakery boxes, gently place your packaged loaf inside. You can add a sheet of tissue paper first for extra flair. Close the box securely and maybe add another branded sticker or a “Thank You” tag to the outside. Boom! Instant upgrade.
Common Mistakes to Avoid (So You Don’t Look Like a Rookie)
Let’s learn from others’ mistakes, shall we? Avoid these common packaging faux pas:
- Packaging Warm Bread: Seriously, don’t do it. We covered this. It’s like putting a wet puppy in a plastic bag – just a bad idea.
- Skipping Labels: Thinking you can just tell people what’s in it? Nah, fam. Always include ingredients, especially allergens! It’s not just good practice; it’s often legally required. Plus, people like knowing what they’re eating, crazy, right?
- Flimsy Materials: Using cheap, thin plastic wrap or bags that tear easily is a rookie move. Your bread deserves better. Invest in good quality; it speaks volumes about your product.
- Over-Decorating: You’re selling banana bread, not a Christmas tree. While a little pizzazz is good, too much ribbon, glitter, or unnecessary accessories can look tacky and distract from your delicious product. Keep it classy, not chaotic.
- No Branding: You’ve put all that effort into baking, why hide your awesome business? Make sure your name and contact info are somewhere on that package. How else will people find you again for more banana bread goodness?
Alternatives & Substitutions (Because We Like Options!)
Don’t have exactly what I listed? No worries, we can totally improvise!
- Instead of Plastic Wrap: You can use wax paper or parchment paper as your initial wrap. It still provides a decent barrier, though maybe not as air-tight as plastic. Just be sure to really secure it with tape or twine if going this route. It gives a nice rustic feel, too.
- For Bags: If cellophane isn’t available, clear bakery bags are pretty standard. Even a brown paper bag tied with string can work for a very rustic, farmers’ market vibe – just make sure the bread inside is still well-wrapped for freshness.
- Branding on a Budget: Don’t have custom labels? Get yourself an ink stamp with your logo! Or, hand-write charming labels on cardstock and attach them with twine. It’s personal, unique, and totally acceptable when you’re starting out. IMO, handwritten can sometimes feel even more special!
- Eco-Friendly Options: Consider compostable cellophane bags (they exist!) or brown paper bags made from recycled content. Partner with local printers for labels on recycled paper. Small changes can make a big impact.
FAQ (Frequently Asked Questions) – Because You’ve Got Questions, We’ve Got (Snarky) Answers
Got more on your mind? Let’s tackle some common conundrums.
- How long will my banana bread stay fresh once packaged?
Well, if you followed my super-secret (not really) plastic-wrap-then-bag method, it should stay deliciously fresh for about 3-5 days at room temperature. Want it to last longer? Tell your customers to freeze it! It thaws beautifully. - Should I slice the banana bread before packaging?
Unless specifically requested, nope! Slicing exposes more surface area to air, which means it dries out faster. Keep it whole, let the customer do the honors. Plus, it looks more substantial that way, doesn’t it? - What if I’m selling at a farmers’ market? Do I need boxes?
Not necessarily! For a market, the clear bag with a lovely label and twine often works wonders. People like to *see* what they’re buying. Boxes are great for gifting or if you want a more upscale presentation, but don’t feel pressured if it doesn’t fit your vibe or budget. - What about food safety regulations for ingredients/allergens?
Okay, this isn’t the fun part, but it’s super important. You MUST list all ingredients, especially common allergens (like nuts, dairy, wheat, soy, eggs). Check your local food safety guidelines, too. Better safe than sorry, and it builds trust with your customers. - Can I use pretty, patterned tissue paper inside the bag with the bread?
Hold your horses! Generally, no. Anything that directly touches food should be food-safe. Most decorative tissue paper isn’t. Stick to putting tissue paper *outside* the primary food-safe packaging (like in a box, around the bag). Safety first, darling!
Final Thoughts (Now Go Get ‘Em!)
Alright, superstar baker! You’ve got the goods, and now you’ve got the know-how to make ’em look absolutely irresistible. Packaging is more than just wrapping; it’s an extension of your brand, a promise of deliciousness, and honestly, half the fun of selling your amazing creations. So go forth, wield your plastic wrap and twine with confidence, and make those banana bread dreams a reality. Now go impress someone—or yourself—with your new packaging prowess. You’ve earned it!

