Ever had that moment when you’re scrolling through glorious dessert pics, mouth watering, but the thought of baking something complex makes you wanna just order pizza instead? Been there, done that, bought the oversized stretchy pants. But what if I told you there’s a dessert that screams ‘fancy patisserie’ but whispers ‘super chill, you got this’? Get ready, because we’re about to make a Strawberry Shortcake Cake that’s so good, it’ll make your tastebuds do a happy dance!
Why This Recipe is Awesome
Seriously, this isn’t your grandma’s ‘spend all day in the kitchen’ kind of recipe. It’s more like your cool aunt’s ‘whip this up while watching Netflix’ kind of recipe. **It’s basically idiot-proof**, even if your baking track record involves more ‘happy accidents’ than intentional masterpieces. We’re taking the best parts of strawberry shortcake – the fluffy cake, the fresh berries, the dreamy cream – and making it into a show-stopping cake that’ll make everyone think you’re a culinary genius. No fuss, maximum deliciousness. What’s not to love?
Ingredients You’ll Need
For the Cake Layers (aka your future fluffy clouds):
- All-purpose flour: The backbone of all good things. Don’t substitute with almond flour unless you want a different cake, obviously.
- Granulated sugar: Sweetness. Pure, unadulterated sweetness.
- Baking powder: For lift! We want tall, proud cakes, not flat pancakes.
- Salt: Just a pinch to make everything else taste better. Trust me on this one.
- Unsalted butter: Softened, because cold butter is the enemy of smooth batter.
- Whole milk: For moisture and tenderness. Don’t skimp and use skim unless you want sad, dry cake.
- Vanilla extract: A hug in liquid form for your tastebuds.
- Large eggs: Room temperature, please! They emulsify better.
For the Strawberry Filling (the juicy heart of it all):
- Fresh strawberries: The star of the show! Hull and slice them up.
- Granulated sugar: To macerate the berries and bring out their syrupy goodness.
- Lemon juice (optional but recommended): A little zing to brighten everything up.
For the Whipped Cream Frosting (your dreamy, cloud-like topping):
- Heavy cream (cold!): Absolute essential for whipping.
- Powdered sugar (aka confectioners’ sugar): For sweetness and stability.
- Vanilla extract: More vanilla, because you can never have enough.
Step-by-Step Instructions
- Prep Time is Fun Time (or just necessary time): Preheat your oven to 350°F (175°C). Grease and flour two 8-inch round cake pans. If you have parchment paper, line the bottoms too – it’s like a little insurance policy against sticking.
- Berry Bliss: In a medium bowl, gently mix your sliced strawberries with the sugar and lemon juice (if using). Let them hang out and get juicy while you make the cake. This is called macerating, fancy huh?
- Dry Mix Party: In a large bowl, whisk together your flour, sugar, baking powder, and salt. Make sure there are no lumpy surprises waiting for you.
- Wet Mix Wonders: In another bowl, whisk together the milk, vanilla extract, and eggs until they’re well combined.
- Butter Up!: Add the softened butter to your dry ingredients. Using an electric mixer, beat on low speed until the mixture resembles coarse crumbs. We’re creating little pockets of buttery goodness.
- Combine & Conquer: Slowly add the wet ingredients to the dry ingredients, mixing on low speed until *just* combined. **Don’t overmix**, or your cake will be tough like your aunt’s fruitcake. Scrape down the sides of the bowl.
- Bake It ‘Til You Make It: Divide the batter evenly between your prepared cake pans. Bake for 25-30 minutes, or until a wooden skewer inserted into the center comes out clean.
- Chill Out: Let the cakes cool in the pans for about 10 minutes before inverting them onto a wire rack to cool completely. **Patience is key here**, trying to frost a warm cake is a recipe for disaster (and melty frosting).
- Whip It Real Good: Once the cakes are cool, make your whipped cream. In a large, *very cold* bowl (pop it in the freezer for 10 mins first!), beat the heavy cream, powdered sugar, and vanilla extract with an electric mixer on high speed until stiff peaks form. Don’t overbeat, or you’ll have butter instead of cream.
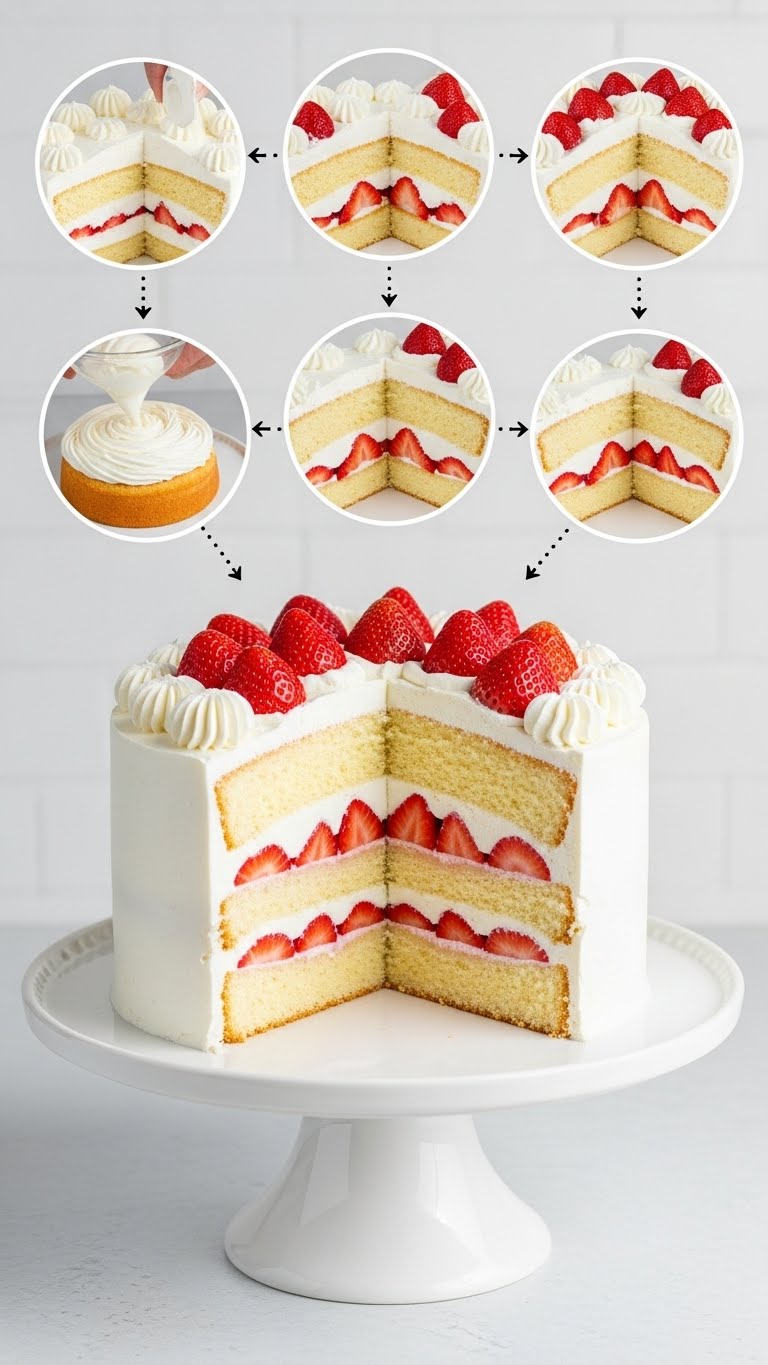
- Assemble Your Masterpiece: Place one cooled cake layer on your serving plate. Spoon about half of your macerated strawberries over it, leaving a small border. Spread about a third of the whipped cream over the strawberries. Top with the second cake layer.
- The Grand Finale: Spread the remaining whipped cream generously over the top and sides of the cake. Arrange the rest of the strawberries on top as beautifully as you dare.
- Devour: Slice, serve, and bask in the glory of your delicious creation!
Common Mistakes to Avoid
- **Not preheating the oven:** Rookie mistake! Your cakes won’t rise properly if they go into a cold oven.
- **Overmixing the batter:** You want tender cake, not a hockey puck. Mix until *just* combined, then stop. Seriously.
- **Not letting cakes cool completely:** Frosting a warm cake is a one-way ticket to a soupy, sliding mess. Don’t do it.
- **Overbeating your whipped cream:** From fluffy clouds to sad, grainy butter in seconds. Keep an eye on it!
- **Using non-cold heavy cream:** Cold cream whips better and holds its shape longer. It’s a science thing.
Alternatives & Substitutions
- **Dairy-free?** You can definitely find dairy-free butter alternatives and plant-based milks that work pretty well in the cake. For the whipped cream, try a good quality coconut cream (chill a can of full-fat coconut milk overnight, then scoop out the thick cream on top). It’s a different vibe, but still yummy!
- **Other berries?** While it’s called “strawberry” shortcake, who’s to stop you from using raspberries, blueberries, or a mix of all three? Live your best berry life!
- **Want extra zing?** A little orange zest in the cake batter can add a lovely brightness. Or a splash of almond extract for a slightly different flavor profile.
- **Store-bought cake mix?** Look, no judgment here. If you’re really short on time or confidence, a good quality vanilla or white cake mix can be your shortcut. Just follow the box directions for the cake, then proceed with the strawberry and whipped cream steps! **IMO**, homemade is always better, but sometimes you gotta do what you gotta do.
FAQ (Frequently Asked Questions)
- **Can I make this ahead of time?** You can bake the cake layers a day in advance and store them tightly wrapped at room temperature. The berries can be macerated a few hours ahead. **But the whipped cream?** Make that *right before* assembling and serving for the best texture.
- **My whipped cream isn’t getting stiff, what gives?** Is your cream super cold? Is your bowl cold? Are you using heavy cream (at least 36% fat)? If all yes, keep beating! Sometimes it just takes a minute. If it’s still not working, maybe your cream was too old, or not heavy enough.
- **Can I use frozen strawberries?** You can, but fresh is definitely superior for texture and flavor here. If using frozen, make sure they are completely thawed and drain any excess liquid before macerating, otherwise your cake will get soggy.
- **Do I need special cake flour?** Nope! All-purpose flour works perfectly for this cake. No need to buy an extra bag unless you want to.
- **What if I only have one cake pan?** You can bake one layer at a time, just make sure to keep the remaining batter covered while the first layer bakes. Or you can bake it in a 9×13 inch pan and then cut it into two layers, or just serve it as a single-layer sheet cake. It’ll still taste amazing!
- **Can I use margarine instead of butter?** Well, technically yes, but why hurt your soul like that? Butter just tastes better and gives a richer flavor and texture. **FYI**, butter is usually preferred in baking for a reason.
Final Thoughts
So there you have it, folks! Your very own, incredibly delicious, and surprisingly easy Strawberry Shortcake Cake. You’ve just unlocked a new level of dessert-making prowess without breaking a sweat (or your sanity). Seriously, this cake is a total crowd-pleaser and proof that fancy doesn’t have to mean complicated. Now go impress someone – or yourself – with your new culinary skills. You’ve earned it! And maybe, just maybe, save a slice for me.


