So you’re craving something that screams ‘fancy dessert’ but whispers ‘minimal effort’ right into your soul? Welcome, my friend. We’re about to make Tiramisu so good, you’ll wonder if you secretly opened a high-end Italian patisserie in your kitchen. And guess what? It’s ridiculously easy. Seriously. Let’s get this party started!
Why This Recipe is Awesome
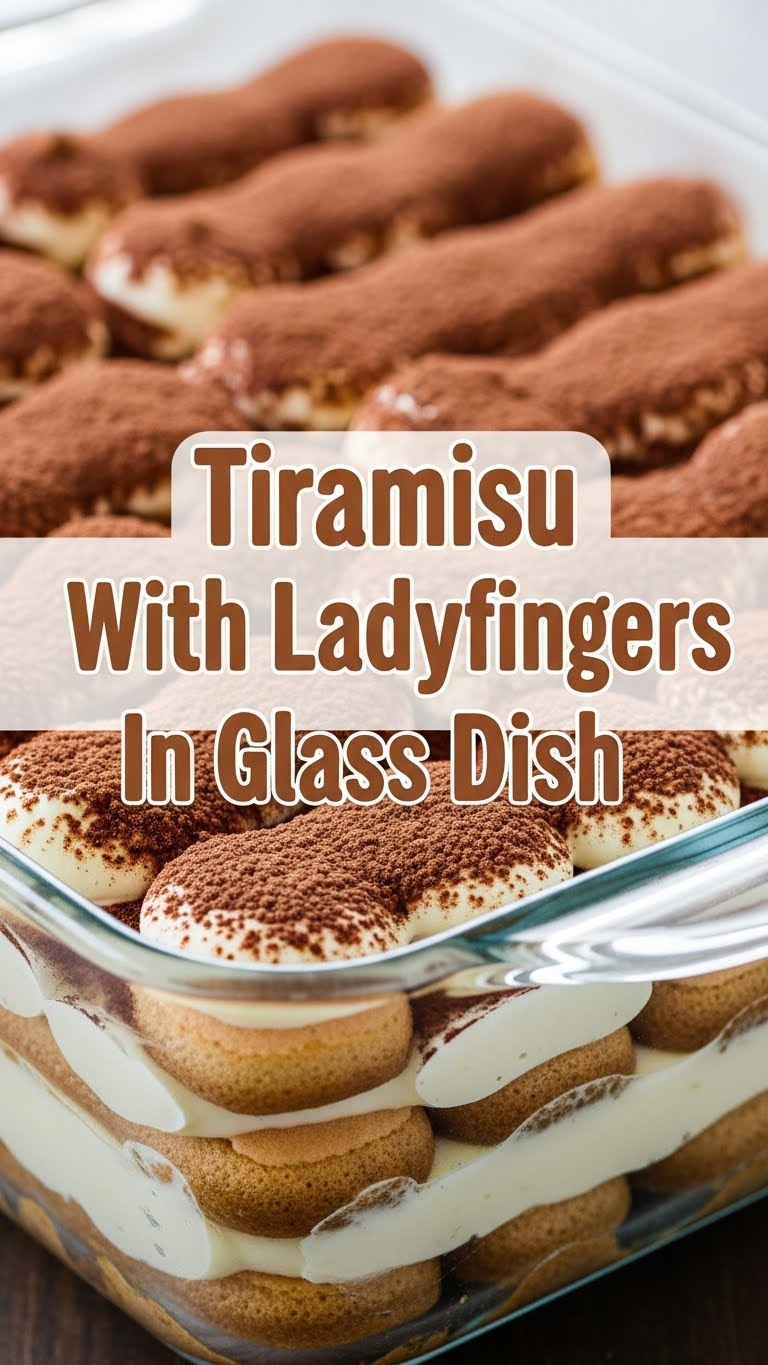
Okay, let’s be real. This isn’t just a recipe; it’s a superpower. Why? Because you get to create something that looks like it took you hours of painstaking work, but actually required minimal fuss. It’s no-bake, which means your oven gets a much-needed vacay, and your kitchen stays cool. Plus, serving it in a clear glass dish? Instant elegance, darling. It’s basically coffee-soaked cookies, creamy dreams, and a sprinkle of pure happiness.
This recipe is practically idiot-proof. Even I didn’t mess it up, and my track record with delicate desserts is…spotty. You’ll impress everyone, including yourself, without breaking a sweat. Consider it your new go-to for looking effortlessly chic in the kitchen.
Ingredients You’ll Need
Gather ’round, my sweet-toothed companions! Here’s what you’ll need to transform your kitchen into a little slice of Italy:
- Strong Brewed Coffee or Espresso: About 1.5 cups, chilled. And by chilled, I mean *cold*. Nobody wants a warm, soggy ladyfinger. Trust me.
- Granulated Sugar: Half a cup. Just enough to sweeten the deal, without sending you into a sugar coma.
- Mascarpone Cheese: 16 ounces (two 8-ounce containers). This is the absolute STAR. Don’t even *think* about cream cheese unless you’re actively trying to create a very sad, confused tiramisu.
- Heavy Cream: 1.5 cups. For that cloud-like, ethereal fluffiness.
- Vanilla Extract: 1 teaspoon. A splash of warmth and sunshine.
- Ladyfingers (Savoiardi): About 24-30, depending on your dish size. These are our crispy, dippable heroes. Get the good, firm ones!
- Unsweetened Cocoa Powder: For dusting. Because presentation matters, even if you’re eating this alone in your pajamas (no judgment here, been there!).
- Optional: Kahlua, Rum, or Marsala Wine: 1/4 cup. If you’re feeling a little boozy and grown-up. Adds that extra oomph!
Step-by-Step Instructions
- Brew and Chill: First things first, make your coffee or espresso. If you’re adding any booze, stir it in now. Then, let that liquid gold cool down completely. Like, to fridge-cold levels. This step is non-negotiable!
- Whip the Cream: Grab a cold bowl (seriously, a cold bowl helps!) and beat the heavy cream with about 2 tablespoons of your granulated sugar until it forms lovely, stiff peaks. Set this aside in the fridge. You want it fluffy and stable.
- Mascarpone Magic: In another bowl, combine the mascarpone cheese, the remaining sugar, and the vanilla extract. Beat it until it’s smooth, light, and creamy. Now, gently, *gently* fold in your whipped cream. Don’t overmix, or your beautiful mascarpone might decide to weep on you. We’re aiming for fluffy, not watery.
- Dip, Don’t Drown: This is where the ladyfingers enter the scene. Quickly dip each ladyfinger into the chilled coffee mixture. I’m talking a quick one-second dip per side, maybe two. They are not sponges; we want them moist, not mushy.
- Layer One: Arrange a single layer of these perfectly-dipped ladyfingers at the bottom of your glass dish. If they don’t fit perfectly, break ’em up! This is a judgment-free zone.
- Creamy Cloud: Spread about half of your divine mascarpone mixture evenly over the ladyfingers. Use an offset spatula or the back of a spoon.
- Repeat! Add another layer of dipped ladyfingers, then top with the remaining mascarpone cream. Smooth it out for that professional look.
- Chill Out: Cover your masterpiece with plastic wrap and refrigerate for at least 4-6 hours. Honestly, overnight is even better for maximum flavor fusion and for it to set properly! Patience is a virtue, especially when tiramisu is involved.
- Dust and Serve: Just before you’re ready to serve (and bask in the glory), generously dust the top with unsweetened cocoa powder. Slice, serve, and prepare for a chorus of compliments!
Common Mistakes to Avoid
Nobody’s perfect, but we can avoid some common tiramisu blunders, right? Pay attention, people!
- Drowning the Ladyfingers: We talked about this! They are not bath toys. A quick dip means a quick dip. Otherwise, you’ll end up with a sad, soggy mess that looks more like a coffee soup.
- Using Warm Coffee: Warm coffee will make your ladyfingers disintegrate on contact and warm up your beautifully chilled cream. Rookie mistake. Always, always use chilled coffee.
- Overmixing the Mascarpone/Cream: You want a light, airy texture. Overmixing can cause the mascarpone to split or the cream to become grainy. Gentle folds are your friend, not aggressive beating.
- Not Chilling Enough: Look, I know it’s hard to wait. But tiramisu needs time to firm up and for all those glorious flavors to get acquainted. If you skip this, it’ll be a runny disaster. Don’t do it!
- Substituting Mascarpone (with cream cheese): I’m telling you, this isn’t the same. Mascarpone has a unique richness and subtle flavor. Cream cheese is, well, cream cheese. Your tiramisu will totally judge you.
Alternatives & Substitutions
Feeling a little rebellious? Here are some simple swaps and creative twists:
- Coffee Alternative: Decaf works just fine if you’re sensitive to caffeine. For a kid-friendly (and booze-free!) version, you could even use strong hot chocolate or chocolate milk for dipping. Just make sure it’s cold!
- Ladyfinger Swap: If you’re in a real pinch and can’t find ladyfingers, a simple sponge cake or even graham crackers (for a slightly different vibe) can work. But, FYI, it won’t be “authentic” tiramisu; more like a delicious, close cousin.
- Booze Options: No Kahlua? No problem! Amaretto, dark rum, or even a good quality brandy are fantastic. For an alcohol-free version, simply omit it. The tiramisu will still be divine.
- Toppings Beyond Cocoa: While cocoa is classic, feel free to get creative! Try grated dark chocolate, a few fresh raspberries, or even a dusting of cinnamon for a different twist.
FAQ (Frequently Asked Questions)
- “Can I make this ahead of time?”
Absolutely! Tiramisu is one of those magical desserts that actually tastes *better* the next day, once all those flavors have had a chance to really get to know each other. Weekend project, anyone?
- “How long does tiramisu last in the fridge?”
Wrapped well, it’ll last about 3-4 days in the fridge. But let’s be real, unless you’re hiding it, it won’t last that long. It’s too delicious!
- “What if I don’t have mascarpone?”
*Sighs dramatically* Okay, technically, you *could* try a mixture of cream cheese and heavy cream (about 1:1 ratio), but it won’t have the same rich, subtle flavor. It’ll be more cheesecake-y. Proceed with caution and manage expectations. I recommend finding mascarpone.
- “My tiramisu is runny, what did I do wrong?”
Hmm, did you over-soak the ladyfingers? Or maybe over-mix the cream? And most importantly, did you chill it long enough? That’s key, IMO. It needs solid chill time to firm up.
- “Can I freeze tiramisu?”
You *can*, but the texture might change a bit when thawed. The cream can get a little watery, so it’s generally best enjoyed fresh or just after a good chill. But if you have leftovers you absolutely can’t eat, it’s an option!
Final Thoughts
See? Told you it was easy! You’ve just whipped up a dessert that usually costs a small fortune at fancy restaurants, and you did it right in your own kitchen. Now go impress someone—or yourself—with your new culinary skills. You’ve totally earned that second (or third) slice. Seriously, you’re basically a professional now. Enjoy, chef!


