Ever have those days where you just *need* chocolate, but also, like, *effort*? Yeah, me too. And let’s be real, a store-bought candy bar just isn’t cutting it when your soul craves something a little… fancy. But without the fancy price tag or the fancy chef skills. Enter: homemade hazelnut truffles! Get ready to impress everyone (including yourself) with minimal fuss and maximum deliciousness.
Why This Recipe is Awesome
Seriously, this recipe is a game-changer. Why? Let me count the ways:
- **It’s practically foolproof.** If I, a person who once set off the smoke alarm making toast, can do it, so can you. Consider it an idiot-proof zone, even I didn’t mess it up!
- **Minimal ingredients, maximum impact.** You probably have half this stuff lurking in your pantry already. No obscure ingredients here, promise.
- **It tastes like a million bucks**, but costs, like, ten. Your friends will think you secretly went to pastry school. Just nod vaguely and accept the compliments.
- **Did I mention chocolate? And hazelnuts?** It’s a match made in dessert heaven, no heavy lifting required.
Ingredients You’ll Need
Gather your troops! These are the heroes of our truffle story:
- **Heavy Cream (½ cup):** The velvety base. Don’t skimp, this isn’t the time for ‘light’ anything. Your truffles deserve a creamy hug.
- **Good Quality Chocolate (8 oz – about 225g):** Semi-sweet or dark (60-70% cocoa is primo). **Don’t you dare grab those waxy chocolate chips**, unless you want waxy truffles. You deserve better!
- **Unsalted Butter (2 tbsp):** Gives it that extra melt-in-your-mouth richness. Because everything’s better with butter, IMO.
- **Vanilla Extract (1 tsp):** A little splash of magic. Or just… vanilla. But let’s go with magic.
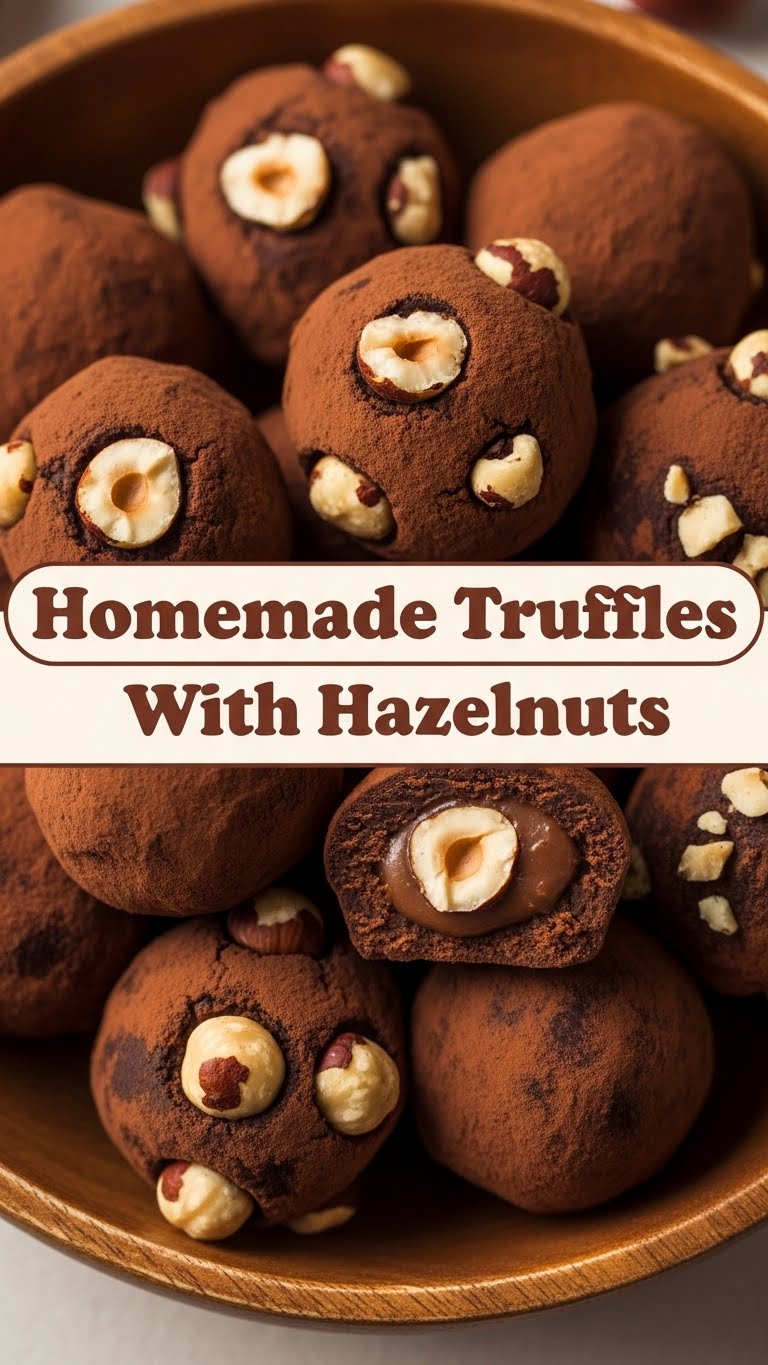
- **Roasted Hazelnuts (½ cup):** Chopped finely. These are the stars, folks! Toast them yourself for extra oomph, or buy them pre-roasted if you’re feeling a bit lazy (no judgment here!).
- **Optional Coatings:**
- **Cocoa Powder:** Classic, elegant.
- **More Chopped Hazelnuts:** For that double hazelnut hit!
- **Powdered Sugar:** Sweet snow, basically.
- **Melted Chocolate (for drizzling):** If you’re feeling extra fancy.
Step-by-Step Instructions
Okay, put on your metaphorical chef’s hat (or don’t, we’re informal here). Let’s get truffling!
- **Prep Your Nuts:** If your hazelnuts aren’t roasted (and let’s be real, most aren’t), spread them on a baking sheet and toast at 350°F (175°C) for 8-10 minutes until fragrant. Let them cool, then rub them in a clean towel to remove most of the skins. Chop them finely. **Don’t skip the toasting, it brings out their flavor like nobody’s business!**
- **Chop Your Choc:** Get your good quality chocolate and chop it into small, uniform pieces. This helps it melt evenly. Put it in a heatproof bowl.
- **Heat the Cream:** Pour the heavy cream into a small saucepan. Heat it over medium heat until it just begins to simmer and tiny bubbles form around the edges. Don’t let it boil vigorously! We’re not making soup here.
- **Melt Magic:** Pour the hot cream over the chopped chocolate in the bowl. Let it sit undisturbed for about 5 minutes. This gives the chocolate a chance to warm up and start melting its glorious self.
- **Stir It Up:** After 5 minutes, grab a whisk and gently stir the mixture from the center outwards until it’s completely smooth and glossy. Add the butter and vanilla extract, then stir until the butter is fully incorporated. This, my friend, is your ganache base!
- **Add the Hazelnuts:** Fold in about half of your finely chopped roasted hazelnuts into the ganache. Save the rest for rolling – trust me, you’ll want that extra crunch on the outside.
- **Chill Out:** Cover the bowl with plastic wrap and pop it in the fridge for at least 2-3 hours, or until it’s firm enough to scoop. **Resist the urge to peek every five minutes.** Good things (and firm truffles) come to those who wait.
- **Roll ‘Em Up:** Once firm, use a small spoon or a mini ice cream scoop to portion out small balls (about 1-inch diameter). Roll them quickly between your palms to form perfect spheres. Your hands might get a little messy – that’s part of the fun! Think of it as a chocolate facial.
- **Coat ‘Em:** Roll each truffle in your chosen coating – the remaining chopped hazelnuts, cocoa powder, or powdered sugar. Get creative! Mix and match if you’re feeling wild.
- **Chill (Again!):** Place the finished truffles on a parchment-lined plate or tray and chill them again for about 30 minutes to firm them up completely. Then, devour!
Common Mistakes to Avoid
We’ve all been there. Here are some pitfalls to dodge:
- **Using sub-par chocolate:** This isn’t the time for candy melts, friends. Your truffles will taste like disappointment. A good chocolate makes all the difference.
- **Overheating the cream:** If your cream boils aggressively, it can scorch and affect the final texture. Gentle simmer is key! You’re aiming for warm, not volcanic.
- **Impatience:** Trying to roll the ganache before it’s properly chilled is a recipe for a sticky, melty mess. **Seriously, chill out.** The fridge is your friend.
- **Not chopping your chocolate small enough:** Big chunks won’t melt evenly, leaving you with lumpy ganache. Nobody wants lumpy ganache. It’s a rookie mistake!
- **Skipping the hazelnut toasting:** You’re missing out on a huge flavor boost! Toasting intensifies that nutty goodness and gives them an amazing aroma.
Alternatives & Substitutions
Feeling creative? No hazelnuts? No problem! Here are some fun ways to mix things up:
- **Nutty Swaps:** Not a hazelnut fan? (Gasp! But okay, I guess.) You can totally use **almonds, pecans, or walnuts** instead. Just toast and chop ’em the same way.
- **Chocolate Choices:** Feeling adventurous? Try **milk chocolate** for a sweeter truffle, or go full-on **dark chocolate (75%+)** for a more intense, less sweet treat. White chocolate works too, but might need a slightly different cream ratio as it’s less stable, FYI.
- **Flavor Boosts:** Add a tiny splash of **liqueur** like Frangelico (hazelnut liqueur, *duh*), Kahlua, or even a hint of rum/brandy to the ganache with the vanilla. Orange zest or a pinch of cinnamon could also be fun!
- **Coatings Galore:** Beyond the classics, try **shredded coconut, sprinkles (for a fun vibe!), finely crushed cookies, or even a dusting of espresso powder** for a mocha twist. The world is your oyster… or truffle.
FAQ (Frequently Asked Questions)
Got questions? I’ve got (casual) answers!
- **Q: Can I use milk instead of heavy cream?**
- A: Well, technically you *could*, but your truffles won’t be nearly as rich, smooth, or stable. The high fat content of heavy cream is crucial for that luxurious ganache texture. **Don’t do it unless you want sad truffles!** Why hurt your soul like that?
- **Q: How long do these truffles last?**
- A: Stored in an airtight container in the fridge, they’ll happily hang around for about 1-2 weeks. But honestly, they’ll probably be gone much faster. 😉
- **Q: My ganache is too runny, what did I do wrong?**
- A: It usually means your chocolate wasn’t fully melted, or the ratio of cream to chocolate might be a tad off. **Don’t panic!** Pop it back in the fridge for longer, or if it’s really soupy, you can gently reheat it over a double boiler and whisk vigorously to emulsify.
- **Q: My ganache is too hard to roll!**
- A: It’s been in the fridge for too long, or your ratios are a bit chocolate-heavy. Let it sit out at room temperature for 10-20 minutes to soften slightly. If it’s still too stiff, you can warm it briefly over a double boiler until it’s just pliable enough.
- **Q: Do I *have* to roast the hazelnuts?**
- A: You don’t *have* to, but **you really, really should!** Roasting brings out their natural oils and deepens their flavor significantly. It’s the difference between ‘good’ and ‘OMG these are amazing!’
- **Q: Can I freeze these truffles?**
- A: Absolutely! Freeze them on a parchment-lined tray until solid, then transfer to an airtight freezer-safe container for up to 2-3 months. Thaw them in the fridge overnight before serving.
- **Q: Is there a trick to getting perfectly round truffles?**
- A: Practice makes perfect, but a small scoop helps with uniform size. Then, roll quickly between slightly cooled palms. If your hands get too warm, run them under cold water for a sec!
Final Thoughts
So there you have it, folks! Your very own, impressive-but-easy homemade hazelnut truffles. You just made something that looks and tastes super gourmet with minimal fuss. Now go ahead, brag a little. Share them (maybe, if you’re feeling generous), or hoard them all for yourself (no judgment, I told you). You’ve earned this deliciousness! Now go impress someone—or yourself—with your new culinary skills. You’ve earned it!


