So you’re scrolling through TikTok, seeing all those fancy desserts, and thinking, “Ugh, too much effort,” right? Me too, friend. But what if I told you we could whip up something ridiculously delicious, looks super impressive, *and* doesn’t require an advanced degree in pastry arts? Enter the Raspberry Tiramisu, your new best friend. This isn’t your nonna’s espresso-soaked classic; we’re bringing a vibrant, fruity twist to the party, and trust me, it’s a game-changer.
Why This Recipe is Awesome
Because it’s basically a hug in dessert form, but *way* prettier. It’s **no-bake**, meaning your oven gets a well-deserved nap. It’s got that fancy Italian name, Tiramisu, which makes you sound sophisticated, but honestly, it’s idiot-proof. Even I didn’t mess it up, and my kitchen has seen some things. Plus, raspberries? Hello, burst of freshness! It’s the perfect blend of creamy, sweet, and tart, and it’ll make everyone think you spent hours slaving away. Spoiler: you didn’t.
Ingredients You’ll Need
Gather ’round, dessert whisperer, these are your tools for greatness:
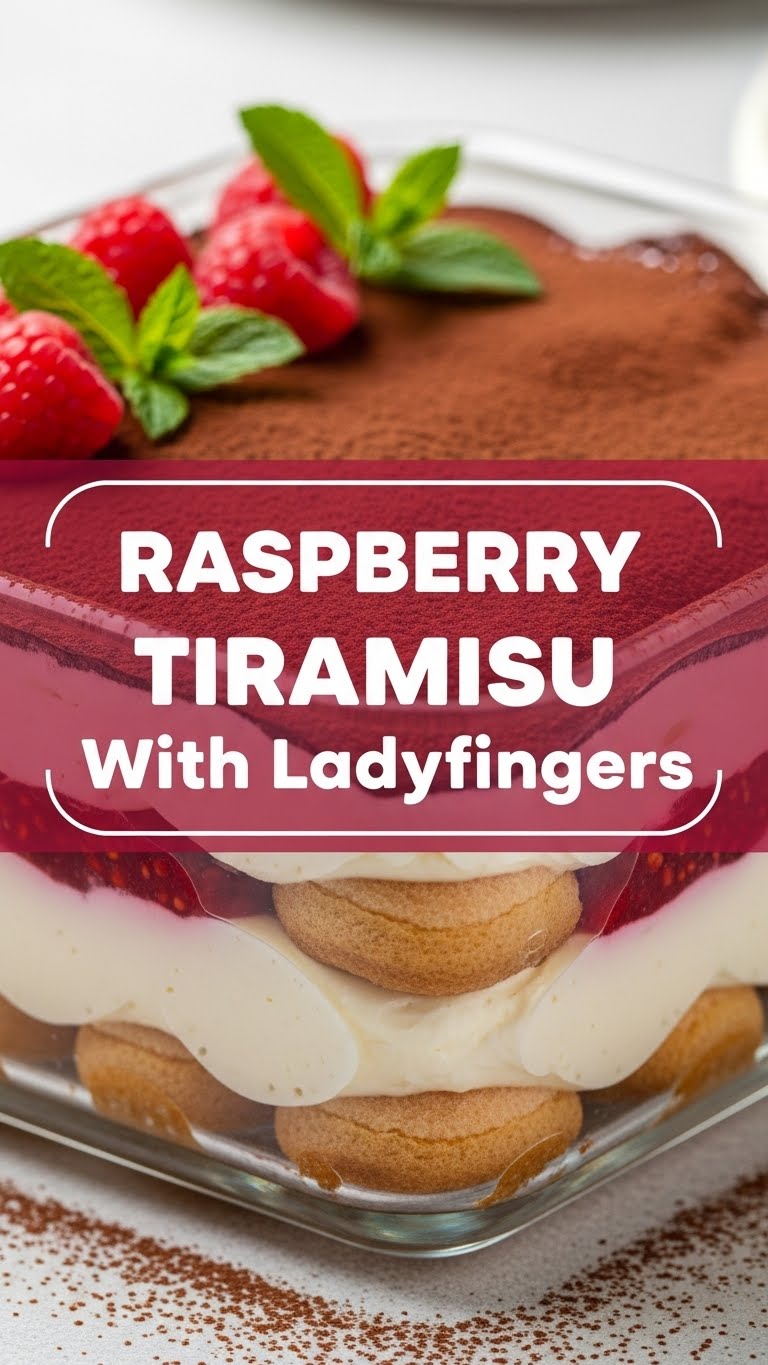
- Ladyfingers (Savoiardi): About 24-30, depending on your dish size. These are the crispy, airy biscuits that soak up all the goodness. Don’t even *think* about substituting with shortbread, unless you like sadness.
- Fresh Raspberries: Two 6-ounce punnets (about 2 cups total). We’re going for fresh, vibrant flavor here, not that frozen block you forgot about last winter.
- Mascarpone Cheese: Two 8-ounce containers (16 oz total). The star of the creamy show. Make sure it’s good quality, because this is where the magic happens. Don’t skimp, my friend.
- Heavy Cream (or Whipping Cream): 1 ½ cups. For that cloud-like texture. No light stuff, we’re not counting calories here, we’re making dessert dreams come true.
- Granulated Sugar: ½ cup, divided. Just enough to sweeten the deal without making it cloyingly sweet.
- Vanilla Extract: 1 teaspoon. A splash for warmth and good vibes.
- Lemon Juice: 1 tablespoon, freshly squeezed please! A little zing to cut through the richness and make those raspberries sing.
- Raspberry Liqueur (optional, but highly recommended): 2-3 tablespoons (like Chambord). Adds a sophisticated boozy kick. If you’re skipping the booze, a little extra lemon juice or even a touch of raspberry syrup will do.
- Water: ½ cup. For the raspberry dip.
- Powdered Sugar (for dusting, optional): To make it look extra professional and impress your guests.
Step-by-Step Instructions
Alright, apron on (or not, we’re casual here), let’s get building!
- Prep Your Berries: In a small saucepan, combine one punnet of your fresh raspberries, ½ cup of water, and 2 tablespoons of granulated sugar. Heat gently over medium-low heat, mashing the raspberries slightly with a fork, until they break down and form a syrup (about 5-7 minutes).
- Strain the Goodness: Pour the raspberry mixture through a fine-mesh sieve into a shallow dish. Press the solids with the back of a spoon to extract all the juicy goodness. Let it cool completely. This is your luscious ladyfinger dip! If using raspberry liqueur, stir it into the cooled syrup now.
- Whip the Cream: In a large, chilled bowl, combine your heavy cream, ¼ cup of granulated sugar, and vanilla extract. Beat with an electric mixer on medium-high speed until **stiff peaks form**. Don’t overmix, unless you want butter (which, while delicious, isn’t what we’re going for).
- Create Mascarpone Dream: In another medium bowl, gently whisk your mascarpone cheese with the remaining 2 tablespoons of granulated sugar and the fresh lemon juice until just smooth and creamy. **Don’t overmix mascarpone**, it can curdle and get grainy! Treat it like delicate velvet.
- Fold It In: Gently fold the whipped cream into the mascarpone mixture until just combined. Be tender, you’re building a cloud, not kneading dough!
- Assemble Layer One: Quickly dip each ladyfinger into your cooled raspberry syrup – we’re talking a quick dunk, a second or two per side. **Don’t let them get soggy!** Arrange a single layer of these happy, moist ladyfingers at the bottom of an 8×8 inch (or similar) dish.
- Spread the Love: Dollop half of your mascarpone cream mixture over the ladyfingers and spread evenly with an offset spatula or the back of a spoon.
- Raspberry Shower: Scatter a generous handful of your remaining fresh raspberries (from the second punnet) over the cream layer.
- Repeat and Chill: Add another layer of quickly-dipped ladyfingers, the remaining mascarpone cream, and another scattering of fresh raspberries.
- The Hardest Part: Cover your masterpiece with plastic wrap and chill in the fridge for **at least 4-6 hours**, or ideally overnight. This lets all those flavors get cozy and mingle, and helps the tiramisu set beautifully.
- Serve and Shine: Before serving, dust lightly with powdered sugar, if you’re feeling fancy, and garnish with a few more fresh raspberries. Enjoy your moment of glory!
Common Mistakes to Avoid
Even though it’s idiot-proof, there are a few potholes to dodge on your path to tiramisu bliss:
- Over-Dunking Ladyfingers: This is the #1 rookie mistake. Your tiramisu will turn into a mushy, sad puddle. **Seriously, a quick dip is all it takes!** They’ll absorb more moisture as they chill.
- Over-Mixing Mascarpone: Mascarpone is delicate. Whisking it too vigorously or for too long will make it curdle and look grainy. Treat it gently, like a newborn kitten. A light touch is key.
- Not Chilling Enough: Patience, young padawan! Chilling is crucial for the tiramisu to set properly and for the flavors to meld. Don’t rush perfection – a good chill time really makes it shine.
- Using Warm Syrup: Dipping ladyfingers in warm syrup will make them disintegrate. Always let your raspberry syrup cool completely. Nobody wants crumbly mess.
- Skimping on Quality Ingredients: This recipe is simple, so the quality of your mascarpone and fresh raspberries really shines through. Don’t buy the cheap stuff, your taste buds will thank you. IMO, it makes a huge difference.
Alternatives & Substitutions
Life happens, ingredients run out, or you just wanna get funky. Here are some thoughts:
- No Mascarpone? Ricotta cheese (drained super well) can work in a pinch, but the texture won’t be as rich or smooth. Cream cheese mixed with a little heavy cream could also be an option, but it will have a tangier flavor. Honestly, though, **mascarpone is king here** for that signature luxurious creaminess.
- Booze-Free? Absolutely! Skip the raspberry liqueur and just use extra lemon juice in your raspberry syrup, or a touch of raspberry flavoring. A bit more simple syrup could also work.
- Different Berries? Absolutely! Blueberries, blackberries, or even sliced strawberries would be fantastic. Fresh is always best for that pop of color and flavor.
- Short on Ladyfingers? While not ideal, you could *try* a plain sponge cake cut into strips, but it might get soggy faster and lack that classic tiramisu chew. Stick to ladyfingers if you can!
- Sugar Substitute? For those watching sugar intake, use your preferred granular sugar substitute in equal measure. Taste and adjust for sweetness!
FAQ (Frequently Asked Questions)
- “Can I make this ahead of time?” Oh, honey, you *should*! This tiramisu actually tastes better the next day, once all the flavors have had a chance to get seriously acquainted. Up to 2-3 days in advance is perfect.
- “How long does it last?” Covered and chilled, it’s usually good for 3-4 days. But let’s be real, it’ll probably be gone much faster than that, right? Mine never makes it past day two.
- “My mascarpone mixture looks lumpy, help!” Sounds like you might have overmixed it a tad, or your mascarpone was a bit too cold. Try gently folding in a tiny bit more heavy cream to smooth it out, but sometimes it’s just a texture thing you’ll have to live with. It’ll still taste divine, I promise!
- “Can I freeze raspberry tiramisu?” You *can*, but I wouldn’t recommend it. The texture of the ladyfingers can change, and the cream might separate when thawed. It’s best enjoyed fresh from the fridge.
- “What if I don’t have a specific size dish?” No worries! Any dish that holds about 8-10 cups will do. A deeper dish will mean fewer layers but thicker ones, a wider dish will mean more layers but thinner ones. It’s all good! The world won’t end.
Final Thoughts
See? Told you it wasn’t rocket science! You’ve just created a show-stopping dessert that’s ridiculously easy and even more ridiculously delicious. Now go impress someone – your family, your date, your dog, or even just your fabulous self – with your new culinary superpowers. You’ve earned those bragging rights! And maybe save a slice for me, yeah?


