Short, Catchy Intro
So, you’ve scrolled past enough fancy dessert videos to know you want something decadent, but the thought of spending hours in the kitchen makes you want to just order takeout? My friend, you’ve come to the right place. Today, we’re diving into the ridiculously easy, incredibly impressive world of **Assorted Chocolate Truffles**. Get ready to look like a culinary genius with minimal effort!
Why This Recipe is Awesome
Okay, real talk. This recipe is awesome because it’s genuinely **foolproof**. I mean, if I can make these without accidentally setting off the smoke detector or creating something vaguely resembling a science experiment, you absolutely can too. They’re quick, they require no baking (hallelujah!), and they taste like you actually know what you’re doing. Plus, you can customize them to infinity and beyond, making you the reigning champion of dessert diplomacy. Need a quick gift? Truffles. Need to impress your in-laws? Truffles. Just want to eat your feelings? **Definitely truffles.**
Ingredients You’ll Need
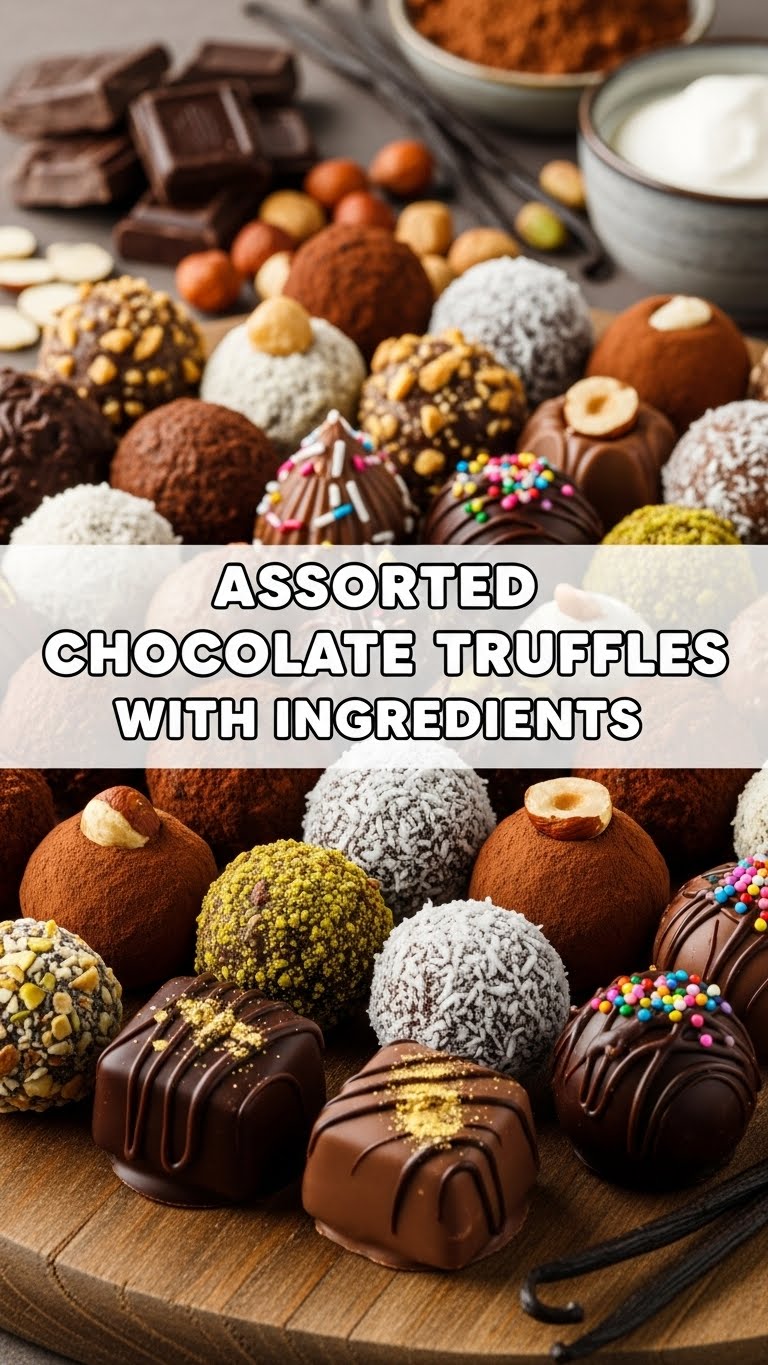
Alright, gather your supplies, intrepid chef! This isn’t rocket science, but quality ingredients do make a difference (don’t tell anyone I said that). Here’s your shopping list for basic chocolate ganache truffles, ready for a glow-up:
- 2 cups (about 12 oz or 340g) good quality chocolate chips or finely chopped chocolate: This is where you don’t skimp, my friend. Milk, dark, semi-sweet – pick your poison! The better the chocolate, the happier your taste buds will be.
- 1 cup (240ml) heavy cream (aka whipping cream): The silky smooth magic maker. Don’t even think about light cream unless you want sad, runny truffles.
- 2 tablespoons (28g) unsalted butter: Adds a lovely sheen and richness. It’s like the secret handshake of deliciousness.
- 1 teaspoon vanilla extract (optional but recommended): A tiny splash makes a big difference. It’s like adding a little sparkle.
- Pinch of salt: Enhances all those chocolatey flavors. It’s like a tiny flavor cheerleader!
- For coating/dusting (choose your adventure!): Cocoa powder, powdered sugar, finely chopped nuts (pistachios, almonds, pecans!), shredded coconut, sprinkles, melted white chocolate for drizzling, crushed cookies (Oreos, Biscoff!), espresso powder… the world is your oyster!
Step-by-Step Instructions
Deep breaths, buttercup. You’ve got this. Follow these steps and prepare for chocolatey bliss:
- Prep Your Chocolate: Place your chocolate chips or finely chopped chocolate into a heatproof bowl. Make sure the bowl is dry – water is chocolate’s arch-nemesis!
- Heat the Cream: In a small saucepan, gently heat the heavy cream over medium heat until it just begins to simmer around the edges. Don’t boil it like a mad scientist’s potion!
- Pour & Wait: Immediately pour the hot cream over the chocolate in the bowl. Let it sit, undisturbed, for about 5 minutes. This is crucial for melting the chocolate evenly. Patience, padawan.
- Stir in the Good Stuff: After 5 minutes, add the butter, vanilla extract (if using), and pinch of salt. Gently whisk or stir the mixture from the center outwards until it’s completely smooth, glossy, and oh-so-tempting ganache. No lumps allowed!
- Chill Out: Cover the bowl with plastic wrap, pressing it directly onto the surface of the ganache to prevent a skin from forming. Pop it into the refrigerator for at least 2-3 hours, or until it’s firm enough to scoop. Pro tip: Overnight chilling is even better!
- Roll ‘Em Up: Once firm, use a small spoon, a melon baller, or a mini ice cream scoop to portion out small amounts of ganache. Roll them quickly between your palms into bite-sized balls. Don’t dawdle too much, or your hands will get messy (but hey, free chocolate hand mask?).
- Coat ‘Em Pretty: Immediately roll each truffle in your chosen coatings. Get creative! Cocoa powder for classic, chopped nuts for crunchy, sprinkles for fun. Place the coated truffles on a parchment-lined baking sheet.
- Final Chill & Serve: Return the finished truffles to the fridge for another 15-30 minutes to firm up their glorious coatings. Then, serve them up and bask in the glory!
Common Mistakes to Avoid
Even the best of us stumble. Here’s how to avoid rookie errors and ensure truffle triumph:
- Overheating the Cream: Boiling cream can scorch it and mess with the chocolate’s texture. Gentle simmer, folks, gentle simmer!
- Stirring Too Soon: Pouring the cream and immediately stirring is a no-go. Give that hot cream time to do its job and melt the chocolate evenly. Impatience makes lumpy ganache!
- Not Chilling Enough: Trying to roll runny ganache is a recipe for a sticky, frustrating disaster. Seriously, **chill your ganache properly!**
- Using Low-Quality Chocolate: This isn’t the time for those questionable chocolate bars you found in the back of the pantry. Good quality chocolate = good quality truffles. It’s science.
- Adding Water: Even a tiny drop of water can seize chocolate, turning it into a grainy, unworkable mess. Keep everything dry, dry, dry!
Alternatives & Substitutions
Feeling adventurous? Want to raid your pantry like a culinary pirate? Here are some ideas:
- Different Chocolates: Mix and match! Use a blend of dark and milk chocolate, or try white chocolate (though it’ll be sweeter and need a tad less cream sometimes). **My fave is a mix of semi-sweet and dark.**
- Flavor Boosters: Instead of just vanilla, try a splash of:
- **Espresso powder:** Deepens the chocolate flavor beautifully.
- **Liqueurs:** A tablespoon of Kahlúa, Grand Marnier, Irish Cream, or even a good whiskey will make them adult-friendly (and extra fancy!). Add it with the butter and vanilla.
- **Extracts:** Almond extract, peppermint extract (hello, mint truffles!), orange extract. A little goes a long way!
- Coatings Galore: Beyond the basics, think: instant coffee granules, finely crushed freeze-dried raspberries, mini chocolate chips, edible glitter (because why not?), finely grated orange zest for a zesty kick. Get wild!
FAQ (Frequently Asked Questions)
You’ve got questions, I’ve got (mostly) answers. Let’s tackle some common truffle conundrums:
- Q: My ganache looks curdled or greasy! What did I do wrong?
- A: Oh no! It usually means it’s either too hot or too cold, or it’s separated. Try adding a tablespoon of *just warm* milk or cream and stirring gently until it comes back together. If it’s too cold, a *very* gentle warm bath might help. **Don’t panic!**
- Q: Can I use milk instead of heavy cream?
- A: Well, technically you *could*, but it won’t be nearly as rich or firm, and your truffles might be sad and soft. Heavy cream is called for for a reason, my friend. Stick to the good stuff for ultimate decadence!
- Q: How long do these last?
- A: In the fridge, in an airtight container, they’ll happily hang out for about 1-2 weeks. (Though honestly, who has them last that long?!)
- Q: Can I freeze truffles?
- A: Absolutely! Place them in a single layer on a baking sheet to freeze, then transfer to an airtight container or freezer bag. They’ll be good for a month or two. Thaw in the fridge before serving.
- Q: Why are my truffles not perfectly round?
- A: Because you’re a human, not a truffle-making robot, that’s why! Embrace the rustic charm. They’ll still taste amazing. **Imperfection is character!**
- Q: Can I make these vegan?
- A: You bet! Use a good quality dark chocolate (check ingredients for dairy) and full-fat coconut cream (the thick stuff from a can, chilled, with the liquid drained off) instead of heavy cream. It works beautifully!
Final Thoughts
And there you have it! You’ve just conquered the magnificent world of assorted chocolate truffles. Give yourself a pat on the back – or better yet, eat a truffle. Seriously, these little bites of heaven are proof that you don’t need a culinary degree to create something truly spectacular. Now go impress someone (or just yourself, because you deserve it!) with your newfound chocolate wizardry. You’ve earned it, you glorious truffle maker, you!


