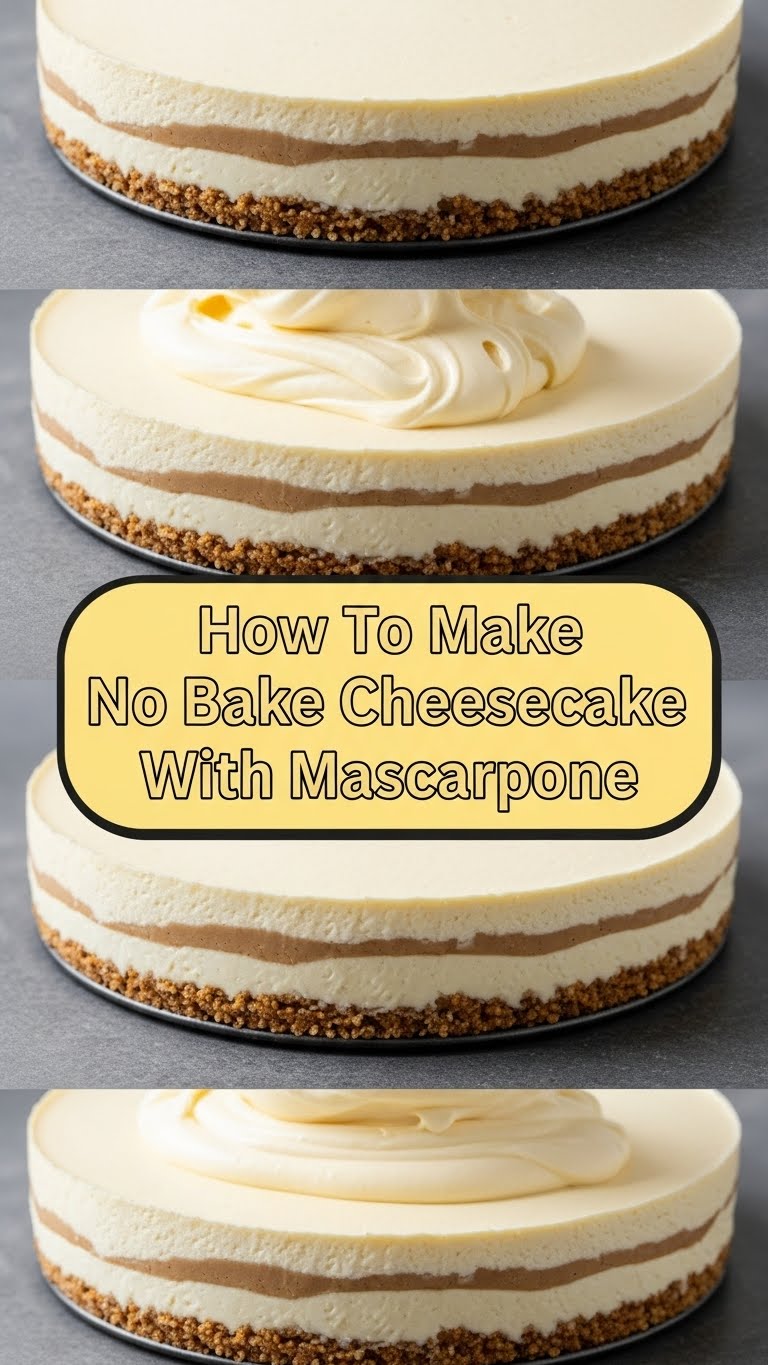
So, you’re craving something ridiculously tasty, creamy, and impressive, but the thought of turning on the oven on a perfectly good day (or any day, let’s be real) makes you want to crawl back into bed? Same, friend, same. Enter the superhero of desserts: No-Bake Mascarpone Cheesecake. It’s like magic, but with more cheese and less rabbit. And honestly, it’s a total game-changer.
Why This Recipe is Awesome
Okay, let’s break it down. Why is this specific no-bake cheesecake going to become your new best friend? First off, it’s NO-BAKE. That means zero oven anxiety, zero worrying about cracks, and zero sweating over a hot stove when you could be, well, not doing that. Secondly, we’re using mascarpone, which is basically cream cheese’s fancier, richer Italian cousin who just got back from a fabulous vacation. It brings a next-level silkiness and a subtle, sophisticated tang that regular cream cheese just can’t quite match on its own.
And thirdly, it’s pretty much idiot-proof. Seriously, if I, a person who once set off a smoke alarm making toast, can nail this, you absolutely can too. It’s fast, it’s elegant, and it screams “I spent hours on this!” when in reality, you probably spent more time choosing which Netflix show to binge while it chilled. Total win.
Ingredients You’ll Need
Get ready for a grocery list that’s shorter than your patience for Monday mornings. Here’s what you’ll need to grab:
- Graham Cracker Crumbs (about 1 ½ cups): The foundation of our dreams. You can crush your own or buy them pre-crushed. Your call, rockstar.
- Unsalted Butter (½ cup, melted): The glue that holds our crust together. Don’t skimp here; we need that buttery goodness.
- Mascarpone Cheese (8 oz block, softened): The star of the show! Make sure it’s softened, or you’ll be fighting a lumpy battle. Nobody wants that.
- Cream Cheese (8 oz block, softened): Mascarpone’s trusty sidekick. Also softened, please and thank you.
- Powdered Sugar (1 ½ cups, sifted): For that perfectly smooth, no-grainy-bits sweetness. Sifting is non-negotiable for a silky filling.
- Heavy Cream (1 ½ cups, cold): We’re whipping this bad boy into fluffy clouds of deliciousness. Keep it cold until go-time!
- Vanilla Extract (1-2 teaspoons): The MVP of flavor. Use good quality stuff; it makes a difference.
- Lemon Zest (1 teaspoon, optional but highly recommended): A little zing to cut through the richness. Trust me on this one.
- Your Favorite Toppings: Fresh berries, chocolate shavings, a drizzle of caramel – get creative!
Step-by-Step Instructions
Alright, apron on (or not, we don’t judge), let’s make some magic happen. This is practically foolproof, so breathe easy!
Crust Time! In a medium bowl, combine your graham cracker crumbs and melted butter. Mix it up until it looks like wet sand. Press this mixture firmly and evenly into the bottom of a 9-inch springform pan. Really press it down, like you’re squishing out all your frustrations. Pop it in the fridge while you make the filling.
Whip the Cream. In a large, very cold bowl (a chilled metal bowl works best!), whip the cold heavy cream until you get beautiful, stiff peaks. This is your whipped cream, people! Set it aside gently.
Creamy Dreamy Filling. In another large bowl, beat the softened mascarpone and cream cheese together until they’re smooth and lump-free. Add the sifted powdered sugar and vanilla extract (and lemon zest, if you’re feeling fancy). Beat again until everything is fully combined and super creamy. Do not overmix! Just mix until incorporated.
Fold it In! Now, gently fold your whipped cream into the cheese mixture. Do this in two additions, using a spatula, until just combined. You want to keep all that beautiful air you whipped in. No aggressive stirring, please; we’re going for light and airy, not dense.
Assemble & Chill. Pour your luscious cheesecake filling over the chilled crust. Smooth the top with your spatula. Now for the hardest part: chilling. Cover the pan loosely with plastic wrap and refrigerate for at least 6 hours, but ideally overnight. This is where the magic truly happens and it sets up perfectly.
Serve & Enjoy! Once fully chilled and firm, carefully remove the sides of the springform pan. Top with your favorite goodies – berries are classic, but chocolate ganache or a simple berry coulis also slaps. Slice it up and bask in the glory of your no-bake masterpiece!
Common Mistakes to Avoid
Even though this recipe is chill (pun intended!), there are a few potholes you might wanna steer clear of:
- Not Chilling Long Enough: This isn’t a suggestion, it’s a command! Pulling it out too early will result in a sad, slumpy mess. Think of the fridge as its cozy little spa where it firms up and becomes its best self.
- Using Cold Cream Cheese/Mascarpone: Seriously, make sure it’s at room temp. Otherwise, you’ll end up with lumps, and nobody likes a lumpy cheesecake. It’s a texture nightmare.
- Overmixing the Filling: Once you add the powdered sugar and fold in the whipped cream, stop beating. Overmixing can deflate your beautiful airy filling and make it dense. We’re aiming for cloud-like, not brick-like.
- Not Sifting Powdered Sugar: You might think, “Eh, who cares?” But those tiny sugar lumps are a real buzzkill for a smooth, velvety texture. Just do it. Your taste buds will thank you.
Alternatives & Substitutions
Feeling adventurous or just out of one ingredient? No worries, here are some ideas:
- Crust Alternatives: Instead of graham crackers, try crushed Oreos (chocolatey goodness!), Biscoff cookies (caramel heaven!), or even shortbread cookies. Just swap them cup for cup.
- Sweetener Swap: If you’re not a fan of powdered sugar, you can use granulated sugar, but it might make the filling slightly less smooth. Sifting is even more important then!
- Flavor Boosts: Swirl in some melted chocolate, a spoonful of espresso powder, or a dash of almond extract into the filling for a different vibe. Don’t be shy!
- Cheese Swap (Use with Caution): While mascarpone is king here, if you absolutely can’t find it, you could potentially use all cream cheese, but the texture won’t be as rich or silky. Some people add a bit of sour cream for tang, but it might thin the consistency. IMO, stick to the recipe for the best results!
FAQ (Frequently Asked Questions)
Got questions? I’ve got (casual) answers!
- Can I use margarine instead of butter for the crust? Well, technically yes, but why hurt your soul like that? Butter just tastes better and sets up firmer. Live a little!
- How long does this cheesecake last in the fridge? If it manages to last that long without being devoured, it’ll keep well for 3-4 days in an airtight container.
- Can I make this ahead of time for a party? Absolutely! It actually tastes better the next day after a good, long chill. Perfect for impressing guests without last-minute stress.
- My cheesecake isn’t setting! What did I do wrong? Most likely, it wasn’t chilled long enough, or the heavy cream wasn’t whipped to stiff peaks. Re-check those steps next time!
- What are some good toppings? The world is your oyster! Fresh berries (strawberries, raspberries, blueberries), a simple chocolate ganache, a fruit compote, lemon curd, or even just a dusting of cocoa powder.
- Do I really need a springform pan? While not strictly necessary (you could use a regular pie dish), a springform pan makes it super easy to unmold and present your beautiful cheesecake without damaging it. Worth the investment, FYI.
Final Thoughts
See? That wasn’t so scary, was it? You just whipped up a dessert that tastes like a fancy pâtisserie creation with minimal effort and zero oven drama. This no-bake mascarpone cheesecake is your new secret weapon for potlucks, dinner parties, or just a Tuesday night when you deserve something amazing. Now go impress someone—or yourself—with your new culinary skills. You’ve earned it!

