So you’re craving something tasty but too lazy to spend forever in the kitchen, huh? Same. And you probably want something that looks fancy but requires zero actual skill? My friend, you’ve stumbled upon a culinary miracle. Get ready for the easiest, creamiest, dreamiest No-Bake Cheesecake with Berries you’ll ever whip up!
Why This Recipe is Awesome
Let’s be real, who actually wants to turn on their oven in summer? Or, let’s face it, ever? This no-bake cheesecake is your new best friend. It’s so ridiculously simple, it practically makes itself. Seriously, it’s idiot-proof; even my cat could probably supervise the assembly. Plus, no oven means no stress, no burnt edges, and no wrestling with a springform pan in a tiny hot kitchen. It’s pure, unadulterated, creamy bliss, designed for maximum deliciousness with minimum effort.
Ingredients You’ll Need
Gather your troops! Here’s what’s on the roster for your dessert masterpiece:
- Graham Crackers: About 1 ½ cups crushed. The humble base, don’t cheap out! These crumbs are carrying the whole dessert.
- Unsalted Butter: 6 tablespoons, melted. Because everything is better with butter, right?
- Full-Fat Cream Cheese: Two 8-ounce blocks, softened. This isn’t the time for “light” versions, folks. We’re here for flavor, not virtue.
- Powdered Sugar: 1 cup. Also known as confectioners’ sugar. Sift it if you’re feeling fancy, otherwise, just make sure there are no lumps.
- Heavy Cream: 1 ½ cups, very cold. This is what makes it fluffy and dreamy. Don’t skip the “very cold” part! It makes all the difference.
- Vanilla Extract: 1 teaspoon. The soul of any good dessert. Use real vanilla, please, your taste buds will thank you.
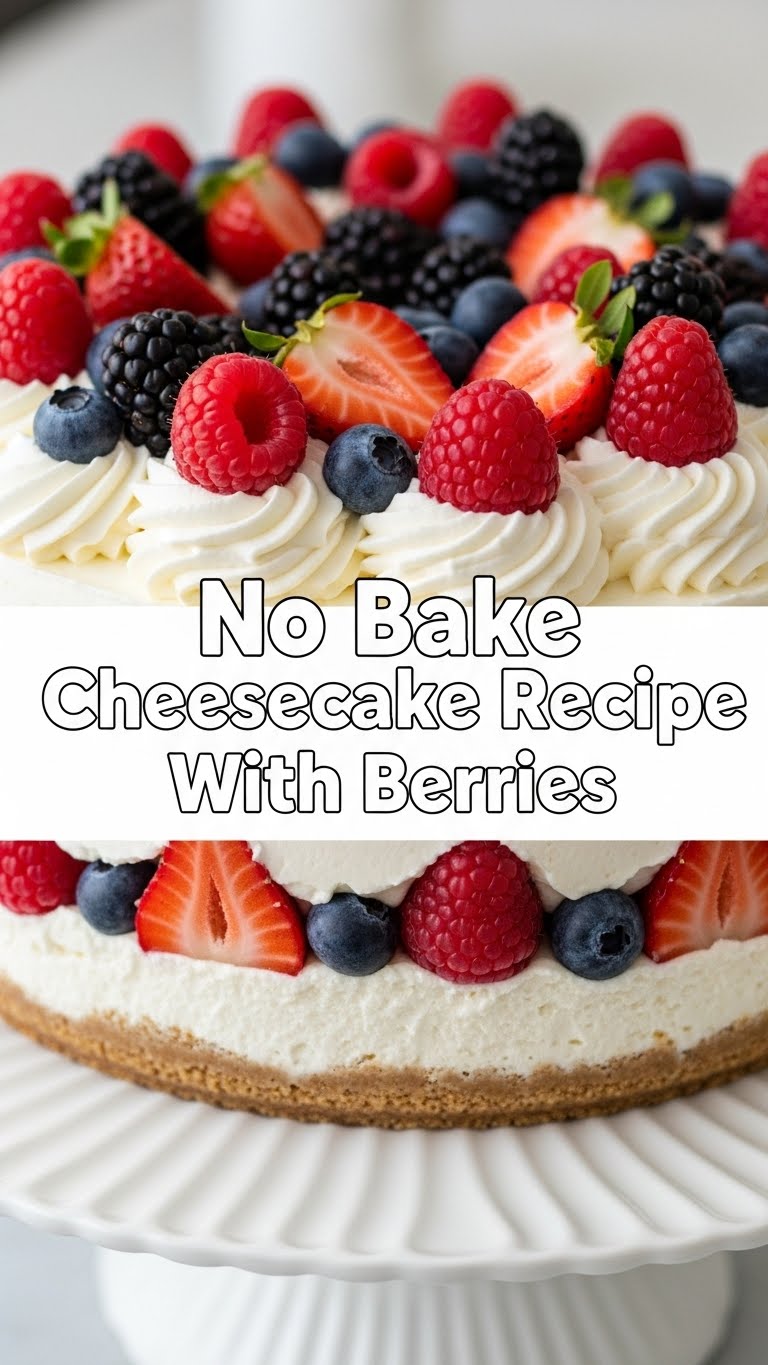
- Mixed Berries: 2 cups (strawberries, blueberries, raspberries). Fresh or frozen (thawed), your call. The prettier, the better, for that Instagram moment.
- Lemon Zest (optional): 1 teaspoon. Adds a little zing and sophistication, if you’re feeling extra.
Step-by-Step Instructions
- Prep Your Pan: Grab an 8 or 9-inch springform pan. Line the bottom with parchment paper if you’re feeling ambitious and want an easy release. Set it aside.
- Crust Time: Crush those graham crackers until they’re fine crumbs. You can use a food processor (the easy way) or a Ziploc bag and a rolling pin (the cathartic way). Melt your butter and mix it thoroughly with the crumbs.
- Press It Down: Press the buttery crumbs firmly into the bottom of your prepared pan. Use the back of a spoon or the bottom of a glass to make it nice and even. Stick it in the fridge for at least 15 minutes to firm up.
- Whip the Cream: In a large, very cold bowl, whip your heavy cream until it forms stiff peaks. Seriously, stiff peaks are key here! Don’t overmix it into butter, though, unless you’re making two desserts.
- Cheesecake Filling: In another bowl, beat the softened cream cheese until it’s super smooth and fluffy. Add the powdered sugar and vanilla extract (and lemon zest, if using) and beat until fully combined and no lumps remain.
- Combine the Magic: Gently fold the whipped cream into the cream cheese mixture. Be gentle! You want to keep that glorious airiness. Mix until just combined.
- Assemble & Chill: Pour the creamy filling over your chilled crust. Smooth the top with a spatula. Now, the hardest part: pop it back in the fridge for at least 4-6 hours, but overnight is best for maximum firmness. Patience, young padawan.
- Berry Good: Once set, carefully remove the cheesecake from the springform pan. Top it generously with your beautiful berries right before serving. Slice and conquer!
Common Mistakes to Avoid
Even though this is an easy recipe, a few common blunders can derail your cheesecake dreams. Learn from my mistakes (and others)!
- Not Chilling Enough: Thinking you can cut into it after an hour. Rookie mistake! You’ll have a delicious puddle, not a cheesecake. Chill, literally.
- Cold Cream Cheese: Trying to beat cold cream cheese. It’ll be lumpy, gluey, and frankly, a pain. Let it sit out, warm up, and become glorious.
- Overmixing the Whipped Cream: Turning your fluffy cream into butter. It’s a fine line, people! Watch it carefully and stop at stiff peaks.
- Using Low-Fat Ingredients: Thinking you can trick the system with low-fat anything. This is a cheesecake. Embrace the decadence. Your taste buds will thank you.
Alternatives & Substitutions
Feeling creative? This recipe is super flexible! Here are some ideas:
- Crust: Graham crackers are classic, but try Oreos for a chocolatey twist (remove the cream first!), or even shortbread cookies. Digestives work well too, if you’re feeling British.
- Toppings: Berries are divine, but feel free to go wild. Chocolate sauce, caramel drizzle, chopped nuts, a simple fruit compote, or even a different type of fruit like peaches or cherries. Your cheesecake, your rules!
- Flavorings: Instead of vanilla, try almond extract for a nutty note, or a splash of an orange liqueur for an adult twist. Lemon or lime juice in the filling can add an extra zing too.
FAQ (Frequently Asked Questions)
- Can I use margarine instead of butter for the crust? Well, technically yes, but why hurt your soul like that? Butter just tastes better, IMO.
- How long does it last in the fridge? Covered, usually 3-4 days. But honestly, it rarely lasts that long in my house.
- Can I freeze it? Absolutely! Wrap it tightly (without berries) and it’ll last for a month or two. Thaw in the fridge overnight.
- My cheesecake isn’t setting, what gives? Did you whip your cream enough? Was your cream cheese softened? And most importantly, did you chill it long enough? Patience is a virtue, especially with no-bake treats.
- Can I make individual cheesecakes? Oh, you fancy! Yes, totally. Press the crust into muffin liners or small ramekins, then top with the filling. Adjust chilling time as needed.
Final Thoughts
And there you have it! A show-stopping, no-sweat, no-bake cheesecake that will fool everyone into thinking you’re a culinary genius. Now go impress someone—or yourself—with your new culinary skills. You’ve earned it, you magnificent kitchen wizard, you! Happy no-baking!

