So you’re craving something ridiculously tasty but just can’t be bothered to turn your oven into a fiery inferno? Same. My oven mostly collects dust, to be honest. But what if I told you we could whip up a legit, fancy-pants dessert that requires zero baking and tastes like a cloud of pure joy? Enter: the No-Bake Cherry Cheesecake. Get ready to impress yourself (and maybe some friends, if you’re feeling generous).
Why This Recipe is Awesome
Okay, first things first: it’s no-bake. Do I even need to say more? No oven, no sweat, no standing around waiting for things to rise or brown perfectly. This alone is reason enough to drop everything and make it, IMO.
Secondly, it’s basically **idiot-proof**. Seriously, if you can stir and press, you can make this. My track record with anything more complex than toast is questionable, yet this cheesecake came out looking like I actually know what I’m doing. It’s creamy, dreamy, and surprisingly quick to put together for something so elegant. Plus, cheesecake is universally loved. You’re basically a hero in dessert form.
Ingredients You’ll Need
Gather ’round, buttercups! Here’s your shopping list for culinary glory:
For the Crust:
- 1 ½ cups Graham Cracker Crumbs: (About 10-12 full sheets). Get the good stuff, no sad, stale crumbs.
- ¼ cup Granulated Sugar: Just a touch for that perfect sweet crunch.
- ½ cup Unsalted Butter: Melted. Don’t skimp. Butter makes everything better. Fact.
For the Cheesecake Filling:
- 2 blocks (8 oz each) Full-Fat Cream Cheese: Softened to room temp. This is NOT the place for low-fat. We’re going for creamy ecstasy, not disappointment.
- 1 cup Powdered Sugar (Confectioners’ Sugar): Sifts beautifully for a smooth texture.
- 1 tsp Vanilla Extract: A good splash! Real vanilla, please, not the imitation stuff that tastes like sadness.
- 1 tbsp Fresh Lemon Juice: Brightens everything up! Your secret weapon against cloying sweetness.
- 1 ¾ cups Heavy Cream (Cold): This is crucial. It whips up like a dream, giving it that airy cloud texture.
For the Cherry Topping:
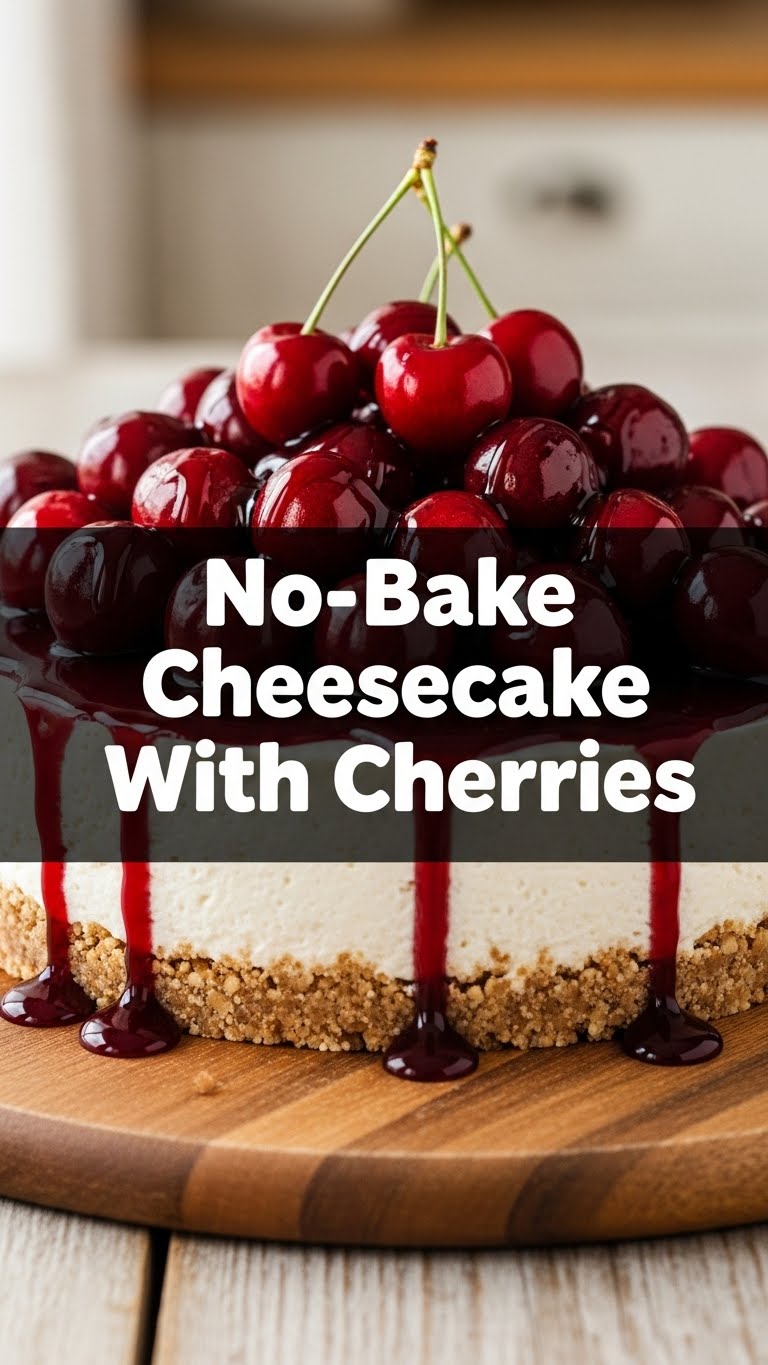
- 1 can (21 oz) Cherry Pie Filling: The easiest cheat ever. Don’t judge, it’s delicious and so convenient!
- Optional: A splash of Kirsch or Almond Extract: For extra oomph, if you’re feeling fancy.
Step-by-Step Instructions
- Crush the Crumbs: In a food processor, pulse your graham crackers until fine crumbs. No food processor? Stick ’em in a Ziploc bag and go wild with a rolling pin (or your frustrations).
- Mix the Crust Magic: In a medium bowl, combine the graham cracker crumbs, granulated sugar, and melted butter. Mix well until it looks like wet sand.
- Press it Down: Press this mixture firmly into the bottom of a 9-inch springform pan. Use the back of a spoon or the bottom of a glass to get it really compact. Pop this bad boy into the fridge to chill while you make the filling. **Don’t skip the chill!**
- Whip the Cream: In a large, super clean bowl, whip the **cold** heavy cream using an electric mixer on high speed until stiff peaks form. Set aside in the fridge.
- Cream Cheese Magic: In another bowl, beat the softened cream cheese with the powdered sugar, vanilla extract, and lemon juice until it’s completely smooth and lump-free. Seriously, beat it good.
- Fold it In: Now for the delicate part! Gently fold the whipped cream into the cream cheese mixture with a spatula. **Be careful not to overmix!** You want to keep that airy lightness.
- Fill ‘er Up: Pour the luscious cheesecake filling over your chilled crust. Smooth the top with a spatula.
- Chill Out (Literally): Cover the pan loosely with plastic wrap and refrigerate for at least 4-6 hours, or ideally, overnight. **Patience, young grasshopper, it’s worth it.**
- Top and Serve: Once set, carefully remove the sides of the springform pan. Spoon the cherry pie filling generously over the top. If using, stir in a splash of Kirsch or almond extract into your cherry topping first for extra flavor. Slice and devour your masterpiece!
Common Mistakes to Avoid
Alright, listen up, because even though this is “idiot-proof,” there are a few rookie errors that can turn your dreamy dessert into a “meh” dessert:
- Using Low-Fat Cream Cheese: I said it once, I’ll say it again. Unless you *want* a sad, watery cheesecake with zero lusciousness, stick to full-fat. This is a treat, not a diet!
- Not Chilling the Crust: You’ll end up with a crumbly, falling-apart mess instead of a firm base. Trust the process and give it some fridge time.
- Overmixing the Filling: Especially after you’ve folded in the whipped cream. Beat it too much and you’ll deflate all that lovely air, losing the light, fluffy texture. Be gentle!
- Not Chilling Long Enough: Impatience is not a virtue here. If you cut into it too early, it’ll be a wobbly, soft mess. Give it the full 4-6 hours, or even better, let it chill overnight for optimal firmness.
- Using Warm Heavy Cream: Your heavy cream needs to be **ice cold** to whip up properly. If it’s even slightly warm, it’ll take forever (or never) to reach stiff peaks.
Alternatives & Substitutions
Feeling creative? Here’s how you can mix things up a bit:
- Crust Variations: Not a graham cracker fan? Try crushed Oreo cookies (for a delightful chocolatey base!), shortbread biscuits, or even ginger snaps for a spicy kick. Oreo crust with cherries? *Chef’s kiss* perfection.
- Topping Fun: While cherries are classic, feel free to swap them out! Fresh berries (strawberries, blueberries, raspberries) with a dollop of fresh cream, a drizzle of chocolate ganache, a swirl of caramel, or even a tangy lemon curd would be divine. Your cheesecake, your rules!
- Citrus Swaps: If lemon isn’t your jam, a splash of orange juice or lime juice can also work to brighten the filling, offering a slightly different but equally delicious vibe.
- DIY Cherry Topping: If you’re feeling ambitious and have fresh cherries, by all means, make your own! But honestly, the canned pie filling is a lifesaver here and tastes great.
FAQ (Frequently Asked Questions)
- Can I use store-bought whipped cream? You *can*, technically. But why skip the sheer joy (and superior taste) of freshly whipped cream that literally tastes like a cloud? Plus, the stability of freshly whipped cream helps the cheesecake set better.
- How long does this no-bake cheesecake last? Covered tightly in the fridge, it’ll last about 3-4 days. But let’s be real, it won’t last that long.
- Can I freeze this cheesecake? Absolutely! Wrap individual slices tightly in plastic wrap and then foil, and freeze for up to a month. Thaw in the fridge overnight before serving.
- My crust isn’t sticking together, what gives? Probably not enough butter, friend. Add another tablespoon or two of melted butter, mix it in, and press harder into the pan.
- Do I *have* to use a springform pan? No, you can use a regular pie dish, but be warned: serving will be more of a scoop-and-serve situation rather than a pristine slice. For presentation, a springform is your BFF.
- What if I don’t have a food processor for the crumbs? No problem! Place graham crackers in a sturdy Ziploc bag, seal it, and bash away with a rolling pin (or a wine bottle, no judgment). It’s quite therapeutic, actually.
- Can I make it ahead of time for a party? Oh, heck yes! That’s the beauty of no-bake. Make it the day before, let it chill overnight, and then just add the cherry topping right before serving. Easy peasy.
Final Thoughts
So there you have it, folks! A cheesecake so ridiculously good, so unbelievably easy, you’ll wonder why you ever bothered turning on an oven in the first place. Go ahead, make it, eat it, share it (or don’t, I won’t tell!). You’ve just earned yourself a culinary black belt in effortless deliciousness.
Now go impress someone—or just yourself—with your newfound no-bake wizardry. You’ve earned it! Seriously, go pat yourself on the back, you magnificent dessert maker.


