So you’re craving something ridiculously good, but the thought of turning on your oven right now (especially if it’s summer, or you’re just… lazy) makes you want to crawl under a blanket? Same, friend, same. Enter the hero of our story: the No-Bake Cheesecake with Cherry Topping. It’s basically a hug in dessert form, requiring zero baking skills and maximum enjoyment.
Why This Recipe is Awesome
Let’s be real, life is complicated enough without wrestling with a fussy oven and a water bath. This recipe is your culinary therapist, designed to be stress-free and utterly delicious. It’s idiot-proof, I swear. Even I, Queen of “Oops, did I just burn water?”, managed to whip this up without a single disaster. It’s cool, creamy, tangy, sweet, and did I mention it requires absolutely no oven time? That means less sweating in the kitchen and more chilling (just like your cheesecake, har har). Plus, it looks fancy enough to fool anyone into thinking you actually put in effort. Your secret’s safe with me!
Ingredients You’ll Need
Gather ’round, my fellow kitchen adventurers! Here’s your loot list:
- For the Crust:
- 1 ½ cups Graham cracker crumbs: Or any crunchy cookie you fancy. Digestives, Oreos (crush with cream), whatever floats your boat. We’re not picky.
- ½ cup (1 stick) unsalted butter, melted: Because everything’s better with butter, right? Don’t skimp here!
- ¼ cup granulated sugar: Just a touch for that perfect sweet crunch.
- For the Cheesecake Filling:
- 2 (8-ounce) blocks full-fat cream cheese, softened: Key word: softened. Cold cream cheese is the enemy of smooth. Don’t be that person.
- 1 cup powdered sugar: Sift it if you’re feeling fancy (or want to avoid lumps).
- 1 teaspoon vanilla extract: The soul of dessert. Don’t skip!
- 1 cup heavy cream, very cold: This is our magic ingredient for that light, fluffy texture. Make sure it’s super cold!
- 2 tablespoons lemon juice: A little zing to cut through the richness.
- For the Cherry Topping:
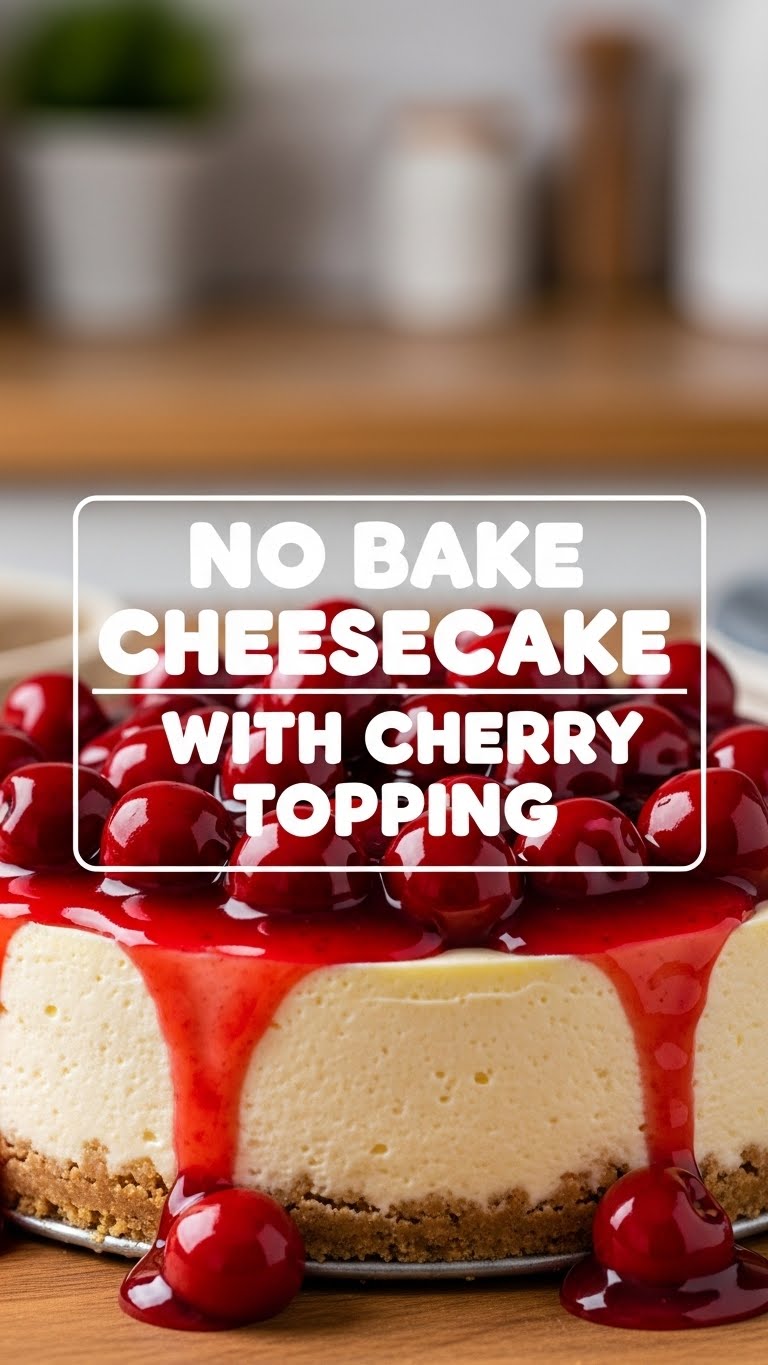
- 1 (21-ounce) can cherry pie filling: The cheat code for deliciousness. You can make your own, but why?
- Optional: a splash of almond extract: If you’re feeling extra. Cherry and almond are BFFs.
Step-by-Step Instructions
Alright, let’s get down to business! Follow these simple steps and prepare for deliciousness.
- Crush it, Baby: Start by crushing your graham crackers (or cookies) until they’re fine crumbs. A food processor is your best friend here, but a Ziploc bag and a rolling pin work too if you’re feeling aggressive.
- Butter Up: In a medium bowl, combine the graham cracker crumbs, melted butter, and sugar. Mix until it resembles wet sand.
- Press On: Press this mixture firmly into the bottom of a 9-inch springform pan. Use the back of a spoon or a flat-bottomed glass. Make sure it’s packed tight! Then, pop it in the fridge while you make the filling.
- Cream Cheese Dream: In a large mixing bowl, beat the softened cream cheese until it’s smooth and creamy. No lumps allowed! Add the powdered sugar, vanilla extract, and lemon juice. Beat until everything is well combined and fluffy.
- Whip It Good: In a separate, chilled bowl, whip the very cold heavy cream until stiff peaks form. This is crucial for that airy cheesecake texture.
- Fold with Love: Gently fold the whipped cream into the cream cheese mixture. Do it in two additions, being careful not to deflate all that lovely air you just whipped in. This is where the magic happens, folks!
- Assemble the Deliciousness: Pour the cheesecake filling over your chilled crust. Smooth the top with a spatula.
- Chill Out: Now for the hardest part: waiting. Cover the pan with plastic wrap and refrigerate for at least 6 hours, or ideally overnight. Don’t rush this! It needs time to set properly.
- Cherry on Top: Once your cheesecake is perfectly set, gently remove it from the springform pan. Spoon the cherry pie filling (and a splash of almond extract, if using) generously over the top.
- Serve and Shine: Slice, serve, and bask in the glory of your no-bake masterpiece!
Common Mistakes to Avoid
Nobody’s perfect, but we can avoid common blunders that lead to cheesecake sorrow. Don’t be that person!
- Using Cold Cream Cheese: I said it once, I’ll say it again: softened cream cheese is non-negotiable! Cold cream cheese means lumpy filling, and no one wants lumpy cheesecake.
- Not Chilling Long Enough: Patience, young padawan! If you cut into it too soon, it’ll be a sad, gooey mess. Six hours minimum, overnight is best. Trust me on this.
- Over-mixing the Whipped Cream into the Filling: You worked hard to get those stiff peaks. Don’t destroy them by vigorously mixing! Fold gently to keep that light, airy texture.
- Skimping on Butter in the Crust: A dry, crumbly crust is a tragedy. Make sure you have enough melted butter to bind those crumbs properly.
Alternatives & Substitutions
Feeling adventurous? Or just don’t have exactly what I listed? No worries, we can totally adapt!
- Crust Swaps: Not a graham cracker fan? Try crushed Oreos (chocolatey goodness!), Biscoff cookies (cinnamon spice heaven), or even shortbread. Just keep the butter and sugar ratios similar.
- Topping Variations: While cherry is classic for a reason (IMO, it’s the best!), feel free to mix it up. Blueberry, strawberry, or even a simple chocolate ganache or caramel drizzle would be amazing. Fresh berries are also a fantastic, lighter option!
- Flavor Boosts: Want to get wild? Add a little lemon zest to the filling for extra brightness, or a tiny splash of liqueur (like Amaretto or Kirsch) if you’re feeling boozy.
FAQ (Frequently Asked Questions)
- “My cream cheese isn’t soft enough! What do I do?”
Uh oh! You can either impatiently wait (like I usually do) or try a quick hack: unwrap it and microwave it for 10-15 seconds. Just be careful not to actually melt it, we’re not making soup here!
- “Can I use low-fat cream cheese?”
Technically yes, but why hurt your soul (and your cheesecake’s texture) like that? Full-fat gives you that rich, creamy goodness this dessert is known for. Treat yourself!
- “How long does this cheesecake last in the fridge?”
If it lasts that long, congratulations on your self-control! It’ll be good for about 3-4 days in an airtight container. The crust might soften a bit, but it’ll still be delicious.
- “Can I freeze no-bake cheesecake?”
You sure can! Wrap it tightly (without the topping) and it’ll last for up to a month. Thaw it in the fridge overnight before serving. Add the topping just before serving.
- “Do I really need a springform pan?”
It makes life SO much easier for serving. You can use a regular pie dish, but getting neat slices out without a disaster might be a challenge. You do you, though!
Final Thoughts
And there you have it, folks! A glorious, no-bake cheesecake that will make you feel like a culinary genius without actually doing any genius-level cooking. This is the perfect dessert for parties, potlucks, or just a Tuesday night when you deserve something special (which is always, FYI). Now go impress someone—or yourself—with your new, super-easy culinary skills. You’ve earned it!

