Alright, listen up buttercups! Got a craving for something sweet, creamy, and cherry-rific but the idea of turning on your oven feels like too much commitment right now? Preach! You’re in the right place, because today we’re tackling the holy grail of lazy-but-impressive desserts: No Bake Cherry Cheesecake with Cool Whip. It’s so easy, your pet hamster could probably make it. (Disclaimer: please don’t let your hamster bake.)
Why This Recipe is Awesome
Seriously, this cheesecake is the MVP of your dessert game. Why? Let me count the ways:
- No Oven Required: Yep, you heard that right. Your oven can stay gloriously off, saving you from sweat and potential kitchen fires.
- Idiot-Proof: I’m talking “even I can’t mess this up” levels of simplicity. If you can mix things and spread things, you’re golden.
- Speedy Gonzales: Aside from chilling time (which, let’s be real, is just waiting for deliciousness), this comes together in a flash. Perfect for last-minute cravings or unexpected guests.
- Cool Whip FTW: We’re not messing around with fancy whipped cream here. Cool Whip is our creamy, dreamy shortcut, making this recipe unbelievably easy and light.
- Crowd Pleaser: Everyone loves cheesecake. Everyone loves cherries. This is a match made in dessert heaven, guaranteed to get you compliments without breaking a sweat.
Ingredients You’ll Need
Gather ’round your supplies, friends. This is a short, sweet list for maximum deliciousness:
- 1 ½ cups Graham Cracker Crumbs: Your crunchy, buttery canvas. Grab a box of graham crackers and blitz ’em or buy them pre-crushed for ultimate laziness.
- ¼ cup Granulated Sugar: Just a touch of sweetness for that perfect crust.
- 6 tablespoons Unsalted Butter, Melted: The sticky glue that holds your crusty dreams together.
- 2 (8-ounce) packages Cream Cheese, Softened: The undisputed star of our creamy filling show. Seriously, let it soften! It makes all the difference.
- 1 cup Powdered Sugar (Confectioners’ Sugar): For that silky smooth, lump-free filling. Don’t even think about using granulated sugar here, unless you like a gritty texture.
- 1 teaspoon Vanilla Extract: A little whisper of warmth.
- 1 (8-ounce) container Cool Whip, Thawed: Our fluffy, easy peasy secret weapon. Make sure it’s thawed, otherwise, you’ll have an ice cream block situation.
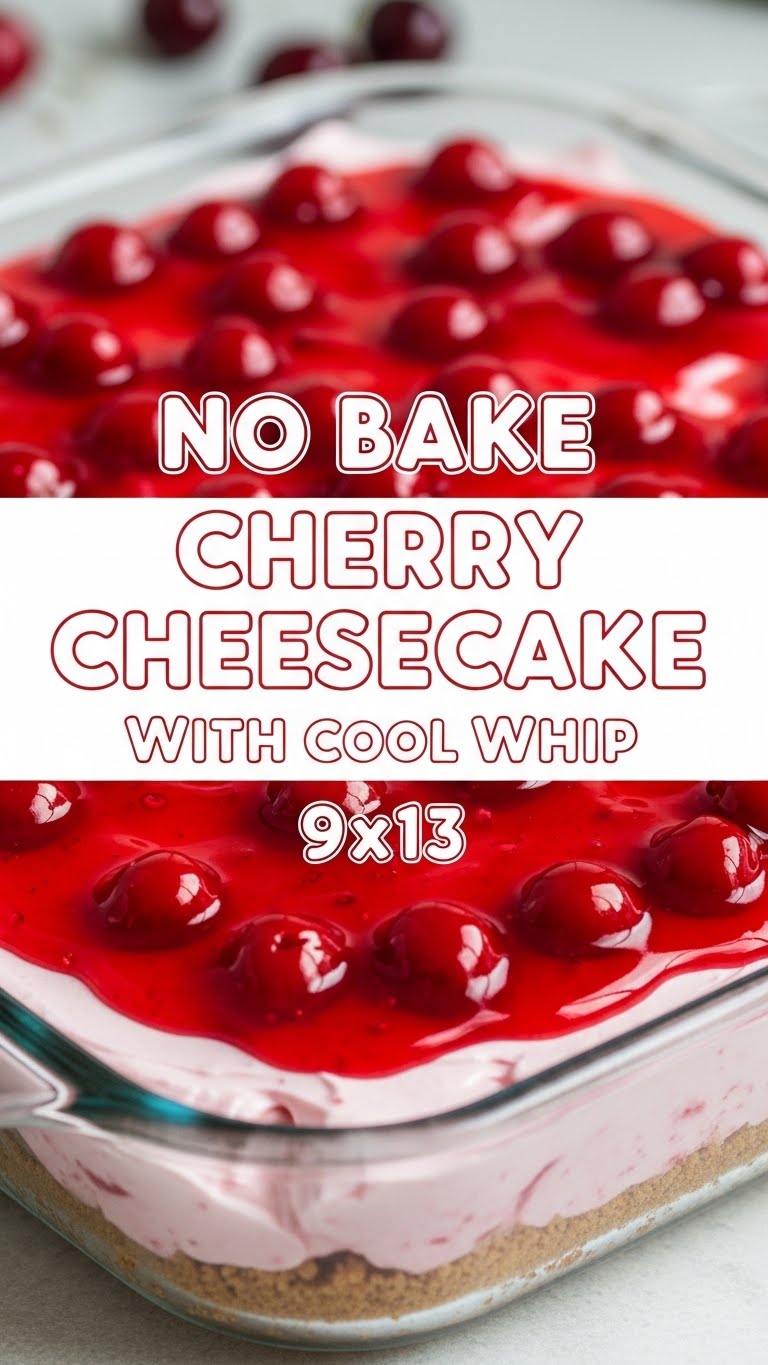
- 1 (21-ounce) can Cherry Pie Filling: The crowning glory, the cherry on top (literally).
Step-by-Step Instructions
Crust Time: Grab your trusty 9×13 inch pan. In a medium bowl, combine your graham cracker crumbs, granulated sugar, and melted butter. Mix it all up until it looks like wet sand. Press this mixture firmly and evenly into the bottom of your pan. Use the bottom of a glass or your knuckles if you’re feeling feisty. Pop this crust into the fridge for at least 15-20 minutes to chill and firm up. Don’t skip this step, trust me.
Filling Frenzy: While your crust is chilling, get started on the creamy good stuff. In a large bowl, using an electric mixer, beat the softened cream cheese until it’s super smooth and fluffy. This is where those room-temp cream cheese blocks really shine!
Sweeten the Deal: Gradually add the powdered sugar to the cream cheese, beating until it’s fully incorporated and lump-free. Stir in the vanilla extract. Keep beating until everything is light and airy. We’re aiming for cloud-like perfection here.
Fold in the Fluff: Gently fold in the thawed Cool Whip until just combined. You want to maintain that airy texture, so don’t go crazy with the mixing. Overmixing is the enemy of fluffy. You’re basically whispering to it, “Blend, my fluffy friend, blend gently.”
Assemble Your Masterpiece: Spoon the cream cheese filling evenly over your chilled graham cracker crust. Smooth it out with a spatula. Now, for the grand finale: spoon the cherry pie filling right on top. Spread it out, making sure every slice gets a generous dollop of that vibrant red goodness.
Chill Out (Literally): Cover the cheesecake loosely with plastic wrap and pop it back into the fridge. Let it chill for at least 4-6 hours, or even better, overnight. This is crucial! It allows all those delicious flavors to meld and the cheesecake to firm up perfectly.
Serve and Shine: Once it’s properly chilled, slice it up and serve! Prepare for oohs and aahs, and maybe even a few “OMG, you made this?!” exclamations. You earned it, chef!
Common Mistakes to Avoid
We all make ’em, but here are some pitfalls to dodge on your path to no-bake glory:
- Using Cold Cream Cheese: Rookie mistake! You’ll end up with a lumpy, chunky filling that no amount of beating will fix. Plan ahead and let it soften on the counter.
- Not Chilling the Crust Enough: If you don’t give that crust time to set, it’ll crumble apart when you slice it. Patience, young padawan!
- Overmixing the Cool Whip: You want that light, airy texture. Mix just until combined, don’t deflate all that lovely fluffiness.
- Eating it Before It’s Set: I know, the temptation is real. But seriously, it needs time in the fridge to firm up and reach its full cheesecake potential. Otherwise, you’re just eating a delicious, albeit messy, pudding.
- Using Granulated Sugar in the Filling: As mentioned, powdered sugar is your BFF for a smooth filling. Granulated sugar won’t dissolve properly and will leave a grainy texture.
Alternatives & Substitutions
Feeling adventurous? Here are some fun ways to mix things up:
- Crust Swaps: Not a graham cracker fan? Try crushed Oreo cookies (remove the cream filling for less sweetness), vanilla wafers, or even shortbread cookies. The world is your crusty oyster!
- Topping Adventures: Instead of cherry, try strawberry, blueberry, or even mixed berry pie filling. Or, for a twist, skip the pie filling and top with fresh sliced fruit, a drizzle of chocolate sauce, or some caramel. Why not both?!
- Homemade Whipped Cream: If you’re feeling fancy (and want a bit more effort), you *could* make your own sweetened whipped cream instead of Cool Whip. But honestly, for pure ease and consistent results, Cool Whip is a winner. IMO.
- Flavor Boosters: Add a little lemon zest to the cream cheese filling for a brighter, tangier kick. A tiny pinch of almond extract with the vanilla could also be divine with the cherries!
FAQ (Frequently Asked Questions)
Got questions? I’ve got (casual) answers!
- Can I use light cream cheese and Cool Whip?
Technically yes, but why hurt your soul like that? Just kidding! You absolutely can for a lighter version, but the full-fat stuff definitely delivers on the creamy indulgence factor.
- How long does this cheesecake last in the fridge?
If you don’t devour it all in one sitting (which is totally acceptable, FYI), it’ll last beautifully for about 3-4 days in an airtight container in the fridge.
- Can I freeze this no-bake cheesecake?
You betcha! You can freeze it for a couple of weeks. Just wrap it tightly in plastic wrap and then foil. Thaw in the fridge overnight before serving. The texture might be a *tiny* bit different, but still delish!
- Do I *really* need to chill it for so long?
YES. Seriously, yes! This isn’t just for cooling; it’s for setting. Without proper chilling, you’ll have a sad, sloppy mess. Think of it as mandatory flavor development time.
- What if I don’t have a 9×13 inch pan?
No worries! You can use a 9×9 inch square pan (it’ll be a bit thicker) or even an 8 or 9-inch springform pan for a taller, more traditional cheesecake look. Just be prepared to adjust your chilling time if it’s much thicker.
- Is it really *that* easy? I’m skeptical.
My friend, it is truly that easy. The hardest part is waiting for it to chill. It’s basically magic for lazy dessert lovers. Go forth and conquer!
Final Thoughts
So there you have it! A ridiculously easy, unbelievably delicious, and perfectly no-bake cherry cheesecake that will make you feel like a culinary genius without actually doing any genius-level work. It’s the perfect dessert for parties, potlucks, or just a Tuesday night when you deserve something sweet. Now go impress someone—or yourself—with your new culinary skills. You’ve earned it!


