So you’re craving something tasty but too lazy to spend forever in the kitchen, huh? Same. Like, *seriously* same. If the thought of preheating an oven makes you want to curl up and nap, then welcome, my friend, you’ve found your people. Today, we’re diving headfirst into the glorious world of No-Bake Cheesecake, specifically the heavy cream variety, because why settle for less when you can have creamy, dreamy perfection without breaking a sweat?
Why This Recipe is Awesome
Let’s be real, most cheesecake recipes look like they require a culinary degree and the patience of a saint. Not this one. This recipe is so ridiculously easy, it practically makes itself. It’s **idiot-proof**, I swear. Even I, a person who once set off the smoke detector making toast, can nail this. There’s no worrying about water baths, cracked tops, or that terrifying moment when you pull a baked cheesecake out of the oven and pray it doesn’t collapse. Nope. Just mix, chill, and voilà! You look like a dessert guru, and all you did was avoid turning on the oven. Plus, it’s incredibly rich and decadent, thanks to our heavy cream hero. Your taste buds will thank you, probably with a standing ovation.
Ingredients You’ll Need
Gather ’round, my fellow kitchen minimalists. Here’s what you’ll need for this masterpiece. Think of it as a small, elite squad of deliciousness.
- For the Crust (the unsung hero):
- 1 ½ cups Graham cracker crumbs: Get the pre-crushed stuff if you’re feeling extra lazy. No judgment.
- ¼ cup granulated sugar: Just a little sweet kiss for our base.
- 6 tablespoons unsalted butter, melted: Because everything is better with butter.
- For the Filling (the star of the show):
- 2 (8-ounce) packages full-fat cream cheese, softened: And by softened, I mean leave it on the counter for a bit. Don’t rush perfection.
- 1 ½ cups powdered sugar (confectioners’ sugar): Sift it if you’re feeling fancy; otherwise, just be prepared to whisk out some lumps.
- 1 teaspoon vanilla extract: The soul of all good desserts. Don’t skip it!
- 1 tablespoon fresh lemon juice (optional, but highly recommended): It’s the secret weapon that cuts through the richness and makes everything sing. Trust me.
- 1 ½ cups heavy cream (cold): The star, the MVP, the reason we’re all here. Make sure it’s **super cold** for the best whipping action.
Step-by-Step Instructions
Alright, apron on (or not, we’re chill like that), let’s get this party started!
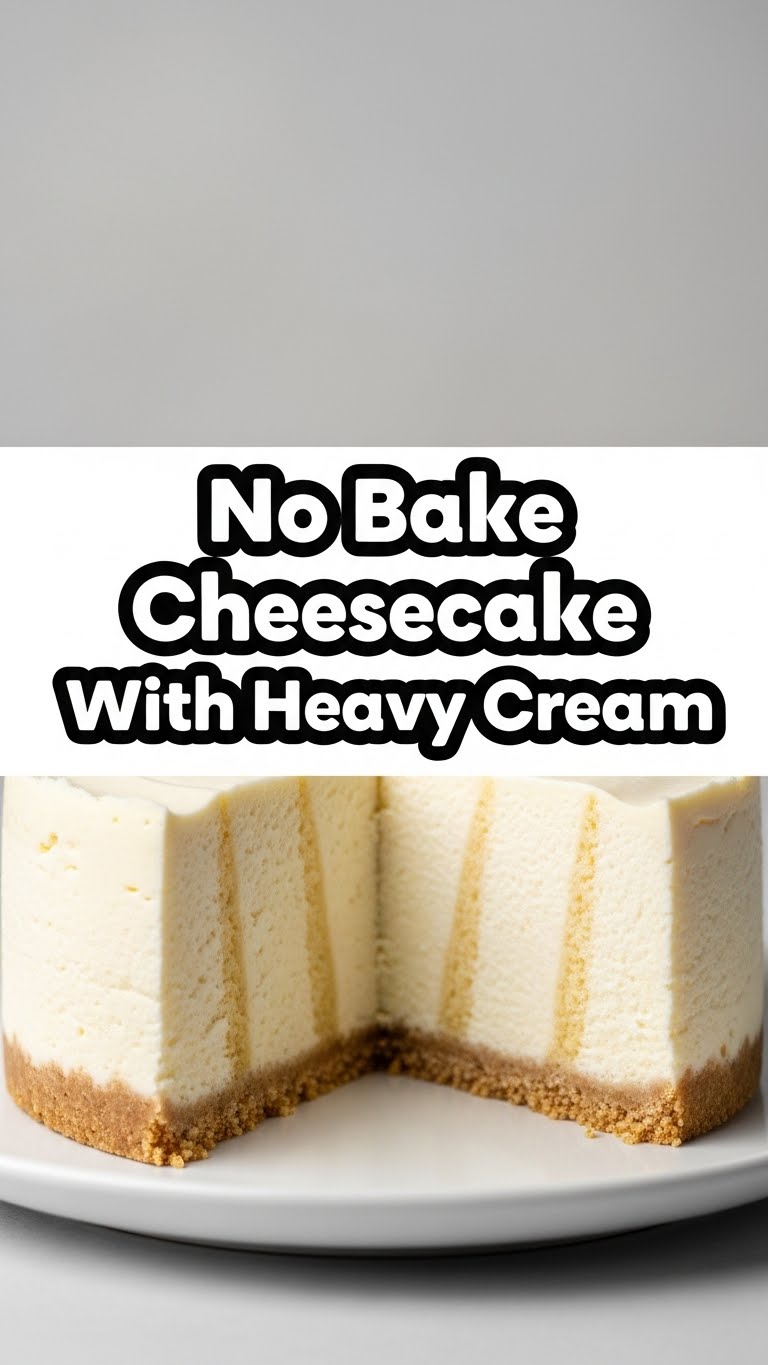
- Crush and Combine the Crust: In a medium bowl, mix your Graham cracker crumbs and granulated sugar. Pour in the melted butter and stir until it’s all nicely moistened and clumpy. It should look like wet sand.
- Press it Down: Press the mixture firmly into the bottom of a 9-inch springform pan. Use the bottom of a glass or your knuckles. You want it packed tight! Pop it in the fridge while you make the filling.
- Whip the Cream Cheese Dream: In a large bowl, beat the softened cream cheese with an electric mixer until it’s super smooth and fluffy. Scrape down the sides of the bowl.
- Sweeten and Flavor: Gradually add the powdered sugar to the cream cheese, beating until well combined. Stir in the vanilla extract and lemon juice (if using). Give it a good scrape and another quick beat.
- Whip the Heavy Cream Hero: In a *separate*, clean, cold bowl (yes, cold helps!), pour in your super cold heavy cream. Beat it with clean beaters on medium-high speed until it forms **stiff peaks**. This means when you lift the beaters, the cream stands up straight like a little mountain. Don’t over-beat, or you’ll have butter!
- Gently Fold Together: Now, for the magic! Gently fold the whipped cream into the cream cheese mixture until just combined. Be careful not to deflate all that lovely air you just whipped into the cream. We want it light and fluffy!
- Assemble and Chill: Pour the glorious filling over your chilled crust. Spread it evenly with a spatula. Cover the pan loosely with plastic wrap and chill in the refrigerator for at least 6 hours, but **ideally overnight**. Patience, grasshopper!
- Serve and Conquer: When you’re ready to serve, carefully remove the sides of the springform pan. Top with fresh berries, chocolate shavings, or whatever makes your heart sing. Slice, serve, and accept all the compliments!
Common Mistakes to Avoid
We’re all about easy street here, but even the easiest roads have a few potholes. Steer clear of these, my friend:
- Not Chilling Long Enough: This isn’t a suggestion, it’s a command! Pulling it out too early is like trying to eat soup with a fork – a runny, disappointing mess. **Give it time.**
- Using Cold Cream Cheese: If your cream cheese isn’t soft, you’ll end up with lumps, and nobody wants lumpy cheesecake. Leave it out for an hour or two.
- Over-Beating the Heavy Cream: Stiff peaks are good. Butter is bad (for this recipe, anyway!). Keep an eye on it; it goes from fluffy to grainy quickly.
- Using Low-Fat Anything: This is cheesecake, not diet food. **Full-fat is your friend** for that rich, creamy texture. Don’t cheat yourself.
Alternatives & Substitutions
Feeling creative? Want to use what you have on hand? I get it. Here are some ideas:
- Crust Swaps: Instead of Graham crackers, try crushed Oreos (chocolatey goodness!), digestive biscuits, shortbread cookies, or even gingersnaps for a spiced kick. Just adjust the sugar slightly depending on how sweet your chosen cookie is.
- Toppings Galore: Fresh berries are classic, but don’t stop there! Drizzle with chocolate sauce, caramel, lemon curd, fruit compote, or a sprinkle of toasted coconut. Get wild!
- Cream Cheese Alternative: If you want to get *really* fancy and extra rich, you can swap half or all of the cream cheese for mascarpone. It’s even creamier, if you can believe it.
- Flavor Boosters: Add a little citrus zest (lemon, orange, or lime) to the filling for an extra zing. Or swap vanilla extract for almond extract for a different flavor profile.
FAQ (Frequently Asked Questions)
- Can I use margarine instead of butter for the crust? Well, technically yes, but why hurt your soul like that? Butter just tastes better, IMO. But if it’s all you have, go for it!
- My cheesecake filling is runny, what did I do wrong? Most likely, your heavy cream wasn’t whipped to stiff peaks, or your cream cheese wasn’t soft enough and created lumps, making it harder to combine smoothly. Or, you didn’t chill it long enough!
- How long does this no-bake cheesecake last? Covered and refrigerated, it’s usually good for 3-5 days. But honestly, it rarely lasts that long in my house.
- Can I freeze this cheesecake? You bet! Wrap it tightly (un-decorated) in plastic wrap and then foil. It’ll keep for about a month. Thaw in the fridge overnight before serving.
- Do I *have* to use lemon juice? No, you don’t *have* to, but it seriously balances the sweetness and richness. It’s like a secret weapon for sophisticated flavor. Try it once!
- What if I don’t have a springform pan? You can use a regular 9-inch pie plate. Just be aware that serving slices might be a bit messier. For easier removal, line a regular round cake pan with parchment paper, leaving an overhang on the sides.
Final Thoughts
So there you have it, my friend! A no-bake cheesecake that’s easy enough for a Tuesday night craving but impressive enough for a dinner party. You’ve officially leveled up your dessert game without even breaking a sweat (or an oven door). Now go impress someone – or yourself, because you totally deserve it – with your new culinary skills. You’ve earned it! Happy chilling, and even happier eating!

