So you’re craving something utterly divine, a little bit fancy, but let’s be real, you’re not trying to win any pastry chef awards today, huh? Same. What if I told you we could whip up some ridiculously good chocolate truffles with chopped nuts, and it’s so simple you’ll wonder why you ever bought them from a store? Spoiler alert: you’ll never go back.
Why This Recipe is Awesome
Okay, let’s be honest. Most dessert recipes sound like they require a science degree and the patience of a saint. Not this one! This recipe for chocolate truffles is basically foolproof. We’re talking minimal effort for maximum deliciousness. It’s no-bake, which means no oven-watching anxiety, and fewer dishes to wash—a win-win in my book.
Plus, these aren’t just any truffles. We’re adding chopped nuts for that perfect crunch, a textural party in your mouth! It’s the kind of treat that looks super impressive but is shockingly easy to make. Your friends will think you’re a culinary genius, and you can just smile enigmatically.
Ingredients You’ll Need
Gather ’round, my sweet-toothed companions! Here’s the small but mighty list of what you’ll need. No exotic foraging required, promise.
- Good Quality Dark Chocolate (250g / about 9 oz): This is the star of the show, so don’t skimp! Aim for 60-70% cocoa solids. Life’s too short for bad chocolate, IMO.
- Heavy Cream (125ml / about 1/2 cup): Also known as whipping cream. This is our magic potion for ultimate creaminess.
- Unsalted Butter (1 tablespoon): Just a tiny knob for extra richness and a silky texture. Don’t skip it unless you actively dislike joy.
- Vanilla Extract (1 teaspoon): A little splash for that warm, comforting “oomph.”
- Pinch of Salt: Seriously, just a pinch! It makes the chocolate taste even more chocolatey. Trust me on this one.
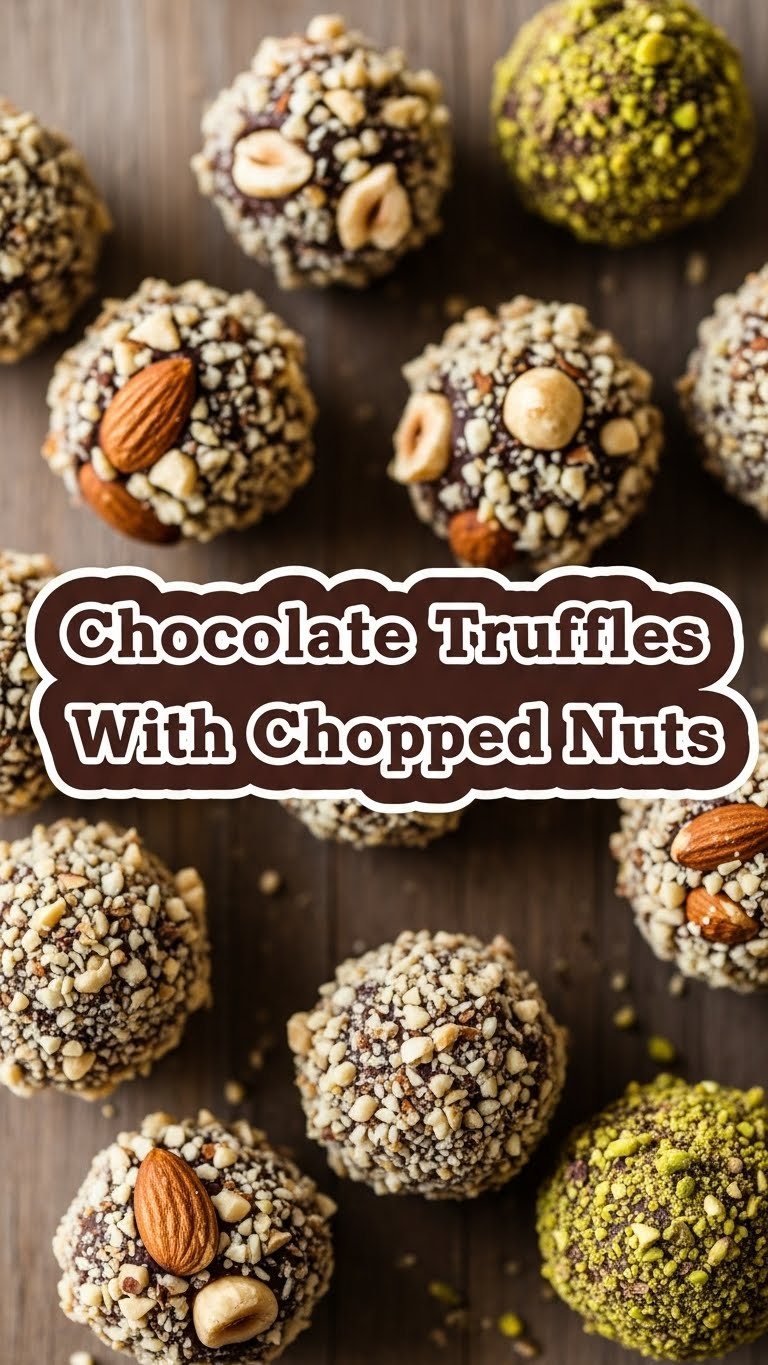
- Your Favorite Chopped Nuts (about 1/2 cup): Pecans, walnuts, almonds, hazelnuts – go wild! Or a mix! Toast them lightly beforehand for extra flavor if you’re feeling fancy.
- Optional Coatings: Cocoa powder, powdered sugar, shredded coconut, or even more chopped nuts for rolling.
Step-by-Step Instructions
- Get Chopping: First things first, grab that glorious dark chocolate and chop it into small, uniform pieces. The smaller they are, the faster they’ll melt. Pop them into a heat-proof bowl and set aside.
- Heat Things Up: In a small saucepan, gently heat the heavy cream and butter over medium heat. Stir occasionally until the butter is melted and the cream just begins to simmer around the edges. Do not boil! We’re making ganache, not soup.
- The Magic Pour: Immediately pour the hot cream mixture over your chopped chocolate. Let it sit undisturbed for about 5 minutes. This gives the hot cream time to melt the chocolate evenly. Don’t touch it!
- Stir to Silky Perfection: After 5 minutes, grab a whisk or spatula and start stirring gently from the center outwards. Keep stirring until the mixture is completely smooth, glossy, and beautifully combined. Stir in the vanilla extract and that tiny pinch of salt.
- Chill Out: Cover the bowl with plastic wrap and pop it into the fridge. Let it chill for at least 2-3 hours, or until it’s firm enough to scoop. You want it firm, but not rock-hard.
- Roll with It: Once firm, scoop out small portions of the chocolate mixture (a melon baller or a teaspoon works great). Quickly roll them between your palms into bite-sized balls. Work fast because your hands’ warmth will make them melt!
- Nutty Finish: Spread your chopped nuts (or other coatings) on a shallow plate. Roll each truffle in the nuts until it’s nicely coated. Gently press to make sure they stick.
- Final Chill: Arrange your beautiful truffles on a parchment-lined tray and pop them back into the fridge for at least 30 minutes to firm up completely. Now you can truly admire your handiwork.
Common Mistakes to Avoid
Listen, we’ve all been there. Here’s a quick heads-up on how to sidestep some common truffle blunders:
- Overheating the Cream: If your cream boils, it can scorch the chocolate and create a grainy ganache. Keep it gentle! We’re aiming for warm, not volcanic.
- Not Chilling Enough: Impatience is a virtue sometimes, but not here! If your ganache isn’t properly chilled, it will be a sticky, melty mess when you try to roll it. Seriously, chill it adequately.
- Using Low-Quality Chocolate: Remember that “life’s too short for bad chocolate” thing? It applies double here. Cheap chocolate often has less cocoa butter, which affects the texture and flavor of your truffles.
- Handling Too Much: When rolling, work quickly. The heat from your hands can melt the truffles fast, making them sticky. If they get too soft, pop them back in the fridge for a few minutes.
Alternatives & Substitutions
Feeling creative? Good! Here are some fun ways to mix things up:
- Nut Swaps: Not a fan of pecans? Try toasted almonds, pistachios, hazelnuts, or even crushed peanuts! For a nut-free version, roll them in toasted shredded coconut or finely crushed cookies.
- Chocolate Varieties: You can absolutely use milk chocolate for a sweeter truffle, or even white chocolate (though white chocolate might need a little less cream as it’s softer). Adjust sweetness by adding a touch of powdered sugar if needed.
- Flavor Boosters: A splash of liqueur (think Kahlua, Amaretto, or Grand Marnier) instead of some of the vanilla can elevate these to adult-only territory. Espresso powder also works wonders to deepen the chocolate flavor. Orange zest is fantastic too!
- Other Coatings: Beyond nuts, try rolling your truffles in cocoa powder, powdered sugar, finely crushed freeze-dried raspberries (for a tart kick!), sprinkles, or even finely chopped pretzels for a sweet-and-salty vibe.
FAQ (Frequently Asked Questions)
Got questions? I probably anticipated them. Let’s chat:
- Do I have to use dark chocolate? Well, no, but it really gives you that intense, rich flavor that makes truffles sing. If you prefer a sweeter treat, use milk chocolate, but be prepared for a slightly softer truffle.
- Can I skip the butter? You *can*, but that tablespoon of butter adds a lovely smoothness and a bit of gloss to your truffles. It’s a small indulgence that makes a big difference in texture.
- My ganache isn’t firming up, help! Did you measure correctly? Was your cream too hot? The most common culprit is not enough chilling time or too warm a kitchen. Pop it back in the fridge for longer, maybe even an hour or two extra.
- How long do these truffles last? Stored in an airtight container in the fridge, they’ll happily last for about a week. But honestly, good luck keeping them around that long!
- Can I freeze these truffles? Absolutely! Arrange them on a parchment-lined tray and freeze until solid, then transfer to an airtight freezer-safe container. They’ll last for a month or two. Thaw in the fridge before serving.
- What kind of nuts are best? Whatever you love! I’m a big fan of toasted pecans or walnuts for that classic flavor. Hazelnuts are also amazing if you’re going for a Ferrero Rocher vibe.
Final Thoughts
See? Told ya it was easy peasy lemon squeezy, but with chocolate! You just made something incredibly delicious and impressive with minimal fuss. Now go impress someone—or yourself—with your new culinary skills. You’ve earned it!
These truffles are perfect for gifting, bringing to a potluck (if you can bear to share), or simply enjoying with a good book and a cup of coffee. Don’t forget to pat yourself on the back. You’re a chocolate wizard, you!


