So you’re craving something tasty but too lazy to spend forever in the kitchen, huh? Same.
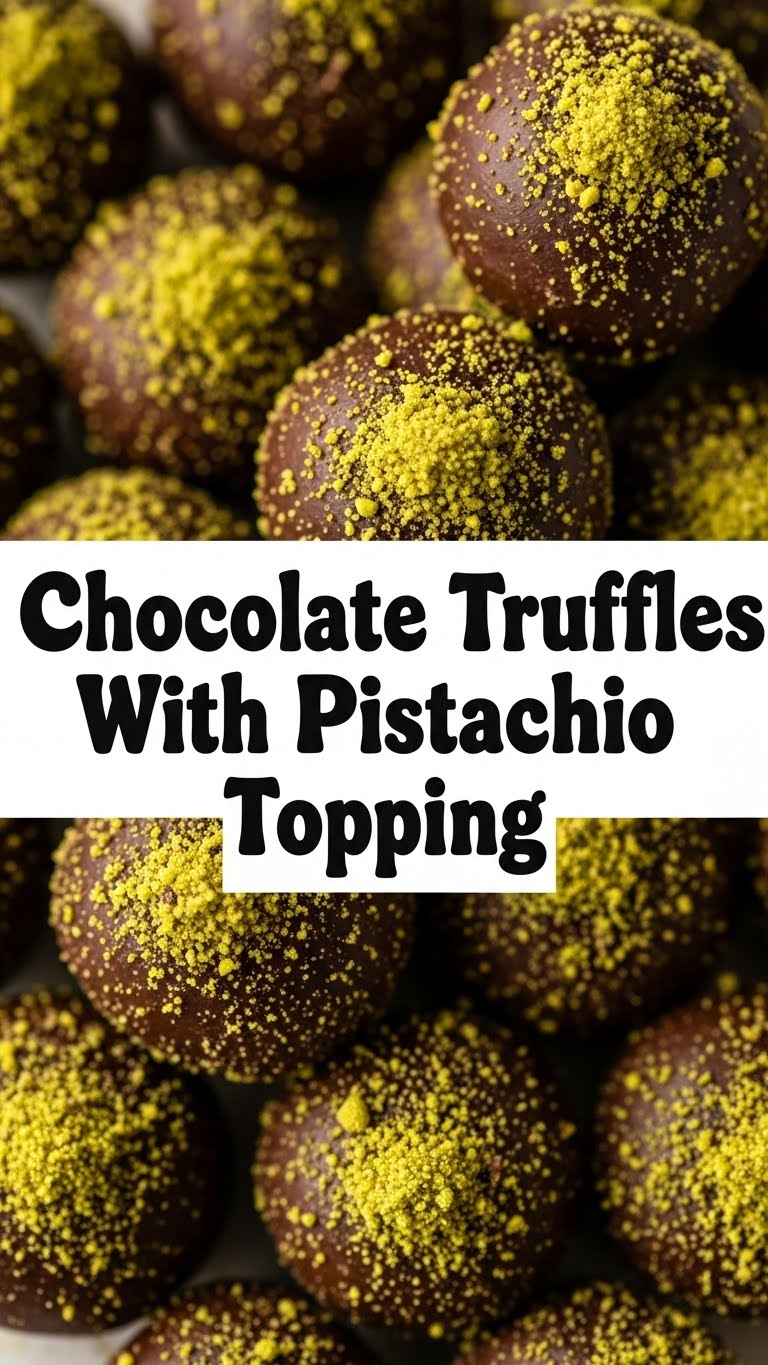
Let’s be real, sometimes you just want that fancy-schmancy dessert vibe without the fancy-schmancy effort. Enter: Chocolate Truffles with Pistachio Topping! These little balls of joy are practically a magic trick – minimum fuss, maximum “OMG, you made these?!” factor. We’re talking rich, melt-in-your-mouth chocolate with a pop of vibrant green pistachio crunch. It’s like a tiny, edible party in your mouth, and you’re invited!
Why This Recipe is Awesome
Okay, let’s break it down. Why is *this* particular truffle recipe going to be your new best friend? First off, it’s **idiot-proof**. Seriously, even I, someone who once accidentally set off a smoke detector with toast, can nail these. Secondly, the prep time is ludicrously short. Most of the waiting is just chilling, which means you can binge-watch your favorite show while they firm up. Third, the pistachio topping isn’t just for looks (though it does make them look super bougie, FYI). It adds this amazing salty, nutty counterpoint to the deep chocolate, creating a flavor combo that’s truly next-level. You’ll feel like a master chocolatier without needing a degree.
Ingredients You’ll Need
Gather ’round, my aspiring dessert wizards! Here’s your simple shopping list:
* 340g (12 oz) Good Quality Dark Chocolate: Don’t skimp here, people! This is the star of the show. Aim for something 60-70% cacao. Think of it as a tiny investment in your happiness.
* 180ml (3/4 cup) Heavy Cream: The secret to that luscious, smooth ganache. Full-fat, please. This isn’t the time for calorie counting, it’s the time for creamy dreams.
* 2 tablespoons Unsalted Butter: Just a tiny bit for extra richness and shine. Because why not? We’re already making truffles, let’s live a little!
* 1 teaspoon Vanilla Extract: A little warm hug for your chocolate. Always a good idea.
* 1/2 cup Shelled Pistachios: Unsalty or lightly salted work best. These are our green jewels, providing that glorious crunch and color.
* Pinch of Sea Salt (Optional, but highly recommended): Just a tiny sprinkle in the ganache can really make the chocolate sing.
Step-by-Step Instructions
Let’s get this delicious show on the road!
- Chop It Up: Grab your chocolate bar and give it a good chop into small, even pieces. The smaller the pieces, the faster and more smoothly it’ll melt. Pop these into a heat-proof bowl. While you’re at it, finely chop those pistachios and spread them out on a plate or shallow dish.
- Heat the Cream: Pour your heavy cream into a small saucepan. Heat it over medium heat until it just begins to simmer and tiny bubbles appear around the edges. Don’t let it boil vigorously! We’re not making soup here.
- Melt the Chocolate Magic: Immediately pour the hot cream over your chopped chocolate. Let it sit for about 5 minutes, untouched. This gives the hot cream time to do its melting magic.
- Stir in the Goodness: After 5 minutes, grab a whisk or a spatula and gently stir the mixture from the center outwards until it’s completely smooth and glossy. If you still have a few stubborn unmelted bits, pop the bowl over a saucepan of simmering water (a “bain-marie” if you’re feeling fancy) and stir until smooth, but don’t let the bowl touch the water.
- Butter and Vanilla Time: Add the butter and vanilla extract to your smooth ganache. Stir until the butter is fully melted and incorporated. Give it a taste (careful, it’s warm!). Add that tiny pinch of sea salt if you’re using it now.
- Chill Out: Cover the bowl with plastic wrap, pressing it directly onto the surface of the ganache to prevent a skin from forming. Pop it in the fridge for at least 2-3 hours, or until it’s firm enough to scoop but still pliable. Patience is key here!
- Roll ‘Em Up: Once firm, use a small spoon or a mini ice cream scoop to portion out the ganache. Roll it between your palms to form nice, round truffles. They don’t have to be perfectly spherical – rustic has charm!
- Pistachio Glamour: Immediately roll each truffle in the chopped pistachios, gently pressing them on so they stick.
- Final Chill: Place your finished truffles on a parchment-lined plate or tray and return them to the fridge for another 30 minutes to set completely.
Common Mistakes to Avoid
Even though this recipe is pretty foolproof, there are a few snags you can, well, snag yourself on. Learn from my past errors!
* Overheating the Cream: If your cream boils aggressively, it can scorch and taste weird. Plus, it might make your ganache greasy. Just gentle simmering, please!
* Not Chilling Enough: Trying to roll liquid chocolate? Good luck, champ. You’ll end up with a sticky, melted mess all over your hands. Patience. Is. Key. I can’t stress this enough.
* Using Sub-Par Chocolate: Seriously, don’t buy that waxy stuff. The chocolate is the main event, so choose wisely. Your taste buds will thank (or curse) you.
* Manhandling the Ganache: When stirring, be gentle. Over-whipping can incorporate too much air or even “break” the emulsion, making it look grainy.
* Thinking you can eat just one: LOL. This is a common mistake for everyone. Just embrace it.
Alternatives & Substitutions
Feeling adventurous? Want to make it your own? Here are some ideas:
* Chocolate Type: You can absolutely use milk chocolate for a sweeter, creamier truffle, or even white chocolate (though white chocolate ganache can be a bit trickier, FYI). If using milk or white, you might want to slightly reduce the butter as they’re often richer.
* Toppings Galore: No pistachios? No problem! Roll them in cocoa powder for a classic look, sprinkles for fun, toasted coconut flakes, finely crushed pretzels for salty crunch, or even other chopped nuts like almonds or walnuts.
* Flavor Boosts: Add a tablespoon of your favorite liqueur (rum, Kahlua, Grand Marnier) to the ganache with the butter for an adult kick. Orange zest, a tiny dash of peppermint extract, or a pinch of cinnamon can also be divine.
* Dairy-Free Dreamin’: If you’re avoiding dairy, use full-fat canned coconut cream instead of heavy cream. Make sure it’s well-chilled, and scoop out only the thick cream from the top. The flavor will be slightly different (hello, subtle coconut!), but still delicious.
FAQ (Frequently Asked Questions)
* How long do these truffles last? If you can manage not to eat them all in one go (impressive!), they’ll last in an airtight container in the fridge for up to 2 weeks.
* Can I use milk chocolate instead of dark? Absolutely! Just be aware they’ll be sweeter. IMO, dark chocolate provides a better canvas for the pistachio.
* Do I really have to chill the ganache for so long? Yes, unless you enjoy sticky hands, a messy kitchen, and sad, flat truffles. The chilling time is crucial for scoopability!
* My ganache looks separated/oily, what happened? Don’t panic! This usually means it’s either too hot or too cold, or it’s been over-stirred. Try adding a tablespoon of warm cream (if it’s too cold) or gently warming it slightly over a bain-marie and whisking vigorously. It often comes back together!
* Can I freeze these truffles? You bet! Once fully set, place them in a single layer on a parchment-lined tray to freeze solid, then transfer them to an airtight container or freezer bag. They’ll last for a couple of months. Thaw in the fridge before serving.
* What if I don’t have vanilla extract? You can skip it, but it does add a lovely depth of flavor. A tiny pinch of instant coffee granules (dissolved in the warm cream) can also enhance the chocolate flavor.
* Can I skip the butter? Technically yes, but why deny yourself that extra silky texture and beautiful sheen? The butter truly makes them *melt* in your mouth.
Final Thoughts
And there you have it, my friend! You’ve just unlocked the secret to creating truly impressive (and ridiculously easy) chocolate truffles. These little beauties are perfect for gifting, bringing to a dinner party, or, let’s be honest, devouring solo on the couch while catching up on your favorite show. Now go impress someone—or yourself—with your new culinary skills. You’ve earned it! Enjoy!


