So you’re scrolling through TikTok, saw some fancy dessert, and thought “I could totally make that… if it didn’t take three days and a culinary degree,” right? **Same, friend, same.** Good news: I’ve got your back with a recipe so ridiculously easy, it feels like cheating. We’re talking about those dreamy, creamy, melt-in-your-mouth Coconut Truffles with extra coconut sprinkled on top, because why wouldn’t we double down on the coconut? Let’s dive into making something delicious without needing a small loan or an engineering degree.
Why This Recipe is Awesome
Okay, so why should you bother with *these* truffles? Well, for starters, they require **zero baking**. Let that sink in. Zero. As in, you won’t even need to preheat your oven, which, let’s be honest, is a win in itself. This recipe is practically idiot-proof. Seriously, I’ve made it when I’m half-asleep and still managed to produce edible, nay, *delicious* results. It’s quick, uses minimal ingredients, and tastes like you spent hours slaving away, when in reality, you probably spent more time choosing which playlist to listen to while mixing. **It’s the ultimate ‘I tried’ dessert with minimal actual effort.** You’re welcome.
Ingredients You’ll Need
Gather ’round, my sweet-toothed companions! Here’s your simple shopping list. Nothing fancy, just good stuff:
- **1 (14-ounce/397g) can Sweetened Condensed Milk**: This is our secret weapon, the magical glue that holds all the deliciousness together. Don’t even *think* about substituting it for evaporated milk; that’s a whole different vibe, and not the one we want here.
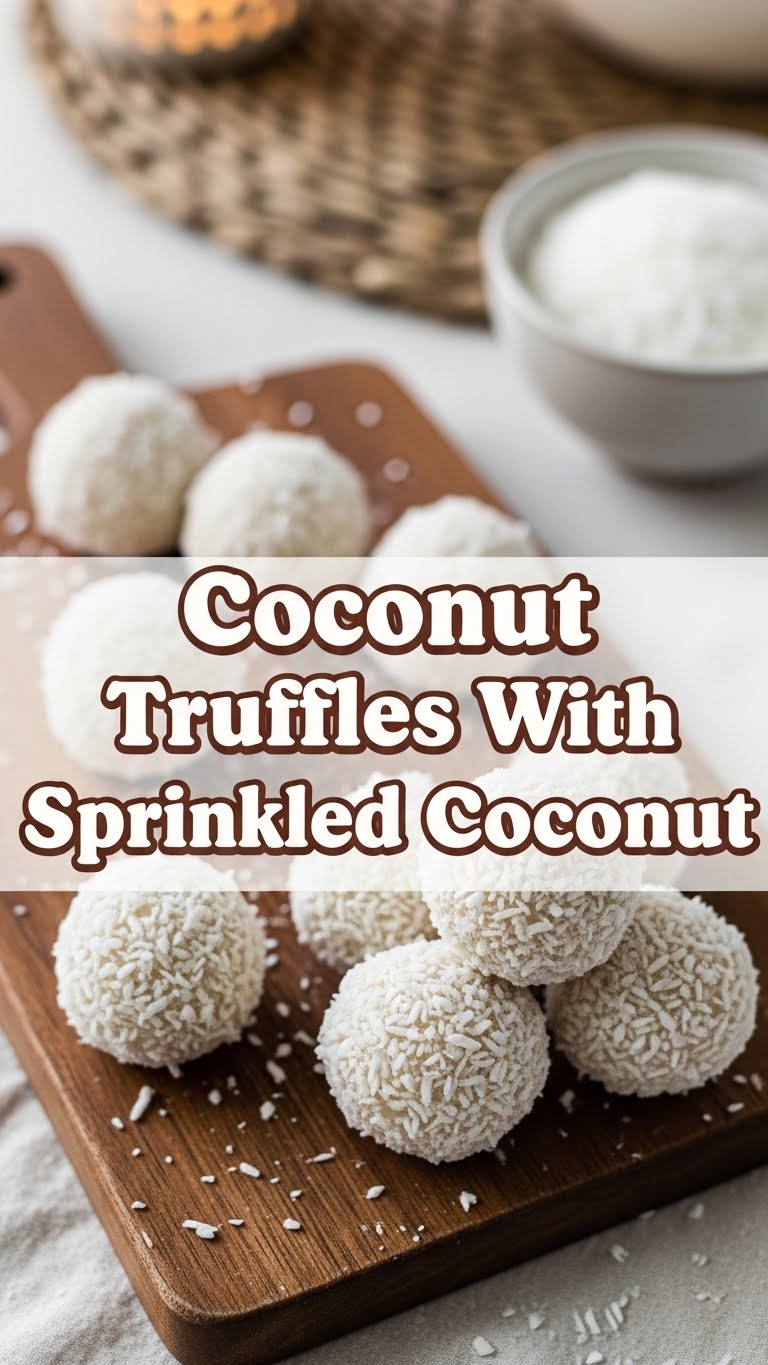
- **4 cups (about 340g) Desiccated Coconut**: The star of the show! Make sure it’s desiccated, not fresh shredded coconut, unless you want a wetter, less truffle-y result. We want dry and ready to soak up all that milky goodness.
- **1 teaspoon Vanilla Extract**: A little splash of this makes everything taste better. It’s like the unsung hero of the dessert world.
- **A tiny pinch of Salt**: Yes, really! It balances the sweetness and makes the coconut flavor pop. Don’t skip it; your taste buds will thank you.
- **Extra Desiccated Coconut for rolling**: Because we’re extra like that. It gives them that perfect snowy, textured finish.
Step-by-Step Instructions
Alright, let’s get down to business. Prepare to be amazed by how easy this is.
- **Mix the Wet Stuff**: Grab a medium-sized bowl. Pour in the entire can of sweetened condensed milk. Add the vanilla extract and that tiny pinch of salt. Stir it all together until it’s well combined. It should look creamy and inviting.
- **Introduce the Coconut**: Now, gradually add the 4 cups of desiccated coconut to the wet mixture. Use a sturdy spoon or a rubber spatula to mix it all up. You want to make sure every strand of coconut is coated with that glorious milky mixture.
- **Chill Out, Literally**: Once everything is thoroughly mixed, cover the bowl with plastic wrap. Pop it into the fridge for at least 30 minutes. **This chilling step is crucial!** It firms up the mixture, making it much easier to roll into balls later. Trust me, you don’t want a sticky, melty mess.
- **Roll ‘Em Up**: Take the chilled mixture out of the fridge. Pour your extra desiccated coconut into a shallow dish or plate for rolling. Now, scoop out about a tablespoon of the coconut mixture. Roll it gently between your palms to form a small, bite-sized ball.
- **Give Them a Coconut Coat**: Immediately roll each formed truffle in the dish of extra desiccated coconut, ensuring it’s fully coated. Place the finished truffles on a parchment paper-lined plate or tray.
- **Chill Again (Patience, Grasshopper!)**: Once you’ve rolled all your truffles, place the tray back into the fridge for another 15-20 minutes. This helps them set completely and become perfectly firm.
Common Mistakes to Avoid
Even though this recipe is super chill, there are a couple of pitfalls you can easily sidestep:
- **Skipping the Chill Time**: This is probably the number one mistake. If you try to roll the mixture when it’s still warm and soft, you’ll end up with sticky hands and sad, misshapen blobs. **Don’t rush the chill!**
- **Using the Wrong Coconut**: Make sure it’s *desiccated* coconut (the fine, dry kind). Shredded coconut (especially the moist, sweetened kind) will give you a different texture, and not in a good way for truffles.
- **Under-mixing**: Make sure all the coconut is evenly coated. A dry patch means a crumbly truffle, and nobody wants that.
- **Forgetting the Salt**: Seriously, that tiny pinch makes a huge difference. It stops the truffles from tasting *just* sweet and brings out all those lovely coconut notes.
Alternatives & Substitutions
Feeling a bit adventurous? Here’s how you can play around with these little gems:
- **Flavor Boosts**: Swap out some of the vanilla extract for a different flavor. Almond extract is fantastic, or try a tiny splash of rum extract for a piña colada vibe. A little orange or lemon zest grated in would also be divine!
- **Chocolate Dip**: Instead of rolling in extra coconut, you could melt some good quality chocolate (dark, milk, or white!) and dip your truffles in it. Let them set on parchment paper.
- **Toasted Coconut**: For an extra layer of flavor and crunch, lightly toast some of the extra desiccated coconut in a dry pan over medium-low heat until golden brown. Let it cool completely before rolling your truffles in it. Yum!
- **Boozy Bits (Adults Only!)**: Add a tablespoon or two of a liqueur like Malibu, Kahlua, or Amaretto to the mixture with the vanilla extract. Go easy, though, you don’t want to make it too wet.
FAQ (Frequently Asked Questions)
Got questions? I’ve got (casual) answers!
- **Can I use fresh coconut?** Well, technically you *could*, but the texture would be much softer and wetter. You’d likely need to dry it out significantly, and the ratio would be totally different. For these truffles, stick to desiccated. Why make life harder?
- **How long do these last?** In an airtight container in the fridge, they’ll happily hang out for about a week. **FYI**, they rarely last that long in my house.
- **Can I freeze them?** Absolutely! Pop them in an airtight container or freezer bag and freeze for up to 2-3 months. Thaw in the fridge or at room temperature for a quick treat. Future you will thank you.
- **Why is my mixture too sticky to roll?** A couple of reasons: either it didn’t chill long enough (go back to step 3!), or your hands are just super warm. Try chilling it longer, or if your hands are the issue, run them under cold water before rolling each batch.
- **Do I have to use sweetened condensed milk?** For this specific recipe and its signature texture and sweetness, yes. There isn’t a direct substitute that will give you the same results without significant recipe changes. **IMO**, it’s irreplaceable here.
- **Can I add food coloring?** Go wild! A drop or two of gel food coloring mixed into the condensed milk can make these truffles vibrant and fun for parties. Pink coconut truffles for a baby shower? Yes please!
Final Thoughts
There you have it, folks! Easy, breezy, delicious coconut truffles that are pretty much guaranteed to make you look like a kitchen rockstar without breaking a sweat. Whether you’re making them for a party, a gift, or just to satisfy your own sweet tooth (no judgment here!), you’re in for a treat. Now go impress someone—or yourself—with your new culinary skills. You’ve earned it! Happy truffle-making!


