So you’re craving something impossibly creamy, ridiculously smooth, and topped with a luscious, shimmering caramel? And you want it to be *easy*? My friend, you’ve come to the right place. Forget those overly complicated dessert recipes that make you want to throw your apron at the wall. We’re making Flan with Caramel Topping, and trust me, it’s going to be so good, you’ll wonder if you secretly went to pastry school overnight. Spoiler alert: you didn’t. This recipe just makes you look like a genius.
Why This Recipe is Awesome
Because it’s practically idiot-proof, even for those of us who occasionally burn water (no judgment, we’ve all been there). It uses simple ingredients you probably already have, doesn’t require a bazillion fancy tools, and honestly, it looks way more impressive than the effort it takes. Plus, that wobbly, custardy perfection with a pour-over of golden caramel? It’s basically a hug in dessert form. And who doesn’t need a delicious hug sometimes?
Ingredients You’ll Need
- For the Caramel:
- 1 cup Granulated Sugar: The regular stuff. Not the fancy chunky kind, unless you like a challenge.
- 1/4 cup Water: Just a splash to get things going.
- For the Flan:
- 1 (14-ounce) can Sweetened Condensed Milk: The magical elixir that makes this flan so rich and creamy. Don’t skimp!
- 1 (12-ounce) can Evaporated Milk: Because more milk equals more custardy goodness.
- 4 Large Eggs: These are our binder. They hold the deliciousness together.
- 1 teaspoon Vanilla Extract: **Don’t skip this!** It’s the secret weapon for that classic flan flavor. Use good quality if you can.
- Pinch of Salt: Just a tiny bit to balance the sweetness. It’s like a secret handshake for your taste buds.
Step-by-Step Instructions
- Preheat & Prep: First things first, get your oven ready. Preheat it to 350°F (175°C). Grab a 9-inch round cake pan or an 8-inch square baking dish. We’ll also need a larger roasting pan for our water bath – don’t worry, it’s not as scary as it sounds.
- Caramel Time: In a medium, heavy-bottomed saucepan, combine the 1 cup of granulated sugar and 1/4 cup of water. Cook over medium heat, swirling the pan occasionally (but resist stirring with a spoon, seriously!). Watch it like a hawk. The sugar will melt, then bubble, and finally turn into a beautiful amber-gold caramel. **This happens fast at the end, so don’t walk away!**
- Pour the Gold: Once it’s that gorgeous amber color, immediately and carefully pour the hot caramel into your prepared cake pan. Swirl the pan gently to coat the bottom evenly. Be careful, it’s super hot! Set it aside to cool and harden.
- Flan Batter Blitz: In a large bowl, whisk together the sweetened condensed milk, evaporated milk, eggs, vanilla extract, and that tiny pinch of salt until everything is beautifully combined and smooth. No lumps allowed!
- Strain for Perfection: Now, for a pro tip: pour the flan mixture through a fine-mesh sieve directly into your caramel-lined pan. This step removes any rogue egg bits or bubbles, ensuring an ultra-smooth, silky flan.
- Water Bath Bliss: Carefully place your flan pan into the larger roasting pan. Now, carefully pour hot water into the larger pan until it comes about halfway up the sides of the flan pan. This water bath (bain-marie, if you’re fancy) helps the flan cook gently and evenly, preventing cracks.
- Bake It Up: Gently slide the whole setup into your preheated oven. Bake for 50-60 minutes, or until the edges are set but the center still jiggles slightly when you gently shake the pan. A knife inserted near the edge should come out clean.
- Cool Down: Carefully remove the roasting pan from the oven, then lift the flan pan out of the water bath. Let it cool completely on a wire rack to room temperature. This is the hardest part: patience!
- Chill Out: Once cool, cover the flan pan with plastic wrap and refrigerate for at least 4 hours, or even better, overnight. **Chilling is non-negotiable for a perfect flan!**
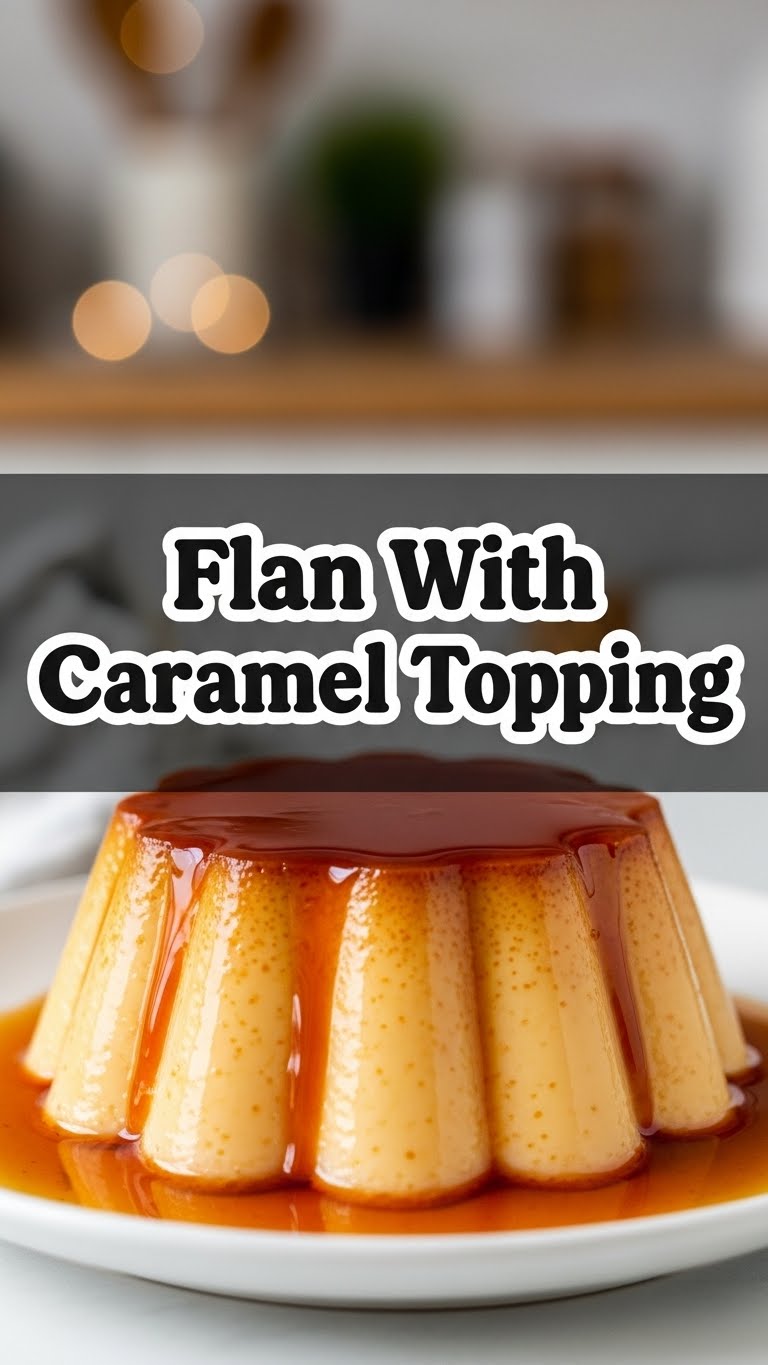
- The Big Reveal: When you’re ready to serve, run a thin knife around the edge of the flan to loosen it. Place a serving plate upside down over the flan pan. In one swift, confident motion, flip the flan pan and plate over. The flan should slide out, releasing all that gorgeous caramel on top. Ta-da!
Common Mistakes to Avoid
- Stirring the Caramel: Seriously, don’t stir it with a spoon! Swirl the pan instead. Stirring can cause sugar crystals to form, leading to grainy caramel. Nobody wants that.
- Burning the Caramel: This stuff goes from perfect to charcoal in about 0.2 seconds. Stay alert! If it turns too dark, it’ll be bitter, and you’ll have to start over. (Sad face.)
- Skipping the Sieve: You might think it’s an unnecessary step, but straining the custard mixture ensures that unbelievably smooth texture. **Don’t be lazy on this one!**
- Not Chilling Enough: Pulling the flan out of the fridge too early is a recipe for disaster. It needs to firm up properly to hold its shape and for the caramel to fully liquify and coat it.
- Forgetting the Water Bath: This isn’t just for show. It provides gentle, even heat, preventing your flan from curdling or cracking. It’s a key player for that silky texture.
Alternatives & Substitutions
Feeling a little rebellious? Here are some tweaks:
- Flavor Boost: Want to get wild? Add a tablespoon of rum or Kahlúa to the flan mixture for an adult twist. Or, infuse the milk with a cinnamon stick or orange peel for an hour before mixing for subtle flavor.
- Milk Swap: While I **highly recommend** the condensed and evaporated milk combo for that classic richness, you *could* use whole milk and a bit more sugar if you’re in a pinch, but the texture won’t be quite as dreamy. IMO, stick to the recipe here!
- Tiny Flans: Instead of one big flan, make individual servings! Pour the caramel and flan mixture into ramekins. Adjust baking time – they’ll probably be done in 30-40 minutes. Adorable and perfect for parties!
FAQ (Frequently Asked Questions)
- My caramel hardened instantly when I poured it into the pan. Did I mess up?
Nope, totally normal! It hardens quickly as it cools. That’s actually what you want. It will re-liquefy beautifully when the flan is baked and chilled. Just be sure to swirl it to coat the bottom before it sets completely. - Can I use light condensed milk?
Technically yes, but why would you want to deprive yourself of that full-fat creamy goodness? It’s dessert, live a little! It might affect the richness slightly, but it won’t ruin it. - My flan cracked on top! What happened?
This usually means it overbaked or the water bath wasn’t deep enough. A deeper water bath and watching the jiggle test closely will help prevent this next time. Don’t worry, it still tastes amazing! - How long does flan last in the fridge?
Properly covered, it’ll last about 4-5 days. But honestly, it rarely lasts that long in my house. It tends to vanish like magic. - Can I make this ahead of time?
Absolutely! In fact, it’s better made a day in advance. This gives it plenty of time to chill and for the flavors to fully meld. It’s the ultimate make-ahead dessert!
Final Thoughts
So there you have it, folks! Your new favorite dessert that’s guaranteed to impress, even if your biggest culinary achievement before this was successfully boiling an egg. Go forth, make this flan, and bask in the glory of your delicious creation. You’ve earned it, you rockstar! Now go impress someone—or yourself—with your new culinary skills. You’ve earned it!


