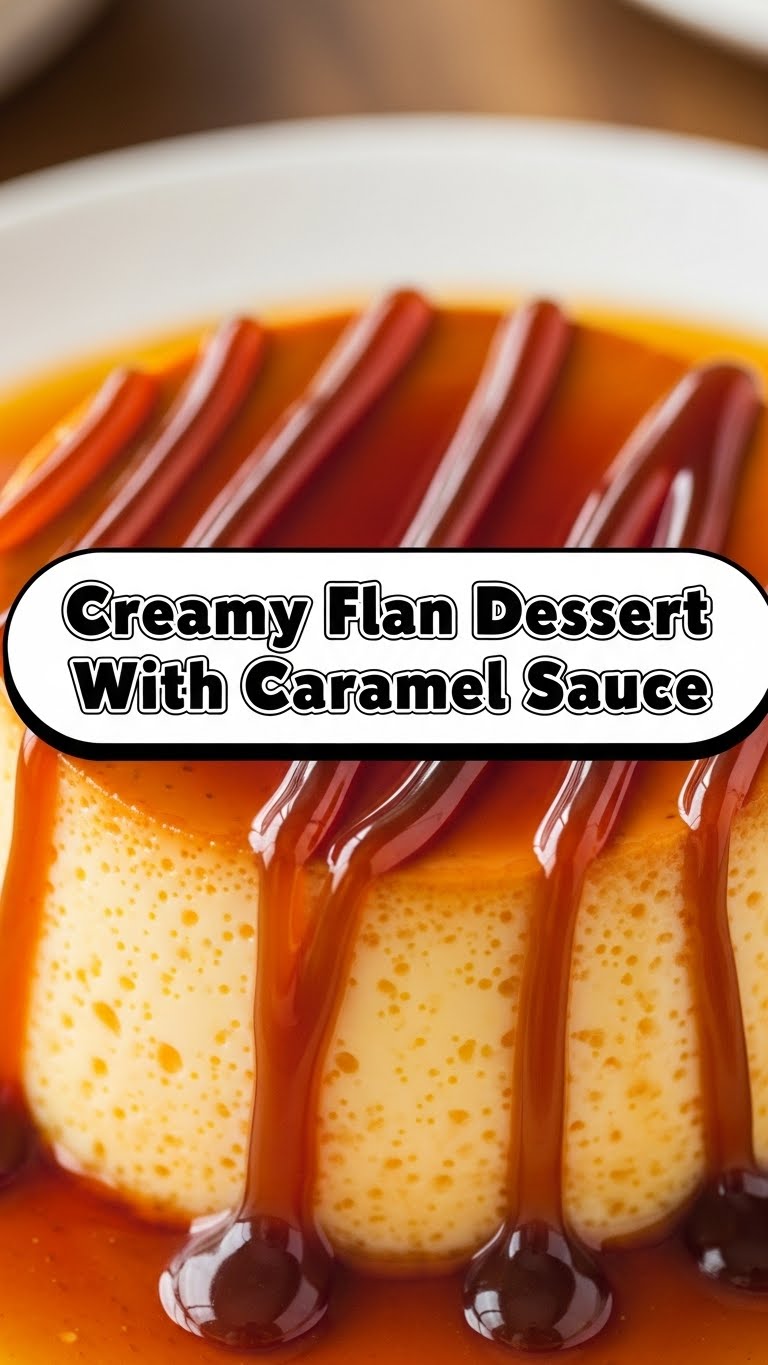
So you’re craving something that screams ‘fancy dessert’ but whispers ‘super easy to make,’ huh? And your sweet tooth won’t quit, but your patience for complicated recipes ran out last Tuesday? Welcome to the club, friend. TBH, mine did too. Today, we’re diving headfirst into the creamy, dreamy world of flan, because life’s too short for boring desserts (and complicated cooking instructions). Get ready to feel like a culinary genius without actually trying too hard!
Why This Recipe is Awesome
Okay, so why bother with this flan recipe when there are, like, a million others out there? Simple. This isn’t just any flan; it’s the kind of flan that makes people think you secretly went to culinary school. It’s **ridiculously easy**, seriously. Even if your culinary skills are usually limited to microwaving popcorn, you got this. Plus, it’s a make-ahead champion, meaning less stress when guests are coming (or when your own craving hits hard). **It’s basically idiot-proof**, and yes, I’m speaking from personal experience. No judgment.
Ingredients You’ll Need
- Sugar (granulated, about 1 cup): For that magical caramel base. Don’t skimp, it’s dessert, remember?
- Whole Milk (2 cups): Go full fat or go home. This is for creaminess, people!
- Sweetened Condensed Milk (1 can, 14 oz): The secret weapon for ultimate richness and sweetness. Seriously, bless this can.
- Evaporated Milk (1 can, 12 oz): More milk, more creaminess, less effort. It’s a team effort.
- Large Eggs (4-5): The binding force, the structure, the flan-ness. Whisk ’em good.
- Vanilla Extract (1-2 tsp): Because everything is better with vanilla. It’s a fact.
- Pinch of Salt: Just a tiny bit to make all that sweetness pop. Don’t skip it, trust me.
- Optional: Rum or Brandy (1 tbsp): For an adult twist, if you’re feeling fancy. YOLO!
Step-by-Step Instructions
- Caramel Time! Grab a heavy-bottomed saucepan. Pour in about 1/2 cup of your sugar. Heat it over medium-low, **don’t stir it initially!** Just let it melt and turn golden brown. Once it starts melting, you can gently swirl the pan. When it’s a beautiful amber, quickly pour it into your flan mold (a 9-inch round pan works great) and swirl to coat the bottom. Be quick, it hardens fast!
- Preheat & Prep. Get your oven preheated to 350°F (175°C). While it’s heating, grab a larger roasting pan – this is for your water bath, aka *bain-marie*. Safety first, folks.
- Flan Batter Assembly. In a large bowl, whisk together the whole milk, sweetened condensed milk, evaporated milk, eggs, vanilla extract, and that tiny pinch of salt. Whisk until it’s all beautifully combined and smooth. **Don’t over-whisk and create tons of bubbles**, we want smooth flan.
- Strain for Smoothness. Pour your flan mixture through a fine-mesh sieve directly into your caramel-coated mold. This step is **crucial for a silky-smooth flan**, catching any eggy bits or bubbles. Trust me on this one.
- Water Bath Magic. Place your flan mold *inside* the larger roasting pan. Carefully pour hot water into the roasting pan until it comes about halfway up the sides of your flan mold. This water bath ensures even cooking and prevents cracks.
- Bake Away! Gently transfer the whole setup to your preheated oven. Bake for about 50-60 minutes, or until the edges are set but the center still jiggles slightly when you gently shake the pan. A knife inserted near the edge should come out clean.
- Cool Down. Carefully remove the flan mold from the water bath (the water is hot!). Let it cool on a wire rack at room temperature for at least an hour.
- Chill Out. Once cool, cover your flan mold with plastic wrap and pop it in the fridge for a minimum of 4 hours, but **ideally overnight**. This chilling time is essential for the flan to fully set and for the caramel to liquefy into that glorious sauce.
- The Grand Reveal. When you’re ready to serve, run a thin knife around the edge of the flan to loosen it. Place a serving plate upside down over the mold, and with a confident *flourish*, flip it over! The flan should slide out, bathing in its own delicious caramel sauce. Ta-da!
Common Mistakes to Avoid
- Burning the Caramel: Oh, the horror! Caramel goes from perfectly amber to burnt and bitter faster than you can say “oops.” Keep an eye on it, and **don’t walk away!**
- Skipping the Water Bath: Thinking you don’t need a bain-marie is a rookie mistake. You’ll end up with a cracked, rubbery flan instead of a creamy masterpiece. Don’t be that person.
- Over-whisking: Too many bubbles in your batter equals a porous, not silky, flan. Whisk gently, just enough to combine.
- Not Chilling Long Enough: Patience, young padawan! If you try to unmold it too early, you’ll have a flan-puddle. **Chilling is key for structure and sauce.**
- Forgetting to Strain: Little bits of cooked egg are not a vibe. Strain your mixture for that super smooth texture. It’s worth the extra 30 seconds, promise.
Alternatives & Substitutions
- Milk Medley: Don’t have evaporated milk? You can sometimes get away with using more whole milk or even heavy cream for extra decadence. **IMO, the evaporated/condensed combo is king**, but you do you.
- Flavor Town: Want to spice things up? Add a pinch of cinnamon or a few cardamom pods to the milk mixture while heating (then strain them out). Or, try orange zest!
- Different Sugars: While granulated is standard for caramel, you *could* experiment with brown sugar for a deeper molasses flavor. Just be aware it might caramelize differently.
- Egg Count: If your eggs are on the smaller side, go for 5. If they’re giant, 4 might be enough. It’s not rocket science, just aiming for the right consistency.
FAQ (Frequently Asked Questions)
- My caramel hardened instantly in the mold! Did I mess up? Nope, that’s totally normal! It *should* harden. The magic of the flan baking in the water bath and then chilling will melt it back into that glorious sauce. Just trust the process.
- Can I make individual flans instead of one big one? Absolutely! Grab some ramekins, adjust baking time (usually shorter, around 30-40 minutes), and you’re good to go. Adorable mini flans for everyone!
- Why does my flan have little holes in it? Ah, the dreaded “bubbly flan”! This usually means you either over-whisked the batter, or your oven was too hot/water bath wasn’t deep enough. Remember: **gentle whisking and a good water bath are your friends.**
- How long does flan last in the fridge? If it lasts that long without being devoured, I’d say 3-4 days, covered. It actually tastes even better the next day as the flavors meld!
- My flan stuck to the mold! Help! Did you run a knife around the edges before flipping? Sometimes it just needs a little wiggle and persuasion. You can also briefly dip the bottom of the mold in warm water for 30 seconds to help release the caramel. **Don’t force it, be gentle!**
- Can I use sugar substitutes for the caramel? *Technically* some can caramelize, but it’s often tricky and the flavor might be different. For the best, authentic caramel experience, stick with good ol’ sugar. Why fix what isn’t broken?
Final Thoughts
So there you have it, folks! Your very own, incredibly impressive, yet shockingly simple flan recipe. You’ve officially conquered a dessert that looks fancy but plays nice. Now go impress your friends, your family, your significant other, or—most importantly—yourself! You’ve earned that sweet, creamy, caramel-drenched slice of heaven. Go forth and flan!

