So, you’re craving something ridiculously decadent, gooey, and just a little bit fancy, but you also want to avoid spending half your day in the kitchen, right? And maybe, just maybe, you’ve got some nuts hanging around that deserve a better fate than just sitting in a bag. Sound familiar? Because, same. Let’s make some magic happen, shall we?
Why This Recipe is Awesome
Okay, buckle up, buttercup, because this isn’t just *any* recipe. This is the “I look like a Michelin star chef but actually spent 20 minutes in my PJs” kind of recipe. Seriously. It’s practically idiot-proof. Even I, with my occasional kitchen blunders (RIP to that one time I tried to make sourdough from scratch), haven’t messed this one up.
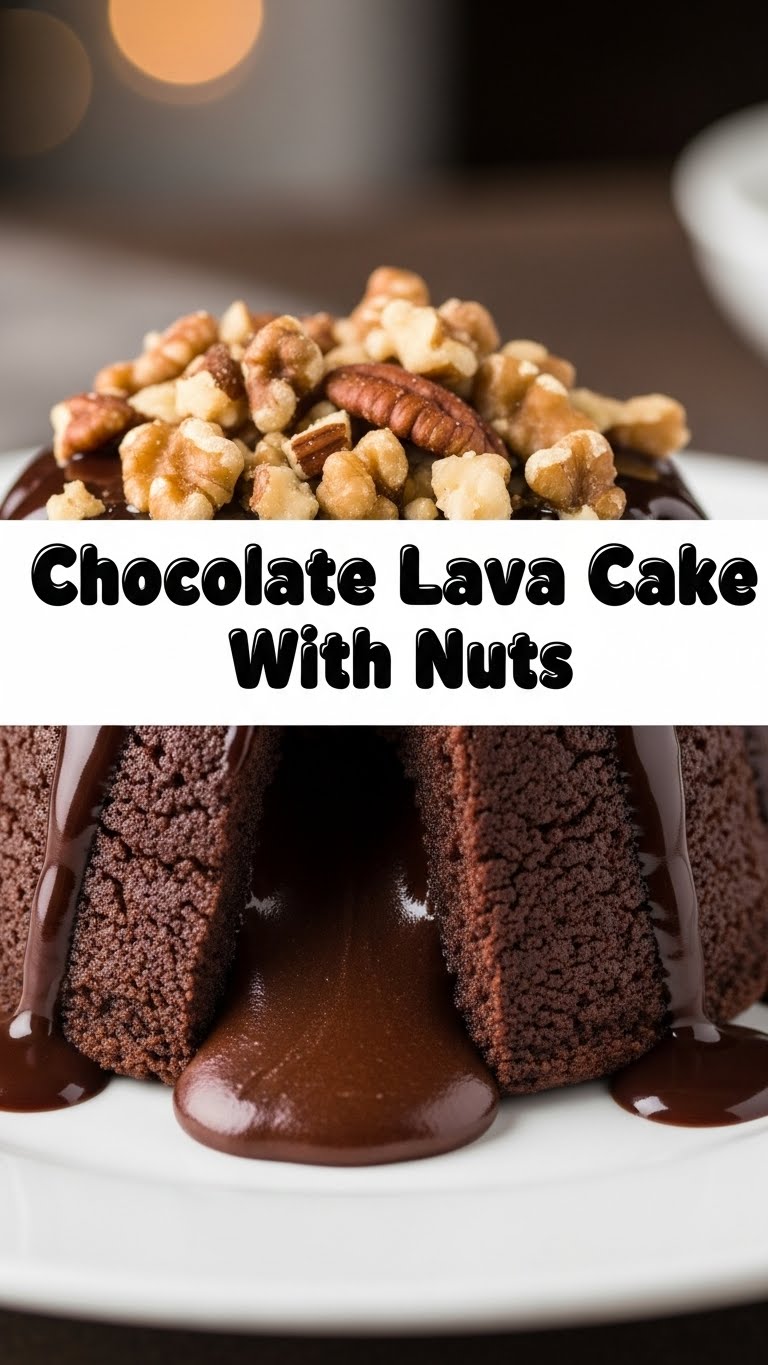
What makes it so stellar? First, it’s lightning fast. We’re talking dessert in less than 30 minutes, start to finish. Second, that glorious, molten chocolate center? It’s pure bliss. Add some crunchy nuts to the mix, and you’ve got a texture party in your mouth. Third, the “wow” factor is off the charts. Serve this to anyone, and they’ll think you’ve got secret culinary superpowers. It’s impressive without being impossible. What more could you ask for?
Ingredients You’ll Need
Gather ’round, my friends. Here’s what you’ll need for your journey to lava cake nirvana. Keep it simple, keep it real.
- Good Quality Dark Chocolate (60-70% cacao): About 4 ounces (115g). Don’t cheap out here! This is the star of the show. Think Ghirardelli, Lindt, or whatever makes your heart sing.
- Unsalted Butter: Half a stick (4 tablespoons or 56g). The real deal, because life’s too short for fake butter.
- Large Eggs: 2 whole eggs and 2 egg yolks. Yes, four eggs total! We need that richness.
- Granulated Sugar: A quarter cup (50g). Just enough to sweeten the deal without making it cloyingly sugary.
- All-Purpose Flour: 2 tablespoons (15g). A tiny bit, just for structure. We’re not trying to build a brick here.
- Pinch of Salt: About a quarter teaspoon. This little hero enhances all the chocolatey goodness.
- Chopped Nuts: About a quarter cup (25-30g) of your favorite. Walnuts, pecans, hazelnuts, even pistachios! Roughly chopped, please. We want texture!
- A little extra butter and cocoa powder: For prepping your ramekins. Don’t skip this!
Step-by-Step Instructions
Alright, let’s get cooking! These steps are super easy, just follow along.
- Preheat & Prep: First things first, crank your oven up to a hot 425°F (220°C). Then, grab four small ramekins (about 4-ounce capacity). Lightly butter the insides of each one and dust them with cocoa powder. Tap out any excess. This ensures your beautiful cakes pop out easily.
- Melt the Chocolate Magic: Next, break up your fancy dark chocolate and cube your butter. Place them in a microwave-safe bowl. Microwave in 20-second bursts, stirring in between, until melted and smooth. Alternatively, use a double boiler on the stovetop. Set aside to cool slightly.
- Whip the Eggs: In a separate medium bowl, whisk together your 2 whole eggs, 2 egg yolks, granulated sugar, and that tiny pinch of salt. Whisk vigorously until the mixture is light yellow and slightly foamy. You’re building air here, which helps with that lovely texture!
- Combine Forces: Now, gently fold the slightly cooled chocolate-butter mixture into the egg mixture. Do it slowly, ensuring everything is well combined but don’t overmix. We want to keep that airy goodness.
- Add the Flour and Nuts: Sift the flour over the chocolate mixture, then gently fold it in until just combined. Again, no aggressive stirring! Finally, fold in your chopped nuts. This is where the magic really starts to happen.
- Fill ‘Em Up: Divide the batter evenly among your prepared ramekins. Don’t fill them to the very brim; leave a little space for them to rise.
- Bake to Perfection: Carefully place the ramekins on a baking sheet (just in case of any overflow, though it’s unlikely with this recipe) and pop them into your preheated oven. Bake for about 12-14 minutes. The edges should be set, but the center should still be wonderfully jiggly. That jiggle means lava!
- Serve & Devour: Let the cakes cool in their ramekins for just 1-2 minutes. Then, carefully run a knife around the edges, place a serving plate on top of each ramekin, and invert. Lift the ramekin to reveal your masterpiece! Serve immediately with a scoop of vanilla ice cream, fresh berries, or a dusting of powdered sugar.
Common Mistakes to Avoid
Look, we all make mistakes. It’s part of the fun, right? But with these tips, you can minimize the drama and maximize the deliciousness.
- Not Preheating the Oven: Rookie mistake! You need that intense heat from the start to get that perfect crust and gooey center. Don’t rush it.
- Overbaking: This is the cardinal sin of lava cake. If you bake it too long, you’ll end up with a very delicious brownie, but no glorious lava. Keep an eye on the clock and trust the jiggle! When in doubt, underbake slightly.
- Forgetting to Grease/Flour Ramekins: Unless you enjoy scraping delicious cake from ceramic, don’t skip this step. The butter and cocoa powder combo is your best friend here.
- Opening the Oven Door Too Much: Patience, my friend! Each time you peek, you let out heat, which messes with the baking process. Trust the timer!
- Overmixing the Batter: Once you add the flour, fold it in gently until just combined. Overmixing develops the gluten, leading to a tougher cake. We want tender and gooey!
Alternatives & Substitutions
Feeling a little rebellious? Want to make it your own? Here are some ideas:
- Nut Swaps: Not a fan of walnuts? Try pecans, hazelnuts, or even toasted almonds. Or, if nuts aren’t your jam, simply omit them! The cake is still fantastic.
- Chocolate Varieties: While dark chocolate gives the best depth, you can use milk chocolate for a sweeter cake or a mix of dark and semi-sweet. Just make sure it’s good quality.
- Gluten-Free: Swap the all-purpose flour for a 1:1 gluten-free baking blend. The small amount of flour means it usually works out great!
- Flavor Boosts: Add a splash of espresso powder (half a teaspoon) to the melted chocolate for an even deeper chocolate flavor. Or, a splash of your favorite liqueur like Grand Marnier or Kahlúa. Ooh la la!
- Serving Suggestions: Beyond vanilla ice cream, consider a dollop of fresh whipped cream, a sprinkle of sea salt (IMO, amazing with chocolate), or some fresh raspberries for a touch of tartness.
FAQ (Frequently Asked Questions)
Got questions? I’ve got (casual and hopefully helpful) answers!
- Can I use margarine instead of butter? Well, technically yes, but why hurt your soul like that? Butter provides a richer flavor and better texture. For the best results, stick with real butter.
- My cakes didn’t have a gooey center. What happened? Oh no! You, my friend, committed the cardinal sin of overbaking. Next time, pull them out a minute or two earlier when the center still looks decidedly wobbly.
- Can I prepare the batter ahead of time? Absolutely! You can make the batter and store it in the fridge for up to 24 hours. Just give it a good stir before pouring into ramekins and add a minute or two to the baking time.
- I don’t have ramekins. What else can I use? Muffin tins work in a pinch, but you’ll need to adjust baking time (likely less, maybe 8-10 minutes) and watch them closely. Just make sure to grease and flour them well!
- How do I know when they’re perfectly done? Look for set, slightly puffed edges, and a center that jiggles like Jell-O when you gently shake the ramekin. If it looks completely solid, it’s overdone. If it looks like raw batter, it needs more time.
- Can I use frozen nuts? Sure, but give them a quick toast in a dry pan or oven before adding them. This really brings out their flavor and crunch!
Final Thoughts
There you have it! A ridiculously easy, incredibly delicious, and surprisingly impressive chocolate lava cake with a satisfying nutty crunch. You’ve now got the power to whip up a dessert that screams “I know what I’m doing” with minimal fuss. So go ahead, treat yourself, treat your friends, or just impress that inner dessert-loving critic.
Now go forth and conquer that kitchen! You’ve earned it. And definitely snap a pic, because that lava flow is Instagram-worthy, FYI.

