So, you’ve scrolled through enough food porn on Instagram to make your stomach grumble louder than a bear in winter, and now you *need* chocolate cake, huh? But not just any cake—we’re talking deep, dark, decadent chocolate cake with a cloud of chocolate mousse inside. Sounds super fancy, like something a French pastry chef would whip up, but guess what? We’re making it happen without a culinary degree or a nervous breakdown. Buckle up, buttercup, because your kitchen is about to become a happy, chocolatey place!
Why This Recipe is Awesome
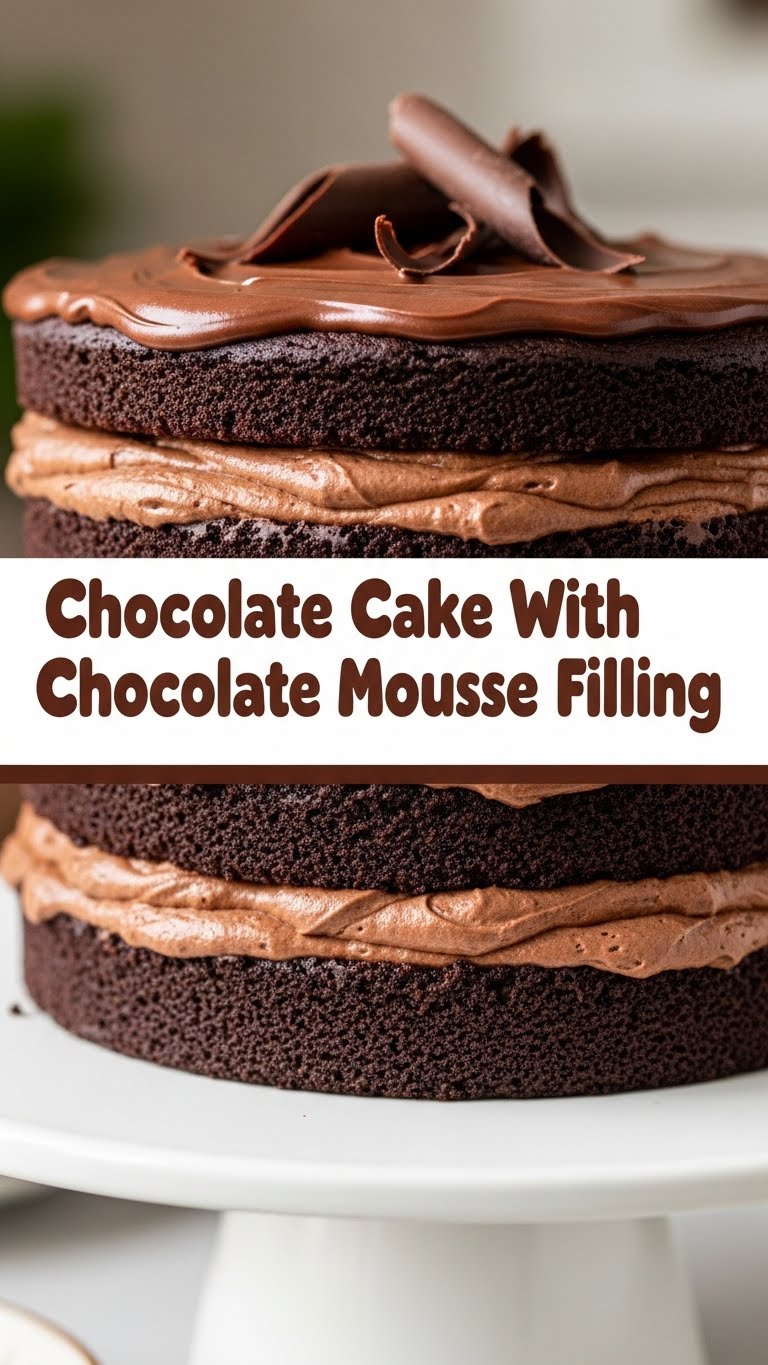
First off, it’s chocolate. Duh. But seriously, this isn’t your grandma’s dry, crumbly cake (no offense, Grandma, love you!). This bad boy is moist, rich, and has a mousse filling that’s so light it practically floats. It looks super impressive, making you seem like a kitchen wizard, but **it’s actually ridiculously easy**. Even your cat could probably supervise and not mess it up. Plus, it’s a guaranteed mood booster. Scientific fact. (Probably.) It’s the kind of cake that makes people ask for the recipe, and then you can smugly tell them how simple it was. Win-win!
Ingredients You’ll Need
Gather your troops! Here’s what you’ll need to conquer this chocolate mountain:
For the Cake:
- 2 cups all-purpose flour (the basic stuff, no fancy flours needed here)
- 2 cups granulated sugar (because sweetness is life)
- ¾ cup unsweetened cocoa powder (the darker, the better!)
- 2 teaspoons baking soda (our lift-off agent)
- 1 teaspoon baking powder (extra lift for a fluffy cake)
- 1 teaspoon salt (to balance all that sweet goodness)
- 1 cup buttermilk (or regular milk with a splash of lemon juice/vinegar—DIY, baby!)
- ½ cup vegetable oil (for ultimate moisture)
- 2 large eggs (straight from the fridge is fine)
- 1 teaspoon vanilla extract (the MVP of baking flavor)
- 1 cup **hot coffee** (don’t skip this, it’s the secret weapon for deep chocolate flavor!)
For the Chocolate Mousse Filling:
- 12 oz good quality dark chocolate (60-70% cacao is perfect, chips or chopped bar)
- 2 cups heavy whipping cream (make sure it’s *cold*)
- ¼ cup powdered sugar (to sweeten things up)
- 1 teaspoon vanilla extract (because everything needs vanilla)
Step-by-Step Instructions
Alright, let’s get messy (but in a fun, delicious way!).
- **Preheat & Prep:** Preheat your oven to 350°F (175°C). Grease and flour two 8 or 9-inch round cake pans. Don’t be shy with the flour; we don’t want sticking!
- **Dry Mix It Up:** In a large bowl, whisk together the flour, sugar, cocoa powder, baking soda, baking powder, and salt. Give it a good whisk to break up any lumps.
- **Wet Ingredients Go In:** Add the buttermilk, oil, eggs, and vanilla extract to the dry ingredients. Beat with an electric mixer on medium speed for about 2 minutes, until just combined and smooth.
- **The Coffee Kick:** Carefully stir in the hot coffee. The batter will be thin—don’t panic! This is exactly what we want for a super moist cake.
- **Bake Away:** Divide the batter evenly between your prepared cake pans. Bake for 30-35 minutes, or until a wooden skewer inserted into the center comes out clean.
- **Cool Down:** Let the cakes cool in their pans for about 10-15 minutes before inverting them onto a wire rack to cool completely. **This is crucial!** Warm cake + mousse = disaster.
- **Mousse Magic (Part 1):** While your cakes are cooling (or once they’re cool), melt the dark chocolate. You can do this in a microwave in 30-second intervals, stirring in between, or over a double boiler. Set aside to cool slightly, but keep it liquid.
- **Mousse Magic (Part 2):** In a separate large, chilled bowl, whip the cold heavy cream with the powdered sugar and vanilla extract until stiff peaks form. **Don’t over-whip** unless you want butter (which, hey, is also delicious, but not for this recipe).
- **Fold It In:** Gently fold about a third of the whipped cream into the slightly cooled melted chocolate. Then, carefully fold that mixture back into the remaining whipped cream until just combined. Don’t overmix; we want it light and airy! Chill the mousse in the fridge for at least 30 minutes to firm up a bit.
- **Assemble Your Masterpiece:** Once the cakes are completely cool, level them with a serrated knife if needed. Place one cake layer on your serving plate. Spread all of the chilled chocolate mousse evenly over the top. Gently place the second cake layer on top.
- **Chill Out:** Pop the assembled cake back into the fridge for at least an hour to let the mousse fully set. You can dust it with a little extra cocoa powder before serving for a fancy touch, or just dig in!
Common Mistakes to Avoid
Even the pros make mistakes, but knowing these common blunders can save you some heartache (and cake-ache):
- **Not Cooling the Cake Enough:** Seriously, I’m reiterating this because it’s that important. Warm cake + mousse = chocolate soup. Nobody wants chocolate soup.
- **Overmixing the Batter:** Once you add the wet to the dry, mix until *just* combined. Overmixing develops gluten, which leads to a tough, dense cake. We want light and fluffy!
- **Skipping the Coffee:** I know some of you might be coffee-averse, but **the coffee deepens the chocolate flavor without making the cake taste like coffee**. It’s pure magic. Trust me on this one, FYI.
- **Over-whipping the Cream:** Whipped cream goes from perfect to butter surprisingly fast. Watch it like a hawk. Stop when it holds stiff peaks.
Alternatives & Substitutions
Feeling a bit experimental, or just missing an ingredient? No worries, here are some ideas:
- **Coffee Substitute:** Don’t have coffee or truly hate it? Hot water works too, but **the coffee really enhances the chocolate flavor**. Decaf coffee is totally fine if you’re sensitive to caffeine!
- **Buttermilk Hack:** If you don’t have buttermilk, just add 1 tablespoon of white vinegar or lemon juice to a measuring cup, then fill the rest with regular milk until you reach 1 cup. Let it sit for 5 minutes before using. Voila!
- **Oil vs. Butter:** You can technically use melted butter instead of vegetable oil in the cake, but oil often results in a moister cake, so stick to the recipe if you want maximum moisture.
- **Chocolate Type:** For the mousse, feel free to play with the chocolate. Milk chocolate will give you a sweeter, milder mousse, while a darker chocolate (70%+) will be more intense and less sweet. IMO, dark is superior for that sophisticated chocolate hit.
- **Gluten-Free:** Swap the all-purpose flour for a good quality 1:1 gluten-free baking blend.
FAQ (Frequently Asked Questions)
Got questions? I’ve got (casual) answers!
- Can I make this ahead of time? Heck yeah! The cake layers can be baked a day in advance and stored tightly wrapped at room temperature. The mousse is best made fresh and assembled, then chilled.
- My mousse isn’t setting, what gives? Did you whip the cream enough? Was your melted chocolate too hot and deflated the cream? **Ensure your cream is super cold** when whipping, and your melted chocolate is only slightly warm (not hot!). Chill the assembled cake longer; it often needs a good few hours to firm up.
- Do I have to use *both* cocoa powder and chocolate for the cake? The recipe uses cocoa powder for the cake’s chocolate flavor, giving it that deep, dark color and richness. The melted chocolate is specifically for the mousse. So no, you don’t use melted chocolate *in* the cake batter itself for this recipe.
- Can I use margarine instead of butter/oil? Well, technically yes, but why hurt your soul like that? Stick to oil for moisture in the cake, or good quality butter for flavor if you’re experimenting.
- How long does this glorious cake last? Covered tightly and refrigerated, about 3-4 days. But let’s be real, it won’t last that long. It tends to vanish faster than a free sample at Costco.
Final Thoughts
See? Told you it wasn’t rocket science! You just baked yourself a ridiculously delicious chocolate cake with chocolate mousse filling. Now go impress someone—or yourself, because self-love is important—with your newfound culinary superpower. You’ve earned every single glorious bite. Don’t forget to send me a pic, or better yet, a slice! Happy baking, my friend!


