Ever had one of those days where you just *need* chocolate cake, but the thought of a super complicated recipe makes you want to curl up in a ball and cry? Yeah, me too. We’ve all been there, staring into the fridge, contemplating a sad bowl of cereal when our soul truly yearns for something… more.
But fear not, my friend, because I’ve got a chocolate cake with mousse frosting recipe that’s so good, you’ll think you hired a pastry chef. Spoiler: you didn’t, you’re just awesome (and followed these ridiculously simple steps). This isn’t your grandma’s dry, boring cake. This is a moist, rich, dark chocolate dream topped with a cloud-like, decadent chocolate mousse. Get ready to impress everyone, including yourself!
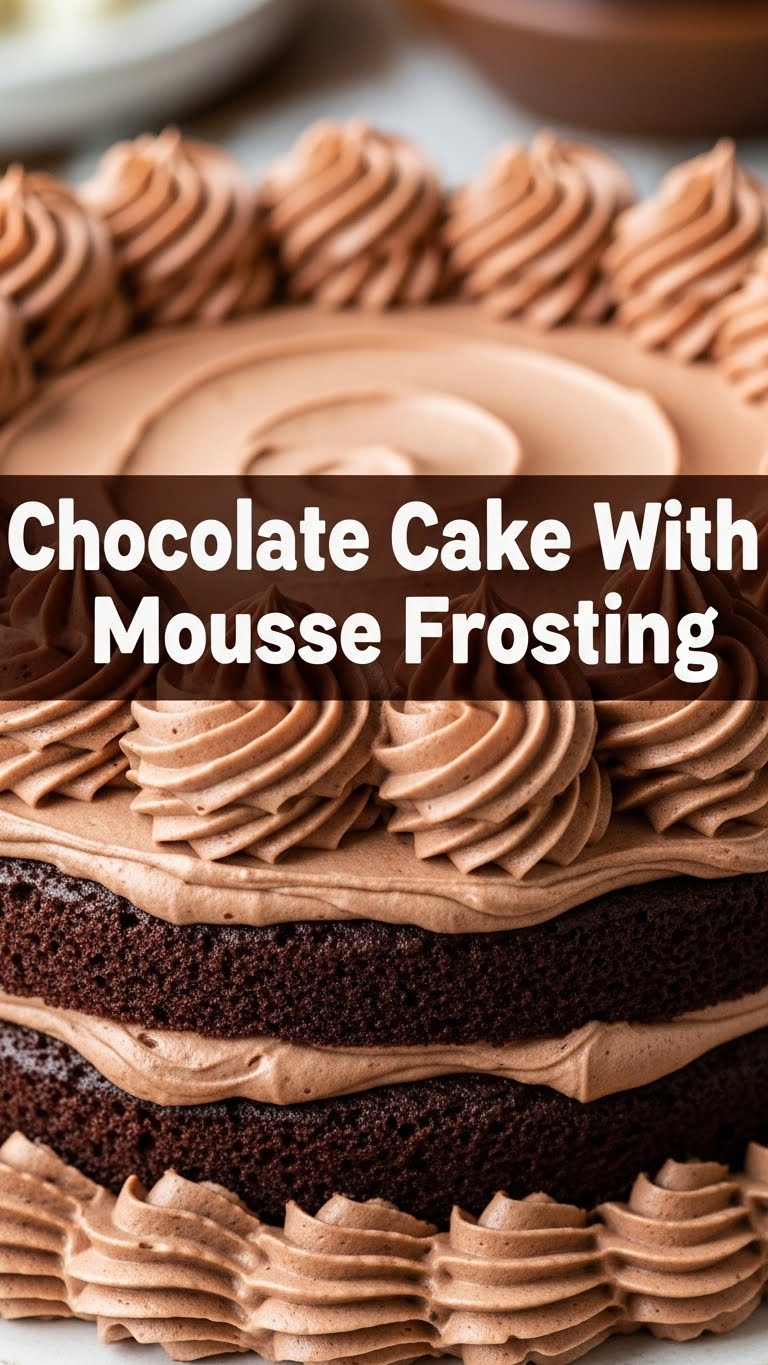
Why This Recipe is Awesome
Okay, let’s be real. We want maximum deliciousness with minimum fuss, right? This recipe delivers on all fronts. First off, it’s a total showstopper. People will ooh and aah, convinced you slaved away for hours. **The truth? It’s deceptively easy.** I’m talking “even I didn’t mess it up” easy, and my track record in the kitchen can be… colorful.
The cake itself is super moist, practically melting in your mouth, thanks to a few secret weapons (more on that later). And that mousse frosting? Oh. My. Goodness. It’s light, airy, intensely chocolatey, and a perfect counterpoint to the rich cake. It elevates the whole thing from “just cake” to “culinary masterpiece.” Plus, you get to lick the bowl, which is, IMO, half the fun of baking.
Ingredients You’ll Need
Gather your troops, aspiring baker! Here’s what we’re working with:
For the Cake:
- 1 ½ cups (180g) All-Purpose Flour: The sturdy foundation of our chocolate empire.
- 1 ½ cups (300g) Granulated Sugar: Sweetness is non-negotiable, obviously.
- ¾ cup (65g) Unsweetened Cocoa Powder: Go for a good quality one here, it makes a difference! Dutch-processed if you have it.
- 1 ½ teaspoons Baking Soda: Our main lift-off agent.
- 1 teaspoon Baking Powder: Its trusty sidekick, ensuring maximum fluff.
- 1 teaspoon Salt: Don’t skip it! It balances all that sweetness and chocolate.
- 2 Large Eggs: Binders, moisteners, and general good guys.
- ¾ cup (180ml) Milk: Whole milk for extra richness, please.
- ½ cup (120ml) Vegetable Oil: The secret to that super moist, tender crumb.
- 2 teaspoons Vanilla Extract: Liquid gold for flavor.
- ¾ cup (180ml) Hot Water or Hot Coffee: **Crucial!** This “blooms” the cocoa for intense chocolate flavor. Coffee deepens it even more.
For the Mousse Frosting:
- 1 cup (240ml) Heavy Cream (cold): The star of the show. Make sure it’s super cold!
- ½ cup (60g) Powdered Sugar: For sweetness and a smooth, non-gritty finish.
- ½ cup (45g) Unsweetened Cocoa Powder: More chocolate, because why not?
- 1 teaspoon Vanilla Extract: A little extra somethin’-somethin’.
- 4 oz (113g) Good Quality Semi-Sweet Chocolate, chopped: Melted and cooled slightly. This is where the *mousse* part really shines!
Step-by-Step Instructions
Alright, apron on, game face on. Let’s make some magic happen!
- **Get Prepped & Hot:** Preheat your oven to 350°F (175°C). Grease and flour two 8-inch round cake pans. Or line with parchment paper for extra non-stick insurance.
- **Dry Team Assembles:** In a large bowl, whisk together the flour, sugar, cocoa powder, baking soda, baking powder, and salt. Give it a good whisk to break up any lumps.
- **Wet Ingredients Join the Party:** Add the eggs, milk, vegetable oil, and vanilla extract to the dry ingredients. Beat with an electric mixer on medium speed for about 2 minutes, until smooth and well combined. Scrape down the sides of the bowl as needed.
- **The Hot Secret:** Carefully, gradually pour in the hot water (or coffee) while continuing to mix on low speed. The batter will be quite thin – **don’t panic, that’s normal!** This is the key to a super moist cake.
- **Bake It Up:** Divide the batter evenly between your two prepared cake pans. Bake for 30-35 minutes, or until a wooden skewer or toothpick inserted into the center comes out clean.
- **Cool Down, Buttercup:** Let the cakes cool in their pans on a wire rack for about 10-15 minutes. Then, carefully invert them onto the wire rack to cool completely. **This is crucial! Don’t rush it.** A warm cake will melt your beautiful mousse.
- **Melt the Mousse Magic:** While the cakes are cooling, gently melt your chopped semi-sweet chocolate. You can use a microwave (short bursts, stir often!) or a double boiler. Set it aside to cool slightly. It needs to be cool enough that it won’t melt your cream, but still liquid.
- **Whip It Good:** In a large, very cold bowl (pop it in the freezer for 10 minutes beforehand!), combine the heavy cream, powdered sugar, cocoa powder, and vanilla extract. Beat with an electric mixer on high speed until **soft peaks** form. We’re going for cloud-like, not stiff like meringue.
- **Fold in the Chocolate:** Gently fold the slightly cooled melted chocolate into the whipped cream mixture until just combined. Be careful not to overmix; you want to keep that airy texture.
- **Stack & Frost:** Once the cake layers are completely cool (seriously, I can’t stress this enough!), place one layer on your serving plate. Spread a generous amount of mousse frosting on top. Place the second cake layer on top and cover the entire cake with the remaining mousse. Get fancy with it, or keep it rustic – totally up to you!
Common Mistakes to Avoid
We’re all human, we all make mistakes. But let’s try to dodge these common blunders to ensure your cake dreams come true:
- **Not Preheating the Oven:** Your oven needs to be at the correct temperature *before* the cake goes in. Otherwise, your cake won’t rise properly and you’ll end up with a sad, dense disc. **Rookie mistake!**
- **Overmixing the Batter:** Once you add the wet to the dry, mix just until combined. Overmixing develops the gluten too much, leading to a tough, dry cake. Nobody wants that!
- **Opening the Oven Door Too Early:** Resist the urge to peek! Opening the oven door lets out heat and can cause your cake to sink in the middle. Give it at least 25 minutes before you even think about looking.
- **Frosting a Warm Cake:** This is a big one. **Your mousse will melt into a sad, sloppy puddle.** Exercise patience, my friend. Let those cake layers cool completely. Pop them in the fridge for 30 minutes if you’re really impatient.
- **Using Warm Cream for the Mousse:** For glorious, fluffy whipped cream, your heavy cream (and ideally your bowl and whisk attachments) needs to be super cold.
Alternatives & Substitutions
Feeling a little adventurous, or missing an ingredient? No worries, I’ve got your back!
- **No Coffee? No Problem (but almost):** If you’re really not a coffee fan, hot water works perfectly fine. However, **the hot coffee truly amplifies the chocolate flavor** without making the cake taste like coffee. Just trust me on this one, it’s a game-changer!
- **Oil vs. Butter:** While melted butter can be used, vegetable oil (or any neutral oil like canola) is key for this cake’s incredible moistness. It keeps the cake tender for days.
- **Gluten-Free Version:** Swap out the all-purpose flour for a good quality 1:1 gluten-free baking blend. You might need to add an extra 1/2 teaspoon of xanthan gum if your blend doesn’t already contain it.
- **Dairy-Free Options:** For the cake, use your favorite plant-based milk. For the mousse, chill a can of full-fat coconut milk overnight, then scoop out the thick cream from the top and whip it like regular heavy cream. Use dairy-free chocolate too!
- **Darker Chocolate Mousse:** Craving a deeper, more intense chocolate hit? Use a higher percentage cacao chocolate for the melted chocolate in the mousse, or add an extra tablespoon of cocoa powder.
FAQ (Frequently Asked Questions)
Got questions? I’ve got answers (and maybe a bit of sass).
1. Can I make this cake ahead of time?
Absolutely! The unfrosted cake layers can be baked a day or two in advance and stored, wrapped tightly, at room temperature. The mousse is best made fresh, but you can chill it for a few hours before frosting. If you frost the whole cake, it’s great in the fridge for 2-3 days.
2. My mousse isn’t thickening! What went wrong?
Uh-oh! Was your heavy cream super cold? And your bowl? Sometimes cream just needs a bit more time and a cold environment. Also, make sure you’re using *heavy* cream, not half-and-half or milk. And did your melted chocolate cool enough? If it was too warm, it could’ve melted the cream.
3. Can I bake this as cupcakes instead?
You bet your sweet bottom! This recipe makes fantastic cupcakes. Adjust the baking time to around 18-22 minutes, checking for doneness with a toothpick.
4. Why the hot water/coffee? Does it really make a difference?
Oh, it makes *all* the difference! The hot liquid helps “bloom” the cocoa powder, which means it helps release and intensify the chocolate flavor. It’s a little bit of kitchen science that equals a lot of deliciousness.
5. How long does this cake last?
If you can resist devouring it all in one sitting, this cake (covered) will last at room temperature for about 2 days, or in the fridge for up to 5 days. Though, honestly, it’s usually gone long before then.
6. Can I skip the mousse and just do a regular chocolate buttercream?
Well, technically yes, but then it wouldn’t be a “Chocolate Cake with Mousse Frosting,” would it? 😉 Kidding (mostly)! If buttercream is your jam, go for it! But I highly recommend giving this mousse a try.
Final Thoughts
So there you have it, your new favorite chocolate cake recipe! It’s ridiculously easy, super impressive, and guaranteed to make you feel like a kitchen wizard. This cake is pure joy, whether you’re celebrating a special occasion or just having a “it’s Tuesday, why not?” moment.
Go on, bake it, share it (or don’t, I won’t judge!), and revel in the deliciousness. You totally nailed it, you culinary superstar! Now go impress someone – or just yourself – with your new skills. You’ve earned that slice!


