Short, Catchy Intro
So you’re craving something ridiculously decadent, chocolatey, and impressive, but you also want to be able to whip it up faster than you can decide what to binge-watch next? And let’s be real, you’re looking for that “wow” factor without actually, you know, *trying* too hard. Welcome, my friend, to the glorious world of Chocolate Lava Cake! Forget complicated desserts; this bad boy is pure magic and surprisingly easy. Think rich, fudgy cake on the outside, with a river of warm, molten chocolate lava oozing out when you cut into it. Yep, it’s basically a hug for your taste buds.
Why This Recipe is Awesome
Let me tell you why this isn’t just *another* recipe. This is THE recipe. First off, it’s pretty much **idiot-proof**. Seriously, if I can make it without setting off a fire alarm, anyone can. It takes minimal ingredients, minimal effort, and barely any time. We’re talking 20-25 minutes from start to molten finish. That’s faster than ordering delivery, and infinitely more satisfying. Plus, it makes you look like a culinary genius, even if your previous baking achievement was not burning toast. The “molten center reveal” is pure drama, making it perfect for impressing dates, dinner guests, or just treating your magnificent self after a long day. It’s a guaranteed mood booster, **IMO**.
Ingredients You’ll Need
Gather your weapons, chef! Here’s what you’ll need to create this masterpiece.
- **Good quality chocolate (4 oz / 113g):** This is the star of the show, so don’t skimp! Semi-sweet or dark chocolate chips work great, or chop up a good bar. Life’s too short for bad chocolate.
- **Unsalted butter (1/2 cup / 113g):** The rich backbone. Make sure it’s unsalted so you control the saltiness.
- **Large eggs (2 whole eggs + 2 egg yolks):** The whole eggs give structure; the extra yolks make it extra rich and gooey. It’s like a secret weapon.
- **Granulated sugar (1/4 cup / 50g):** Just enough sweetness to balance the chocolate without making it cloying.
- **All-purpose flour (2 tablespoons):** This gives it just enough structure to be cakey, but not too much to stop the lava flow.
- **Vanilla extract (1/2 teaspoon):** A tiny splash of pure joy to enhance all those chocolatey notes.
- **Pinch of salt:** Don’t skip this! It makes all the chocolate flavors pop.
- **A little extra butter and cocoa powder for ramekins:** Essential for preventing stickage and making those beautiful cakes slide out effortlessly.
Step-by-Step Instructions
Okay, aprons on, let’s get cooking!
- **Prep those Ramekins:** First things first, grab two 6-ounce ramekins. **Generously butter them** and then dust them with cocoa powder. Tap out any excess. This is crucial for easy release later, so don’t be shy with the butter!
- **Melt the Chocolate:** Get a heatproof bowl. Break up your chocolate and add the butter. Pop it over a saucepan of simmering water (make sure the bowl doesn’t touch the water!) or microwave in 30-second bursts, stirring until smooth and completely melted. Let it cool slightly for a few minutes.
- **Whisk the Wet Stuff:** In another bowl, whisk together the whole eggs, egg yolks, and granulated sugar until they’re light in color and slightly fluffy. This usually takes about 2-3 minutes with a hand whisk, or less with an electric mixer.
- **Combine Everything:** Pour the slightly cooled chocolate mixture into the egg mixture. Gently fold them together until just combined. Then, sift in the flour, vanilla extract, and salt. Continue to fold until there are no dry streaks left, but **don’t overmix**!
- **Fill ’em Up:** Divide the batter evenly between your two prepared ramekins. They should be about two-thirds full.
- **Bake to Perfection:** Place the ramekins on a baking sheet and bake in your preheated oven at 400°F (200°C) for 12-14 minutes. The edges should be set, but the center should still be jiggly when you gently shake them. **This jiggle is key!**
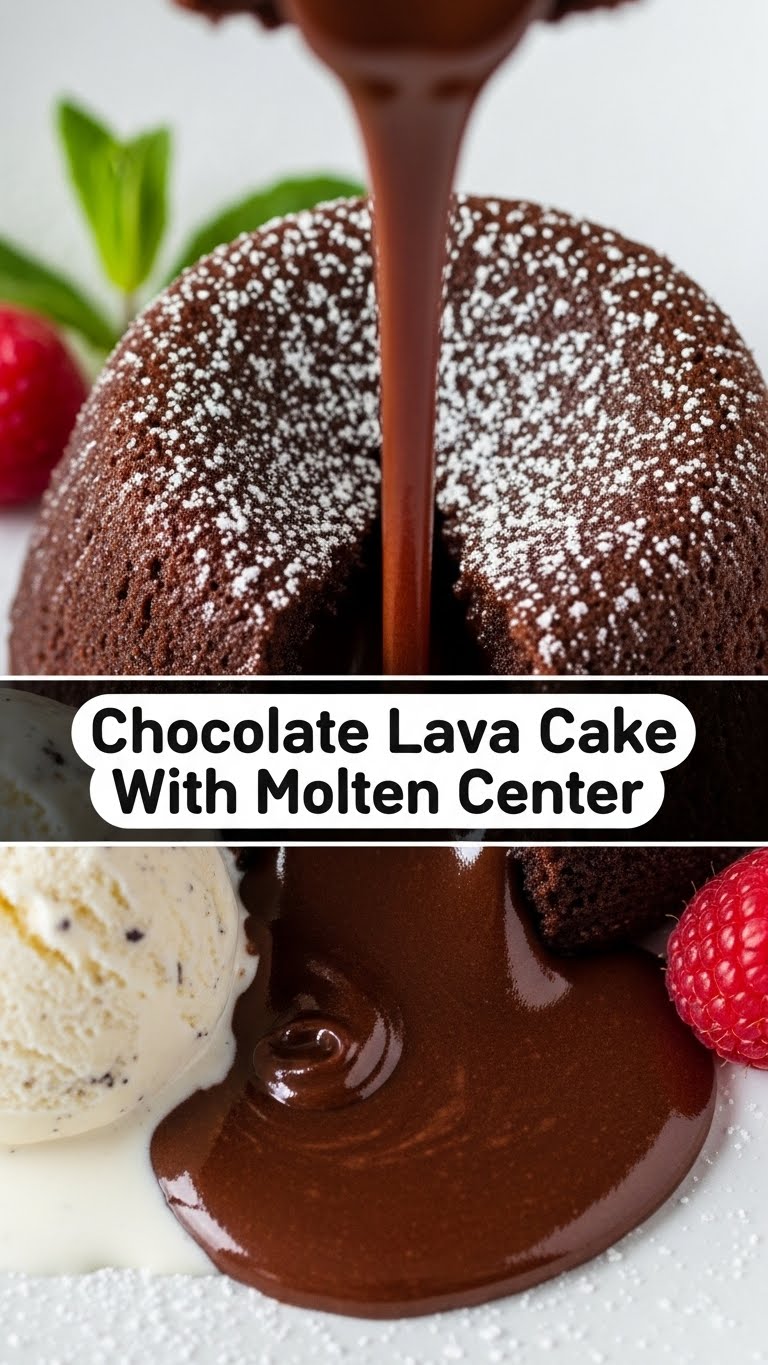
- **The Grand Finale:** Carefully remove from the oven. Let them cool in the ramekins for just 1-2 minutes—no longer! Then, run a thin knife around the edge and invert each cake onto a serving plate. Dust with powdered sugar, add a scoop of ice cream, or whatever your heart desires.
Common Mistakes to Avoid
Even the easiest recipes have pitfalls. Dodge these rookie errors like a pro!
- **Not Preheating the Oven:** Seriously, this isn’t an optional step. A cold oven will give you dense, sad cakes instead of light, airy ones with a molten center. **Always preheat!**
- **Overmixing the Batter:** You’ll develop the gluten in the flour, leading to tough cakes. Mix until just combined, then stop. Walk away from the whisk.
- **Forgetting to Butter/Flour Ramekins:** Unless you enjoy chiseling dessert out of pottery, this step is non-negotiable. Use butter and cocoa powder for the best non-stick result and a lovely dark finish.
- **Overbaking:** This is the ultimate lava cake sin! If you bake it too long, you’ll end up with a regular chocolate cake (which is fine, but not what we’re going for!). Remember that jiggle? That’s your cue to pull them out. When in doubt, underbake slightly.
- **Not Letting Them Rest (or Resting Too Long):** A minute or two in the ramekin helps them set just enough to slide out, but too long and they’ll get stuck, and the lava might solidify. Timing is everything here.
Alternatives & Substitutions
Feeling adventurous? Or just realized you’re out of something crucial? No worries, we’ve got options!
- **Chocolate Swap:** Use dark chocolate for a more intense, less sweet treat. Milk chocolate works too if you prefer it sweeter, but be warned, it’s super rich! White chocolate? Not really for lava cake, but hey, you do you.
- **Flour Power:** For a gluten-free version, simply swap out the all-purpose flour for a good quality 1:1 gluten-free baking flour blend. Easy peasy!
- **Flavor Boosts:** Add a splash of espresso powder (1/4 tsp) to the chocolate for an even deeper flavor, or a tablespoon of your favorite liqueur like Kahlúa, Grand Marnier, or even a good whiskey, for an adult twist.
- **Ramekin Replacements:** No ramekins? Small oven-safe mugs or even muffin tins (fill only 2/3 full and reduce baking time) can work in a pinch. Just make sure they’re well-greased!
FAQ (Frequently Asked Questions)
Got questions? I’ve got answers, delivered with a side of sass.
- **Can I make these ahead of time?** You absolute genius! Yes, you can. Prepare the batter, pour it into the ramekins, cover them, and refrigerate for up to 24 hours. Just add a few extra minutes to the baking time when you pull them out of the fridge.
- **What if I don’t have ramekins? Can I use a muffin tin?** Well, technically yes, but why hurt your soul like that? Small oven-safe mugs work best if you don’t have ramekins. Muffin tins can work, but reduce baking time to around 8-10 minutes and watch them like a hawk!
- **How do I know when it’s done?** This is the million-dollar question! The edges should look set, but the center should still be delightfully jiggly when you gently shake the ramekin. If it’s firm, you’ve overbaked. Pull them out when you see that beautiful jiggle!
- **My cake didn’t release from the ramekin! What went wrong?** Uh oh. Did you butter and cocoa powder those ramekins **generously**? This is the most common culprit. Also, not letting it rest for a minute (or letting it rest too long) can cause issues. Don’t rush or delay!
- **Can I use margarine instead of butter?** Technically you *can*, but I wouldn’t recommend it. Butter offers a richer flavor and better texture that margarine just can’t quite replicate. Treat yourself (and your cake) to the good stuff.
- **How do I store leftovers?** Leftovers? What are those? If by some miracle you have any, you can cover and refrigerate them for a day or two. Reheat gently in the microwave for a few seconds to get that molten center back.
Final Thoughts
There you have it! Your ticket to dessert nirvana. This chocolate lava cake is proof that fancy doesn’t have to mean fussy. It’s quick, it’s simple, and it delivers on that molten, gooey promise every single time. So go ahead, whip up a batch. Impress someone (or just yourself, because you deserve it!). You’ve totally got this new culinary skill in your repertoire now. Enjoy every single molten, chocolatey bite!


