So you’re craving something tasty but too lazy to spend forever in the kitchen, huh? Same. And you’ve got a fancy bone in your body that’s whispering ‘Crème Brûlée’ but your practical brain is screaming ‘too hard!’ Well, friend, silence that practical brain because I’ve got a secret weapon: 3-ingredient Crème Brûlée. Yes, you read that right. Three. Count ’em. Get ready to impress yourself (and anyone else lucky enough to be around) with minimal effort and maximum deliciousness.
Why This Recipe is Awesome
Okay, first off, it’s CRÈME BRÛLÉE. You get to torch things! How cool is that? Second, it’s practically idiot-proof. Seriously, if *I* didn’t mess it up, you’re golden. This recipe strips away all the fuss, leaving you with that silky, custardy goodness and that glorious, crunchy sugar top, all with minimal effort. It’s the kind of dessert that looks like you went to culinary school but actually just involved a quick trip to the grocery store and maybe 20 minutes of actual *work*. Plus, it’s a fantastic way to impress literally anyone without breaking a sweat (or your budget).
Ingredients You’ll Need
- Heavy Cream: The OG. Full-fat, please. This is not the time for skim milk, unless you’re into watery sadness. We’re talking luscious, velvety custard here, so bring on the fat!
- Egg Yolks: The magic binders. These little powerhouses give us that rich, creamy texture we’re after. Don’t throw away the whites, FYI! Make an omelet or meringue later. Or just feel superior for having *only* used the yolks.
- Granulated Sugar: Our sweet secret weapon. Two jobs: sweeten the custard and create that iconic, crunchy lid. It’s a true multitasker.
Step-by-Step Instructions
- Preheat the oven and prep your bath. Get your oven heating to a cozy 325°F (160°C). Grab some ramekins (those cute little oven-safe dishes) and put them in a larger baking dish. You’ll want one with high sides. We’re building a water bath, fancy chef style.
- Warm the cream. Pour your heavy cream into a saucepan. Heat it over medium-low heat until it’s steamy and just starting to bubble around the edges. **Don’t boil it**, we’re not making soup here. Just warm and happy.
- Whisk those yolks and sugar. In a separate bowl, whisk your egg yolks and about 1/4 cup of the granulated sugar until they’re pale yellow and slightly thickened. Whisk like your life depends on it! We want light and airy.
- Temper, baby, temper! Slowly, *slowly* pour about half of the warm cream into your egg yolk mixture while continuously whisking. This is called tempering and it stops your eggs from scrambling. No one wants scrambled eggs in their dessert.
- Combine and pour. Now, pour the tempered egg mixture back into the saucepan with the remaining warm cream. Whisk gently until everything is combined.
- Strain and fill. Pour the custard mixture through a fine-mesh sieve into a liquid measuring cup. Then, carefully pour the custard into your prepared ramekins. Straining ensures a super silky smooth custard, no lumps allowed!
- Water bath time! Carefully pour hot water into the larger baking dish, making sure it comes about halfway up the sides of your ramekins. This water bath creates a gentle, even cooking environment, ensuring a silky custard.
- Bake to perfection. Carefully transfer the baking dish to your preheated oven. Bake for about 30-40 minutes, or until the edges are set but the center still has a slight jiggle.
- Chill out. Remove the ramekins from the water bath (carefully, they’re hot!) and let them cool on a wire rack. Once they’ve reached room temp, pop ’em in the fridge for at least 4 hours, or ideally overnight. **Chilling is non-negotiable for that perfect set.**
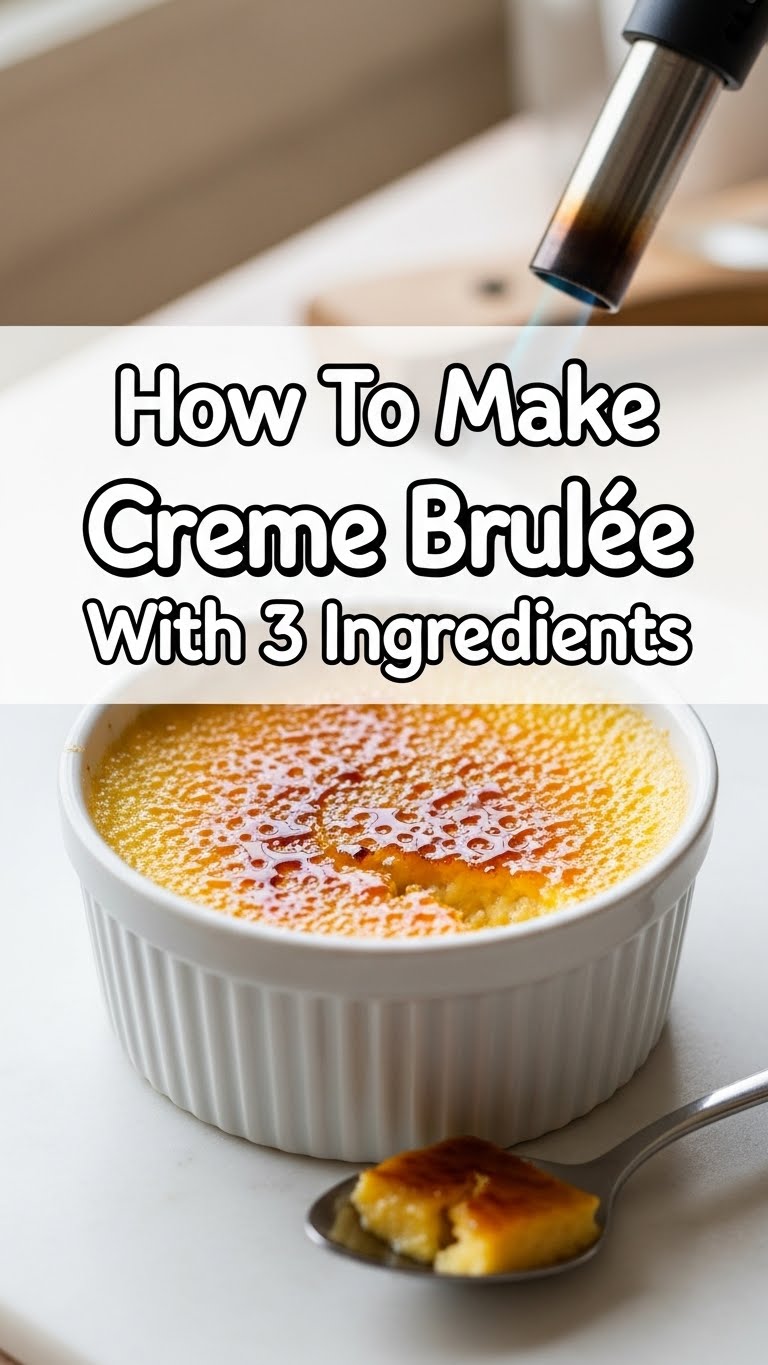
- Torch it! Just before serving, sprinkle a thin, even layer of your remaining granulated sugar over the top of each chilled custard. Grab your kitchen torch (or use the broiler, but a torch is way more fun!) and caramelize that sugar until it’s a beautiful, deep amber crust. Let it sit for a minute to harden. *CRACK!* Perfection!
Common Mistakes to Avoid
- Boiling the cream: Remember, steamy, not bubbly! Boiling cream can scald it and give it a weird flavor. Not what we’re going for in a fancy dessert.
- Scrambling the eggs during tempering: Pouring hot cream too fast into the yolks without whisking like a mad scientist? Hello, egg drop soup! Slow and steady wins the custardy race.
- Overbaking: A fully firm custard means it’s overbaked and will be rubbery. A slight jiggle in the center is your friend, promising ultimate silkiness.
- Skipping the chill: Impatience is your enemy here. If you serve it warm, it’ll be a sad, runny mess. **Trust the fridge, always.**
- Too much sugar for the torch: A thick layer of sugar will just melt into a gloopy mess. Thin and even is key for that satisfying *crack* sound.
Alternatives & Substitutions
Okay, so “3 ingredients” means we’re pretty locked in on the core stuff. But that doesn’t mean we can’t jazz it up without adding more “core” ingredients!
- Flavor Boosts: Add a splash of vanilla extract (or vanilla bean paste if you’re feeling extra fancy) to the cream while warming it for classic goodness. Or, for a twist, try a tiny bit of orange zest, a cinnamon stick, or even a few coffee beans infused in the cream. Just strain them out before combining!
- Sugar Swap: If you’re out of granulated sugar for the top, brown sugar can work in a pinch for the torching, but it gives a different, more caramel-y flavor and isn’t quite as crisp. Try it, but don’t say I didn’t warn you about the purists.
- Serving Shenanigans: Top with fresh berries, a dollop of whipped cream (more cream, who’s counting?), or even a light sprinkle of flaky sea salt for a salty-sweet kick.
FAQ (Frequently Asked Questions)
- Q: Do I really *need* a kitchen torch?
A: Need? No. Want? Absolutely! A broiler works, just watch it like a hawk because sugar burns fast. But honestly, the torch is half the fun. You get to play with fire! - Q: Can I make these ahead of time?
A: YES! That’s the beauty of crème brûlée. Make ’em a day or two in advance, keep ’em chilled, and torch right before serving. Your future self will thank you. - Q: My custard looks curdled. What happened?
A: Uh oh, sounds like you either boiled the cream or didn’t temper the eggs slowly enough. Don’t worry, it happens to the best of us. Try again, but remember: slow and steady! - Q: Why the water bath? Is it just to make me feel like a pro chef?
A: Well, yes, partly! But mainly, it ensures the custard cooks gently and evenly, preventing it from cracking or developing a rubbery texture. It’s science, baby! - Q: Can I use light cream or half-and-half?
A: You *can*, but it won’t be nearly as rich or decadent. You’ll end up with a thinner, less luxurious custard. We’re going for indulgence here, so **stick with heavy cream, IMO.** - Q: My sugar didn’t get crispy after torching. Help!
A: Did you chill the custards enough? The cold helps the torched sugar solidify quickly. Also, make sure you’re getting enough heat on that sugar – don’t be shy with the torch!
Final Thoughts
See? You just made Crème Brûlée! And with only three ingredients, no less. You’re basically a culinary wizard now, capable of conjuring fancy desserts out of thin air (and some cream, eggs, and sugar). So go on, bask in the glory, snap some pics, and most importantly, enjoy that first satisfying *CRACK*. You’ve earned it, my friend. Now go impress someone—or yourself—with your new culinary skills. You’ve totally got this!


