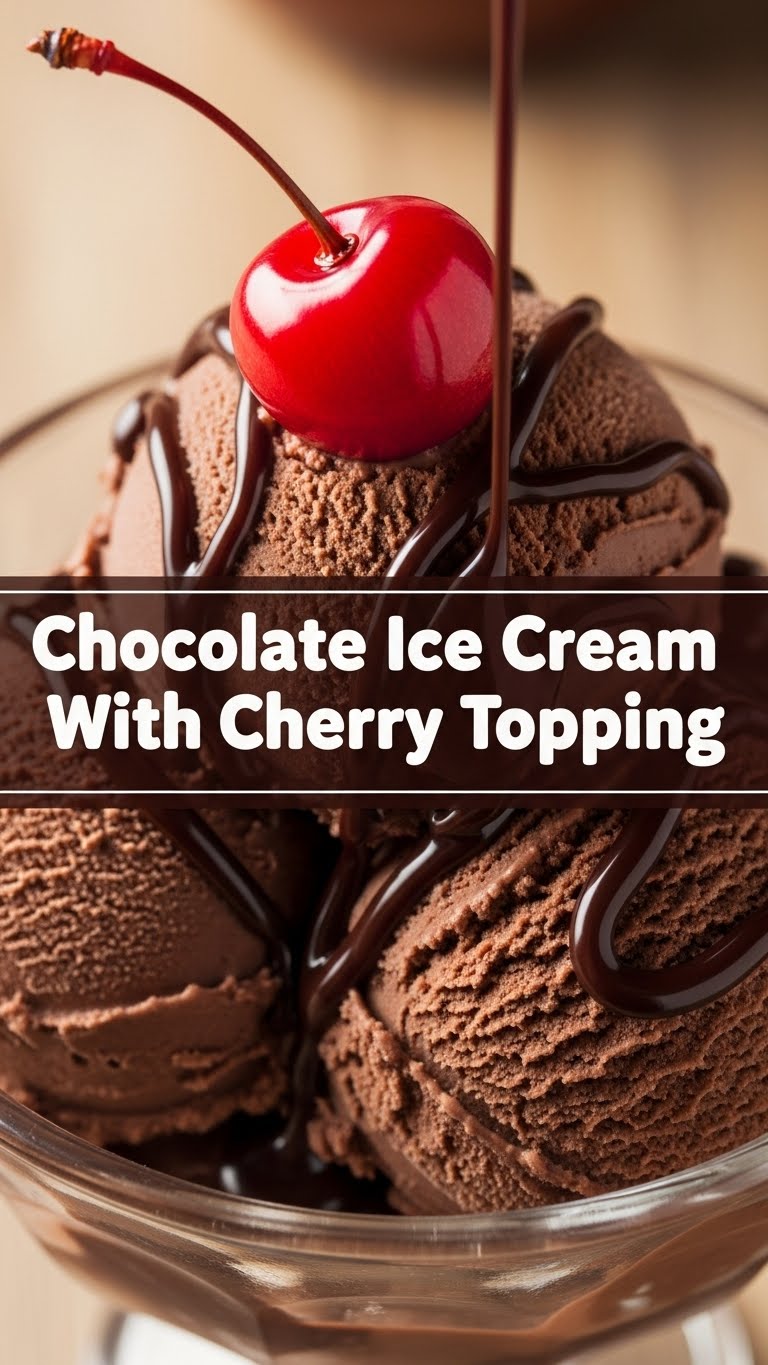
So, you’ve just binged three seasons of your favorite show and now your brain is telling you “dessert!” but your body is saying “couch!”? Yeah, me too. We’ve all been there – craving something seriously decadent but feeling too lazy to, like, *actually* cook. Well, my friend, pull up a digital chair because I’ve got just the thing: homemade chocolate ice cream with a bright, sassy cherry topping that basically makes you a culinary genius without, you know, all the actual work.
Why This Recipe is Awesome
Because life’s too short for boring desserts and complicated instructions, that’s why! This isn’t just any chocolate ice cream; it’s **no-churn** chocolate ice cream. That means no fancy ice cream maker gathering dust in your cupboard. It’s practically idiot-proof, even I didn’t mess it up (and I once set off a smoke alarm trying to boil water). Plus, we’re pairing it with a vibrant cherry topping that makes you look sophisticated, even if you’re eating it straight from the container in your pajamas. It’s the perfect balance of chocolatey indulgence and fruity zing. Trust me on this one.
Ingredients You’ll Need
Get ready for a ridiculously short shopping list. We’re all about efficiency here.
- **2 cups (470ml) Cold Heavy Cream:** This is the absolute star of our no-churn show. Don’t even *think* about substituting it with anything lighter. This is where the magic happens, folks.
- **1 can (14oz/397g) Sweetened Condensed Milk:** Our other secret weapon. It provides sweetness and that creamy, un-icy texture without an ice cream machine.
- **¾ cup (75g) Unsweetened Cocoa Powder:** Go for a good quality one here. It’s chocolate ice cream, so the chocolate needs to shine!
- **1 teaspoon Vanilla Extract:** A little hug for your ice cream, really makes the chocolate sing.
- **Pinch of Salt:** Don’t skip this! It amplifies the chocolate flavor like nobody’s business.
- **1 pound (about 2 cups) Fresh or Frozen Pitted Cherries:** The crown jewels! If using fresh, make sure they’re pitted (obvi). Frozen works beautifully too, no need to thaw.
- **¼ cup (50g) Granulated Sugar:** Just a whisper of sweetness for our cherries. Adjust to your cherry’s tartness.
- **1 tablespoon Lemon Juice:** Brightens up the cherry sauce, cutting through the sweetness and chocolate richness.
Step-by-Step Instructions
Alright, let’s get this party started. Seriously, these steps are so easy, you might wonder why you ever bought ice cream from a store.
- **Get Whippy With It:** Grab a large, chilled bowl and an electric mixer (or a strong arm, if you’re feeling ambitious). Pour in your cold heavy cream and whip it on medium-high speed until **stiff peaks** form. What are stiff peaks? When you lift the beaters, the cream should stand up straight and proud, like a tiny culinary mountain.
- **Chocolatey Goo Time:** In a separate medium bowl, combine the sweetened condensed milk, cocoa powder, vanilla extract, and that tiny pinch of salt. Whisk it all together until it’s smooth, glossy, and smells like pure chocolate heaven. Resist the urge to eat it all right now.
- **Marry Them Gently:** Now for the critical part: gently fold about a third of your whipped cream into the chocolate mixture. This lightens it up. Then, add the rest of the whipped cream, folding until just combined. Be super gentle! You want to keep that glorious air in the cream for ultimate creaminess. Don’t overmix, or your ice cream will be dense and sad.
- **Into the Freezer:** Pour the beautiful chocolate mixture into a 9×5-inch loaf pan or a similar freezer-safe container. Cover it tightly with plastic wrap or a lid. Pop it into the freezer for at least **6 hours**, or ideally, overnight.
- **Cherry Bomb Prep:** While your ice cream is chilling out, let’s make the cherry topping. In a small saucepan, combine your pitted cherries (fresh or frozen), granulated sugar, and lemon juice. Bring it to a simmer over medium heat, stirring occasionally. Let it cook for about 5-10 minutes, until the cherries are softened and the sauce has thickened slightly. Remove from heat and let it cool completely. You can make this ahead of time and keep it in the fridge.
- **Serve and Devour:** Once your ice cream is firm, scoop it generously into bowls. Spoon that glorious, glossy cherry topping over the top. Now, go forth and impress someone (or just yourself, **no judgment here**).
Common Mistakes to Avoid
Even though this recipe is pretty foolproof, there are a few little pitfalls to sidestep. Don’t say I didn’t warn you!
- **Over-whipping the Cream:** If you whip the heavy cream too long, you’ll end up with butter. Delicious, but not what we’re going for in ice cream. Stop when those peaks are stiff!
- **Under-folding (or Over-folding):** If you don’t fold enough, you’ll have streaks of unmixed cream. If you fold too much, you’ll lose all that lovely air, and your ice cream will be dense. A light, gentle hand is key.
- **Not Covering the Ice Cream:** Freezer burn is the enemy of all things delicious. Always make sure your ice cream is covered tightly to prevent those pesky ice crystals.
- **Eating All the Cherry Topping Before It Goes on the Ice Cream:** A very understandable mistake, but try to exercise *some* self-control!
- **Using Low-Quality Cocoa Powder:** This isn’t the time to skimp. The cocoa is the star, so give it the stage it deserves.
Alternatives & Substitutions
Feeling a little adventurous, or missing an ingredient? I got you. Here are some ideas to tweak this masterpiece.
- **Dairy-Free Dream:** You can absolutely make this plant-based! Swap the heavy cream for **full-fat canned coconut cream** (chilled overnight, scoop out the thick cream only). Use a dairy-free sweetened condensed milk, which is becoming increasingly common.
- **Fruit Swap:** Not a cherry person? (Gasp! But okay.) This recipe works wonderfully with other berries like raspberries, blackberries, or even a mix of summer berries. Just follow the same method for the topping.
- **No Cherries? No Problem:** If you’re out of fruit, this chocolate ice cream is phenomenal on its own. Or, top it with chocolate shavings, a drizzle of caramel, hot fudge, or even some chopped nuts. But **IMO**, the cherries really elevate it!
- **A Boozy Kick:** Want to make it an adult-only treat? Add a splash of cherry liqueur (like kirsch) to your cherry topping, or a tablespoon of coffee liqueur (like Kahlúa) to the chocolate mixture before freezing.
FAQ (Frequently Asked Questions)
Got questions? I’ve got answers. (Mostly.)
- **”Do I *really* need heavy cream?”** Yes, my friend, **heavy cream is non-negotiable** for that rich, creamy, no-churn texture. Lighter creams won’t whip properly and will result in icy, sad ice cream.
- **”Can I use regular sugar instead of condensed milk?”** Nope! The sweetened condensed milk isn’t just for sweetness; its unique consistency is what makes this a no-churn recipe. It prevents ice crystals from forming.
- **”How long does it last in the freezer?”** If stored properly (tightly covered!), it’ll last for about 2 weeks. But let’s be real, it won’t make it past day three in my house.
- **”My ice cream isn’t firm enough, what gives?”** Patience, young grasshopper! It likely just needs more time in the freezer. Also, ensure your heavy cream was properly whipped and you didn’t deflate it too much during folding.
- **”Can I add other mix-ins to the ice cream base?”** Absolutely! Once you’ve folded in the whipped cream, feel free to fold in chocolate chips, chopped nuts, mini marshmallows, cookie crumbs… the world is your oyster!
- **”Is this healthy?”** Pfft, it’s dessert! We’re here for joy, not kale. Enjoy it in moderation, or not. Your call.
Final Thoughts
See? I told you it was easy! You just made homemade chocolate ice cream with a vibrant cherry topping from scratch. You, my friend, are a culinary rockstar. Now go impress someone—or yourself—with your new skills. You’ve earned every single glorious scoop. Enjoy your chocolatey, cherry-licious masterpiece. You deserve it!

