So, you’re craving something ridiculously tasty, chocolatey, and impressive, but the thought of turning on the oven or, gasp, *baking* anything just makes you want to curl up with a pint of ice cream and call it a day? Yeah, I feel you. Hard. Well, ditch the guilt and put down that pint (just for a sec!), because I’ve got a recipe that’s about to blow your mind and barely lift a finger. We’re talking **No-Bake Chocolate Mousse Pie with an Oreo Crust**. It’s basically a hug in pie form, and it requires zero baking skills. Seriously, if you can crush a cookie and use a mixer, you’re golden.
Why This Recipe is Awesome
Let’s be real, life is complicated enough without wrestling with finicky soufflés or waiting for dough to rise. This pie, my friend, is the hero we all need. It’s:
- **Effortlessly Elegant:** It looks like you spent hours slaving away, but shhh, that’s our little secret.
- **Dangerously Delicious:** Rich, creamy, chocolatey bliss that practically melts in your mouth.
- **Idiot-Proof:** And I mean that in the most loving way possible. Even I, a person who once set off a smoke alarm trying to boil water, can nail this.
- **No-Bake Nirvana:** Keep your kitchen cool, calm, and collected. No oven required! Your future self, sweating through a summer heatwave, will thank you.
Ingredients You’ll Need
Gather ’round, buttercup, it’s time to assemble our dream team. Most of these are probably already lurking in your pantry, waiting for their moment to shine.
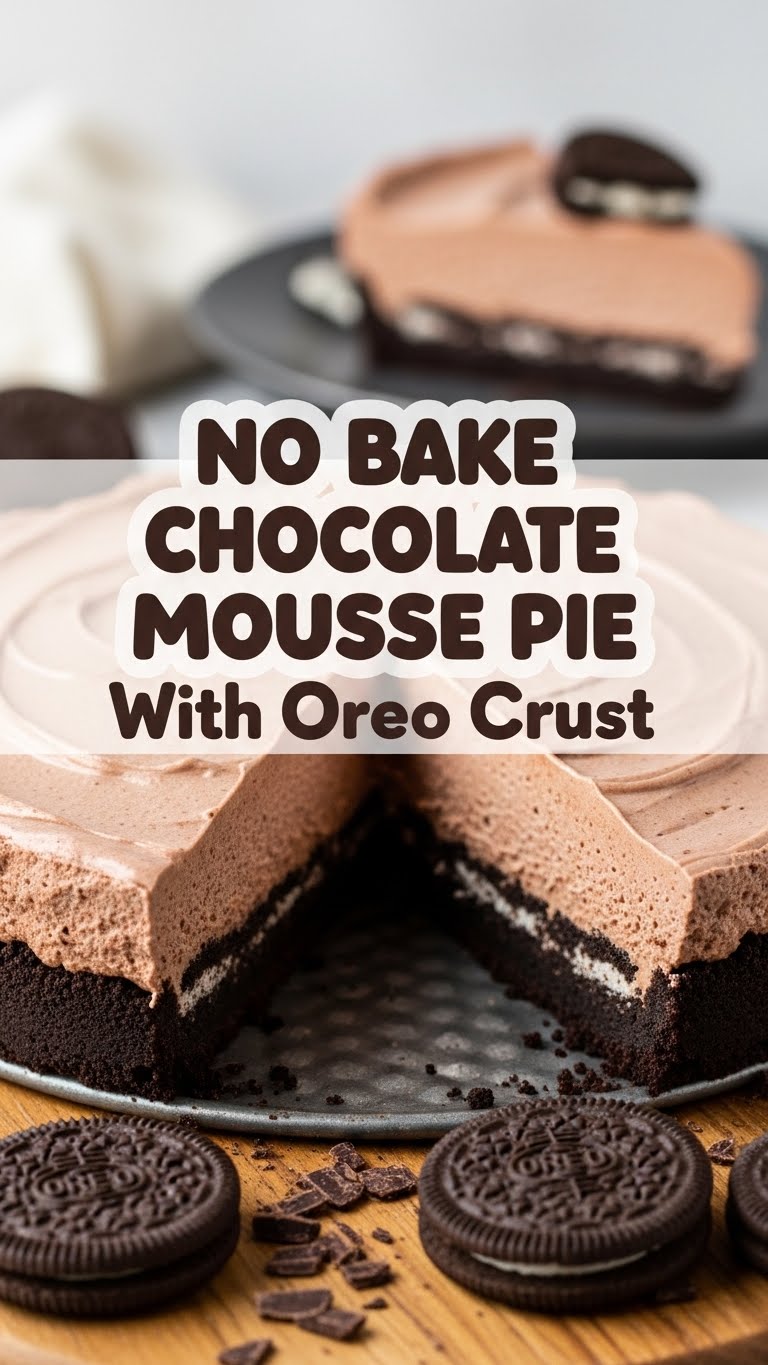
For the Oreo Crust:
- **1 (14.3 oz) package Oreo cookies:** The whole dang package. Original is classic, but hey, if you’re feeling wild, go for a different flavor.
- **6 tablespoons unsalted butter, melted:** Real butter, folks. No substitutes if you want that buttery crunch!
For the Chocolate Mousse Filling:
- **2 cups heavy cream, very cold:** This is the magic potion that makes it light and fluffy. Don’t skimp, don’t use half-and-half. Cold is key!
- **½ cup powdered sugar:** Gives it that silky smooth texture and just the right amount of sweetness.
- **½ cup unsweetened cocoa powder:** For that deep, dark chocolate flavor. Use good quality cocoa, it makes a difference.
- **1 teaspoon vanilla extract:** A splash of warmth and complexity.
- **Pinch of salt:** Enhances the chocolate flavor. Trust me on this one.
Optional Garnish:
- Extra crushed Oreos, chocolate shavings, fresh berries, or a dollop of whipped cream.
Step-by-Step Instructions
Alright, apron on (or not, no judgment here), let’s get this no-bake party started!
- **Crush Those Cookies:** Grab your Oreos. You can either toss them in a food processor and blitz until fine crumbs, or, if you’re feeling primal, put them in a zip-top bag and smash them with a rolling pin (or a heavy mug, or your fist – whatever works!).
- **Butter ‘Em Up:** In a medium bowl, combine your Oreo crumbs with the melted butter. Stir until all the crumbs are nicely moistened. It should look like wet sand.
- **Press & Chill:** Press the crumb mixture firmly into the bottom and up the sides of a 9-inch pie plate. **The firmer you press, the better it holds together!** Pop this beauty into the fridge or freezer for at least 30 minutes to firm up. This is a crucial step, don’t skip it!
- **Whip It Good (But Not Too Good!):** In a large, super-clean bowl with a chilled whisk attachment (if using a stand mixer) or hand mixer, pour in your very cold heavy cream. Start whipping on medium speed, then increase to high.
- **Sweeten & Flavor:** As soft peaks begin to form, gradually add the powdered sugar, cocoa powder, vanilla extract, and the pinch of salt. Continue whipping until stiff peaks form. **Be careful not to over-whip, or you’ll end up with butter!** We’re looking for fluffy, stable mousse, not butter.
- **Fill ‘Er Up:** Spoon or pipe the chocolate mousse into your chilled Oreo crust. Use an offset spatula or the back of a spoon to spread it evenly and make pretty swoops.
- **The Waiting Game (It’s Worth It!):** Cover the pie loosely with plastic wrap and refrigerate for at least 4 hours, or preferably overnight. The longer it chills, the firmer and more stable your pie will be. This also gives the flavors time to mingle and become best friends.
- **Garnish & Devour:** Once firm, slice, serve, and garnish with whatever your heart desires. Extra crushed Oreos, chocolate shavings, or even a few raspberries for a pop of color and tartness work wonders.
Common Mistakes to Avoid
Nobody’s perfect, but we can at least try to avoid these rookie errors, right?
- **Not Chilling Your Crust Enough:** You’ll end up with a crumbly mess that refuses to stay in place. **Chill that crust, people!**
- **Warm Heavy Cream:** Using anything less than *super* cold heavy cream is like trying to catch smoke. It just won’t whip properly. Plan ahead!
- **Over-Whipping the Mousse:** One minute it’s fluffy cream, the next it’s grainy butter. Keep an eye on it! Stop as soon as stiff peaks form.
- **Under-Chilling the Final Pie:** Impatience is a virtue… sometimes. Not when it comes to no-bake pies. If you cut into it too soon, it’ll be a soupy disappointment. **Give it time to set!**
- **Using Cheap Cocoa:** Seriously, invest in a decent cocoa powder. It’s the star of the show here, and a good quality one will give you that rich, deep chocolate flavor you’re craving.
Alternatives & Substitutions
Feeling creative? This recipe is super flexible! Here are a few ideas to shake things up:
- **Crust Swaps:** Not an Oreo fanatic? Try a **graham cracker crust** or a **Nilla Wafer crust** instead. Just follow the same butter-to-crumb ratio. You could even use other flavored sandwich cookies!
- **Mousse Makeovers:** Add a shot of espresso powder to the mousse for a **mocha mousse pie**. Or, a splash of peppermint extract for a **mint chocolate pie**. Feeling fruity? Fold in some raspberry puree or zest an orange into the mousse mixture.
- **Topping Extravaganza:** Drizzle with caramel sauce, sprinkle with toasted nuts, add some mini chocolate chips, or go wild with sprinkles. Your pie, your rules!
- **Dairy-Free Dream:** With so many great non-dairy heavy cream alternatives out there (like coconut cream!), you could totally make this a dairy-free treat. Just ensure your coconut cream is *very* cold.
FAQ (Frequently Asked Questions)
Got questions? I’ve got (casual) answers!
- **Can I use a store-bought Oreo crust?**
Well, technically yes, but why cheat yourself out of the superior taste and texture of a homemade crust? It’s literally just crushing cookies and mixing with butter – you got this! - **How long does this pie last in the fridge?**
If it miraculously lasts that long, it’ll be good for about 3-4 days in an airtight container. But let’s be honest, it’ll probably disappear in 3-4 *hours*. - **Can I make this pie ahead of time?**
Oh, absolutely! This pie is a superstar make-ahead dessert. In fact, it often tastes even better the next day after all the flavors have had a chance to meld. - **What if my mousse isn’t firming up?**
Did you use very cold cream? Did you whip it to stiff peaks? If it’s still a bit soft, try popping it in the freezer for 30-60 minutes before serving. Worst case, it’s a delicious pudding pie! - **Can I freeze this pie?**
Yep! It turns into an incredible frozen chocolate treat. Just wrap it well in plastic wrap and then foil, and it’ll keep for up to a month. Thaw slightly before serving for the best texture. - **Dark chocolate or regular cocoa powder?**
That, my friend, is a matter of personal preference! Dark cocoa will give you a richer, more intense chocolate flavor, while regular will be a bit sweeter and milder. Use what you love!
Final Thoughts
So there you have it! A show-stopping, no-sweat, no-bake chocolate mousse pie with an Oreo crust that’s guaranteed to impress. Whether you’re making it for a party, a potluck, or just a Tuesday night because you deserve something delicious (you totally do!), this recipe is your new best friend. Now go impress someone—or yourself—with your new culinary skills. You’ve earned it! Happy pie-making, my lazy-gourmet friend!


