So, you’re scrolling through your phone, probably looking at pictures of cute puppies or that dream vacation, when BAM! A craving for something ridiculously delicious and red velvet-y hits you. But who has time for a whole cake *and* homemade ice cream? Not us, friend, not us. Good news: I’ve got a recipe that’s about to change your dessert game without demanding your firstborn or your entire weekend. Get ready for Red Velvet Ice Cream with Brownie Chunks, because your taste buds are about to throw a party!
Why This Recipe is Awesome
Let’s be real, you want something amazing without the fuss. This recipe? It’s basically the culinary equivalent of putting on sweatpants but still looking fabulous. We’re talking **no-churn ice cream**, which means you don’t need a fancy machine or any mysterious churning rituals. It’s so easy, your pet hamster could probably make it (if they had opposable thumbs and a tiny whisk, obvs). You get that dreamy red velvet flavor, and then, just when you think it can’t get any better, we throw in glorious, fudgy brownie chunks. It’s minimal effort for maximum bragging rights. Plus, red velvet *and* brownies? It’s basically two desserts having a delicious baby, and everyone’s invited!
Ingredients You’ll Need
Gather your troops, fellow dessert warrior! Here’s what you’ll need to create this masterpiece:
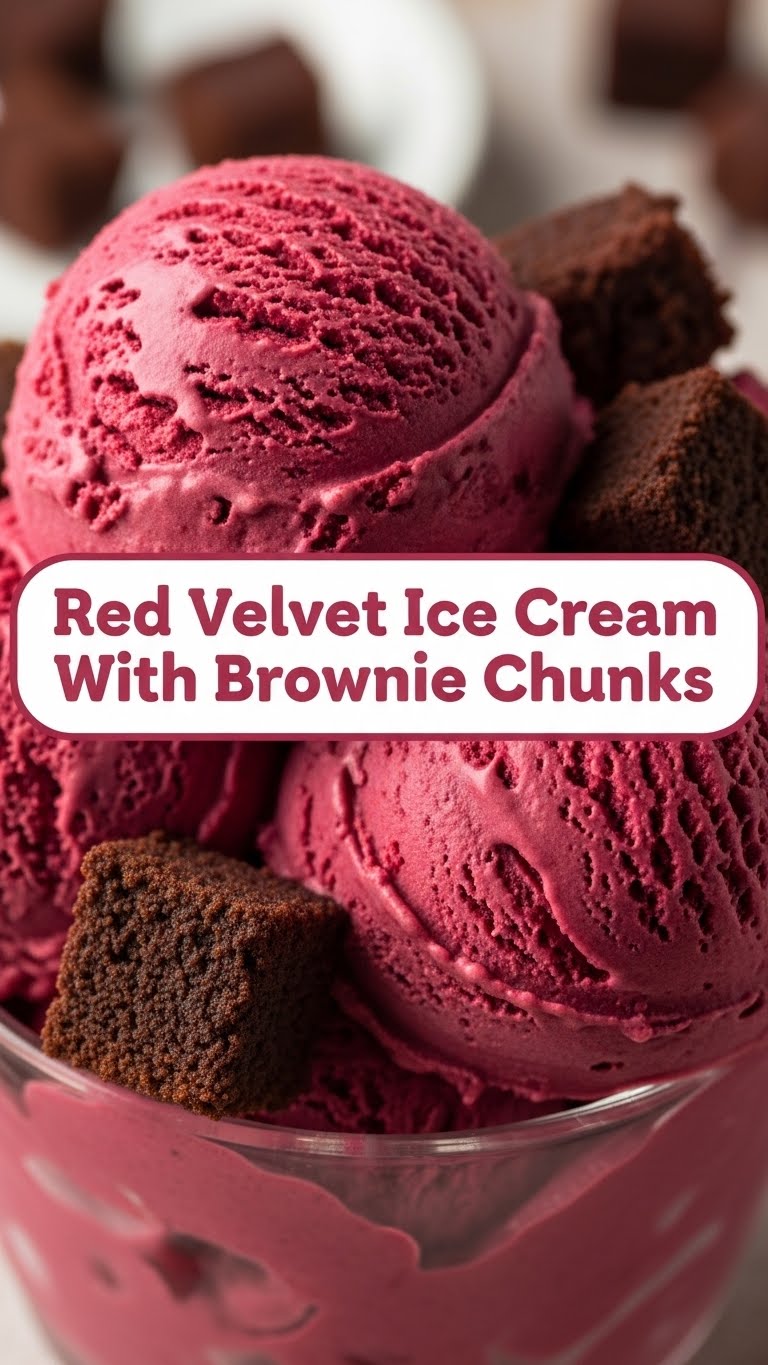
- **Heavy Cream (2 cups / 470ml):** The MVP of no-churn ice cream. Get the full-fat stuff; this isn’t the time for ‘light’ anything. We’re going for rich and creamy, remember?
- **Sweetened Condensed Milk (1 can, 14 oz / 397g):** This is where the magic happens, sugar-wise. Don’t confuse it with evaporated milk unless you want a sad, watery mess. Read the label!
- **Unsweetened Cocoa Powder (2 tablespoons):** Just a touch for that classic red velvet depth. Don’t go wild; we’re not making chocolate ice cream here, just giving it that subtle cocoa kiss.
- **Red Food Coloring (1-2 tablespoons, or more to taste):** Liquid or gel. Gel gives you that vibrant, stop-traffic red. Don’t be shy; aim for that classic, bold hue!
- **Vanilla Extract (1 teaspoon):** A splash for warmth and coziness. The good stuff, please, it makes a difference.
- **Pre-made Brownie Chunks (1.5 cups, chopped):** Yep, we’re cutting corners and loving it! Bake a box mix, cool ’em, chop ’em. Or just buy a store-bought pack of fudgy brownies. **No judgment here!** Just make sure they’re cooled and cut into bite-sized pieces.
Step-by-Step Instructions
- **Whip It Real Good:** Grab a big, chilled bowl and your trusty hand mixer (or stand mixer with a whisk attachment). Pour in the heavy cream and whip it till it forms lovely, stiff peaks. Think clouds, but firmer, holding their shape when you lift the whisk. This might take 3-5 minutes, so put on a good song!
- **The Red Velvet Base:** In a separate medium bowl, combine the sweetened condensed milk, cocoa powder, red food coloring (start with a generous squeeze and add more until you hit your desired fabulous red!), and vanilla extract. Whisk it all together until it’s a beautiful, uniform red lava.
- **Fold with Love (and Care):** Now for the delicate part. Gently fold about a third of your whipped cream into the red velvet base to lighten it up. Then, add the rest of the whipped cream and gently fold until just combined. You want to maintain that airy volume, so be gentle! Don’t deflate those clouds; we need them fluffy for that perfect ice cream texture.
- **Brownie Time!** Time for the star guest: those brownie chunks! Fold them into the mix. Don’t overmix, just distribute the deliciousness evenly. Every scoop deserves a brownie surprise.
- **Freeze for Glory:** Pour your glorious concoction into a freezer-safe container (a loaf pan covered tightly works great!). Smooth out the top, maybe give it a little tap on the counter to settle. **Cover it tightly** (plastic wrap pressed directly on the surface, then foil, works best) and pop it into the freezer for at least 6 hours, or ideally, overnight. Patience is a virtue, my friend, especially when ice cream is involved!
Common Mistakes to Avoid
Don’t fall into these common pitfalls, my friend. We’re aiming for perfection, not a dessert disaster!
- **Not whipping your heavy cream enough:** This isn’t a suggestion, it’s a command! If your cream isn’t stiff, your ice cream will be a soupy disappointment. Don’t skip arm day, or rather, mixer day.
- **Using evaporated milk instead of condensed milk:** Rookie error! One is thick and sweet, the other is… not. Read the label, save yourself the tears and a trip back to the grocery store.
- **Overmixing once the cream is folded in:** Remember those fluffy clouds? If you stir too vigorously, they’ll collapse, and you’ll end up with dense, icy ice cream. We want light and airy, not a brick.
- **Forgetting to cover your ice cream properly:** Freezer burn is a real villain, and it’s coming for your delicious creation. Protect your precious ice cream from ice crystals by covering it tightly. No one wants crunchy ice cream that isn’t supposed to be crunchy.
Alternatives & Substitutions
Feeling creative? Here are a few ways to tweak this recipe to your heart’s content:
- **Brownie Chunks:** Not feeling brownies? (Gasp!) You could swap ’em out for white chocolate chips, chopped Oreos, or even some crumbled red velvet cake if you’re feeling extra meta. **My personal fave:** White chocolate chunks add a nice contrast to the red velvet!
- **Red Food Coloring:** If you’re a purist, you can dial back the red or omit it. But then it’s just ‘cocoa ice cream with brownies,’ and where’s the fun in that? It’s *red velvet* for a reason! Embrace the bold color!
- **Vanilla Extract:** Try almond extract for a slightly different, sophisticated twist. Or, if you’re feeling wild, a tiny bit of orange zest for a surprising citrusy note.
- **Extra Swirls:** Before freezing, swirl in a tablespoon or two of cream cheese frosting (softened, of course!) for an extra layer of red velvet goodness. Yum!
FAQ (Frequently Asked Questions)
Got questions? I’ve got answers. Probably. Let’s see!
- **Do I really need an ice cream maker for this?** Nope! That’s the beauty of ‘no-churn.’ Your freezer is the only special equipment you need. You’re welcome.
- **My ice cream didn’t get firm. What went wrong?** Did you whip the cream to stiff peaks? And did you freeze it long enough? These are usually the culprits. Also, check your freezer temperature – maybe it needs a boost!
- **Can I make this dairy-free?** You *can* try, but finding dairy-free heavy cream that whips well and dairy-free sweetened condensed milk can be a quest. The texture might be different, but hey, experimentation is half the fun!
- **How long does this ice cream last in the freezer?** If it lasts more than a week, I’d be genuinely shocked (because you’ll eat it all). But officially, about 2-3 weeks in an airtight container before quality starts to dip. But seriously, it won’t last that long.
- **Can I use store-bought brownies?** Absolutely! That’s half the magic trick for quick prep. No judgment here! Just make sure they’re fresh and fudgy.
- **Why does my red velvet look more pink than red?** You probably need more food coloring! Gel food coloring is your best friend for a deep, vibrant red. Don’t be afraid to go bold; it’s red velvet, after all!
Final Thoughts
Alright, my culinary wizard, you’ve got the lowdown on crafting a truly impressive, yet deceptively simple, dessert. This Red Velvet Ice Cream with Brownie Chunks isn’t just a treat; it’s a statement. A statement that says, “I can make fancy things, and I still have time for Netflix.” So go forth, whip up this gloriousness, and savor every single scoop. You’ve earned this moment of pure, unadulterated deliciousness! Now go impress someone—or yourself—with your new culinary skills. You’ve earned it!


