So, you’ve scrolled past enough perfectly plated desserts on Instagram and now your sweet tooth is staging a full-blown rebellion, huh? Been there, done that, bought the emergency chocolate. Today, we’re not just satisfying a craving; we’re crafting a masterpiece that screams ‘I tried, but also, I’m kinda a genius.’ Get ready for a Chocolate Tart with Caramel Mousse that’s so good, it’s almost illegal. And don’t worry, we’re keeping it fun and friendly, because life’s too short for boring recipes.
Why This Recipe is Awesome
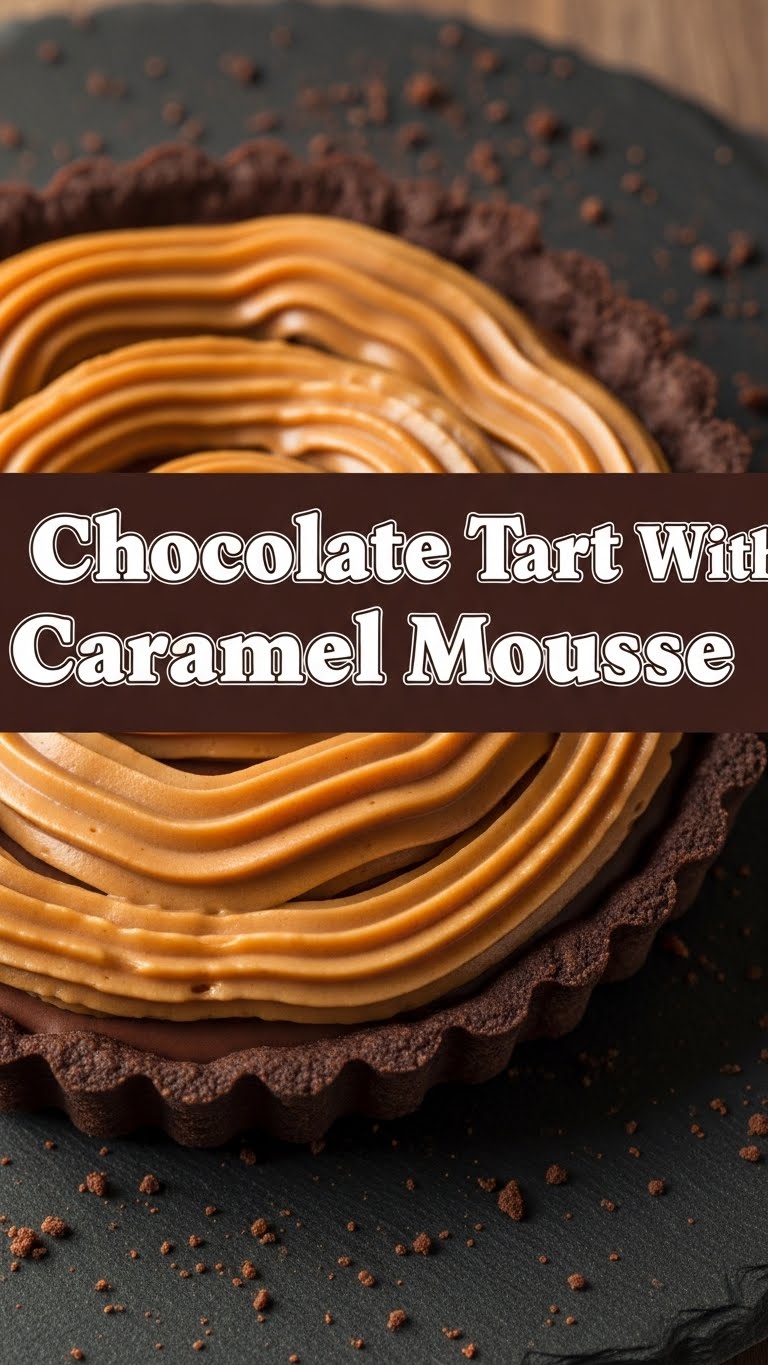
Let’s be real, you’re here for something that looks fancy AF but doesn’t require a culinary degree or an entire weekend. And guess what? This is it! This tart is a showstopper without the show-stopping effort. Here’s why you’re about to fall in love:
- It’s got a **rich, chocolatey crust** that crumbles perfectly.
- The **caramel mousse is light, airy, and bursting with buttery caramel flavor** – no heavy, cloying feeling here.
- It’s a combo of two universally adored things: chocolate and caramel. It’s like they were destined to be together in your mouth.
- **The mousse is no-bake!** Say goodbye to finicky water baths and hello to easy-peasy deliciousness.
- It looks ridiculously impressive, making you the hero of any potluck or Tuesday night.
Ingredients You’ll Need
Gather your troops, aspiring pastry ninja! We’re not using anything too wild here, just good old reliable deliciousness.
For the Chocolate Tart Crust (The sturdy, chocolatey hug)
- 1 ½ cups all-purpose flour: The backbone of our operation. Don’t eyeball this.
- ½ cup unsweetened cocoa powder: For that deep, dark, sophisticated chocolate vibe.
- ½ cup powdered sugar: Melts like a dream, no gritty business allowed.
- ¼ teaspoon salt: Enhances everything, like a good wingman.
- ¾ cup (1 ½ sticks) unsalted butter, very cold and cubed: Essential for flakiness. Think tiny, cold fat bombs.
- 3-5 tablespoons ice water: Just enough to bring it all together. Start with less, add more. Don’t overdo it!
For the Caramel Mousse (The fluffy, dreamy cloud)
- 1 cup granulated sugar: The base of our golden goodness.
- ¼ cup water: To help that sugar do its thing and prevent early crystallization.
- 2 cups heavy cream, cold (divided): We need lots of this for richness and fluff.
- ¼ cup unsalted butter: Adds richness, makes it smooth.
- ½ teaspoon salt (flaky sea salt is a bonus for garnish!): Cuts through the sweetness, makes it sing.
- 1 tablespoon gelatin powder: Our secret weapon for stable mousse. Don’t fear it!
- ¼ cup cold water (for gelatin): To bloom the gelatin.
For the Ganache Drizzle (The glossy finish line – optional but highly recommended)
- ½ cup dark chocolate chips or finely chopped chocolate: The richer, the better.
- ½ cup heavy cream: To make it silky smooth and drizzle-able.
Step-by-Step Instructions
Alright, apron on, battle music cued, let’s get cooking! Follow these simple steps and you’ll be a tart wizard in no time.
Part 1: The Crust (Your sturdy chocolatey hug)
- In a large bowl, whisk together the flour, cocoa powder, powdered sugar, and salt. Make sure there are no lumps of cocoa.
- Add the cold, cubed butter to the dry ingredients. Using a pastry blender or your fingertips, cut the butter into the flour mixture until it resembles coarse crumbs with some pea-sized pieces of butter remaining. Don’t overmix!
- Gradually add the ice water, one tablespoon at a time, mixing just until the dough comes together. You might not need all of it. The dough should be cohesive but not sticky.
- Gather the dough into a disc, wrap it tightly in plastic wrap, and chill in the fridge for at least 30 minutes (or up to 2 days). This is a crucial step for a flaky crust.
- On a lightly floured surface, roll out the chilled dough into a 12-inch circle. Carefully transfer it to a 9-inch tart pan with a removable bottom. Press the dough gently into the bottom and up the sides. Trim any excess dough.
- Prick the bottom of the crust all over with a fork. Line the crust with parchment paper and fill with pie weights or dried beans.
- Bake in a preheated oven at 375°F (190°C) for 15 minutes. Remove the parchment and weights, then bake for another 10-15 minutes, or until the crust looks dry and set.
- Let the crust cool completely on a wire rack. **Seriously, completely cool!**
Part 2: The Caramel Mousse (The fluffy dream)
- In a small bowl, sprinkle the gelatin powder over ¼ cup cold water. Let it sit for 5-10 minutes to “bloom” (it’ll turn into a gel-like consistency).
- In a medium saucepan, combine the granulated sugar and ¼ cup water. Cook over medium-high heat, without stirring, until the sugar dissolves and turns into a deep amber caramel. This takes about 8-12 minutes. Swirl the pan occasionally to ensure even cooking.
- Meanwhile, warm 1 cup of the heavy cream in a separate small saucepan or microwave until steaming but not boiling. This is **important!**
- Once the caramel is amber, remove it from the heat. Carefully and slowly pour in the warm heavy cream, whisking constantly. It will bubble up vigorously, so be careful!
- Stir in the ¼ cup unsalted butter and ½ teaspoon salt until melted and combined.
- Add the bloomed gelatin to the hot caramel mixture and stir until it’s completely dissolved.
- Pour the caramel mixture into a heatproof bowl and let it cool completely to room temperature. It should be thick but still pourable.
- In a separate large bowl, using an electric mixer, whip the remaining 1 cup of cold heavy cream until soft peaks form.
- Gently fold the cooled caramel mixture into the whipped cream until no streaks remain. Be careful not to deflate the cream too much.
- Pour the caramel mousse into your cooled chocolate tart shell. Smooth the top with a spatula.
- Chill the tart in the refrigerator for at least 4-6 hours, or preferably overnight, until the mousse is firmly set.
Part 3: The Ganache Drizzle (The fancy pants top coat – optional, but recommended)
- Place the chocolate chips/chopped chocolate in a small heatproof bowl.
- Heat the ½ cup heavy cream in a small saucepan or microwave until it just begins to simmer.
- Pour the hot cream over the chocolate. Let it sit undisturbed for 5 minutes.
- Stir gently with a whisk until the ganache is smooth and glossy.
- Let the ganache cool slightly until it’s pourable but not too runny.
- Drizzle the ganache artistically over the chilled tart. You can go for full coverage or just a pretty swirl.
- Chill the tart again for another 15-30 minutes to set the ganache.
Common Mistakes to Avoid
Nobody’s perfect, but we can definitely steer clear of these common blunders that might ruin your tart dreams.
- **Overworking the dough:** Your crust will be tough, not tender. Nobody wants a biscuit for a tart. Mix just until combined, then stop!
- **Not chilling the dough:** It’ll be a sticky, unmanageable mess and won’t hold its shape when baked. Patience, grasshopper.
- **Skipping blind baking:** Hello, soggy bottom! This is a crime against tart-kind. Always blind bake for a crisp crust.
- **Burning the caramel:** Keep an eye on that sugar like a hawk on a French fry. If it smells burnt, it tastes burnt. Start over, it’s not worth it.
- **Adding cold cream to hot caramel too fast:** It’ll seize up into a hard lump and splatter everywhere. Warm that cream, then add slowly and carefully.
- **Folding mousse when caramel is still hot:** This will melt your beautiful whipped cream and leave you with a sad, soupy mess instead of fluffy mousse. Cool it down!
- **Not chilling long enough:** You’ll end up with a wobbly, potentially collapsed tart when you try to slice it. Trust the fridge; it knows what it’s doing.
Alternatives & Substitutions
Life’s about options, right? Here are a few ways to tweak this recipe to suit your mood or pantry situation:
- **Crust Creativity:** Feeling extra lazy? A store-bought chocolate cookie crust (Oreo, anyone?) works in a pinch for a no-bake option. Just press it into the pan and chill.
- **Chocolate Intensity:** If dark chocolate isn’t your jam, use semi-sweet chocolate for the ganache or even in the crust for a milder flavor.
- **Caramel Hack:** While homemade caramel is *chef’s kiss*, if you’re really pressed for time, you can (reluctantly) use a good quality store-bought caramel sauce. Just warm it gently, add the bloomed gelatin, and proceed. **IMO**, homemade is always superior.
- **Topping Talk:** Instead of ganache, try a sprinkle of flaky sea salt (highly recommended to balance the sweetness!), fresh berries, or chocolate shavings for garnish.
FAQ (Frequently Asked Questions)
Got questions? I’ve got (casual and witty) answers!
- Can I make this ahead of time? Absolutely! This tart is actually even better the next day once all the flavors have had a chance to mingle and chill out together.
- Why did my caramel seize up? Ah, the caramel conundrum! You probably added cold cream too fast, or perhaps you scraped the bottom of the pot where sugar crystals might form. **FYI**, warm cream is your friend here, and resist the urge to scrape the sides!
- My mousse isn’t setting, help! Did you properly bloom the gelatin? And was the caramel mixture completely cool (room temperature) before you folded in the whipped cream? If it was too warm, it would melt the cream.
- Can I use a different size tart pan? You can, but adjust your crust baking time accordingly. Also, the filling amount might be too much or too little, so you might end up with a thicker or thinner tart.
- Is unsalted butter really necessary? Can I use salted? For baking, unsalted butter gives you control over the salt content. If you *only* have salted, reduce the added salt in the recipe by half a pinch, but unsalted is always the preferred choice.
- Can I omit the ganache drizzle? Sure, but why deny yourself that extra layer of chocolatey bliss? It adds visual appeal and another dimension of flavor. Go for it!
- What’s the best way to cut this beauty? A sharp, hot knife is your best friend. Run it under hot water, wipe it dry, slice, then repeat for each slice. This prevents sticking and gives you clean, Instagram-worthy cuts.
Final Thoughts
You’ve conquered the chocolate tart with caramel mousse! You’re basically a pastry chef now, so go ahead and brag a little. This recipe is all about indulging your sweet tooth with a touch of elegance, without all the fuss. Share it, don’t share it – that’s entirely up to you (I usually just share with myself, no judgment here). Remember, baking should be fun, even if it involves a little culinary drama. Now go impress someone—or yourself—with your new culinary skills. You’ve earned it!


