So, you’re craving something ridiculously indulgent, decadent, and looks like you spent hours slaving away in the kitchen, but you, my friend, are also quite possibly wearing sweatpants and debating if you have to get up for more coffee. Same. Good news: I’ve got a recipe that’s about to make you a dessert hero with minimal effort and maximum deliciousness.
Why This Recipe is Awesome
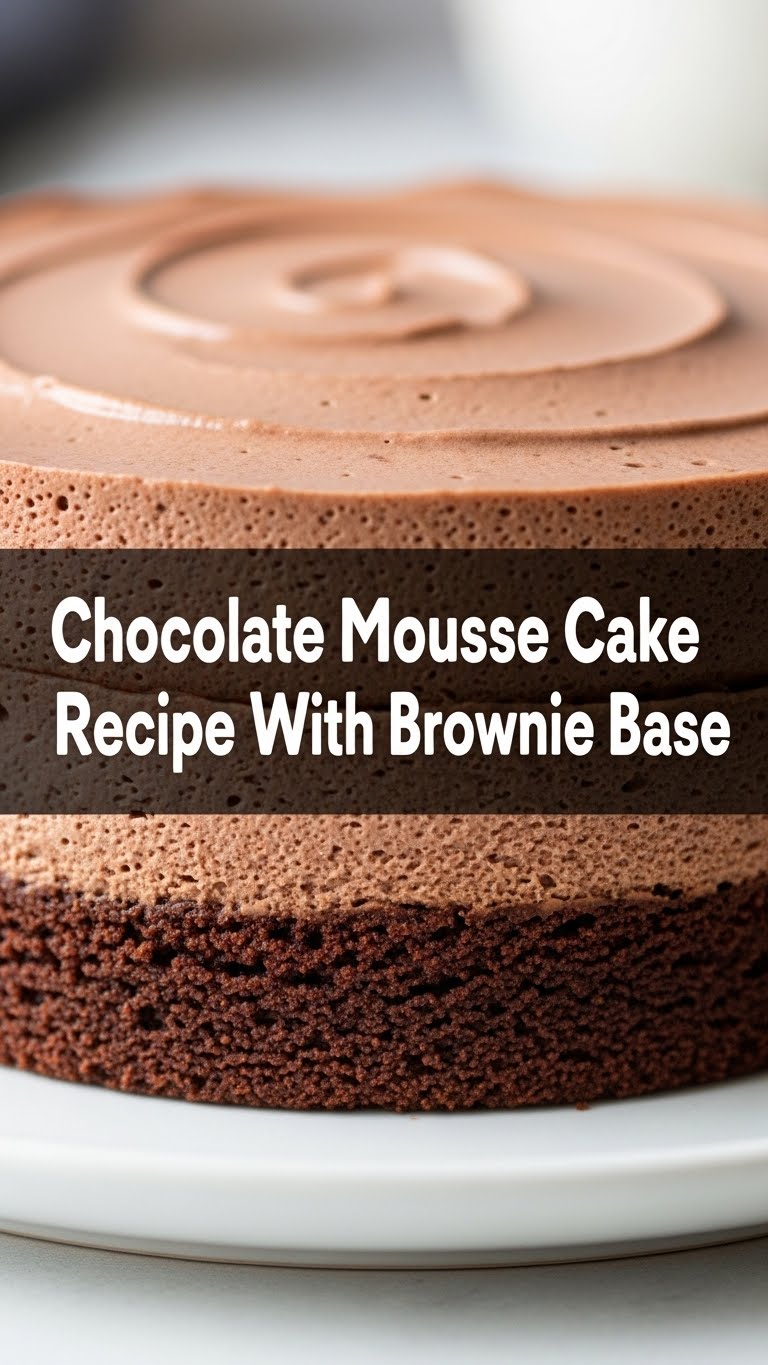
Let’s be real, combining two of the world’s greatest desserts – a fudgy brownie and a cloud-like chocolate mousse – is basically culinary genius. This isn’t just a cake; it’s a statement. It screams, “Yes, I know how to have a good time, and yes, I occasionally dabble in wizardry.” It’s also shockingly easy to make, which means you get all the glory without the usual kitchen-related trauma.
Think about it: a dense, chewy brownie base providing that satisfying anchor, topped with an airy, rich chocolate mousse that just melts in your mouth. It’s like a party in your mouth, and everyone’s invited. Plus, it looks super impressive, making it perfect for potlucks, impressing a date, or just showing off to your cat. It’s practically idiot-proof, I swear. If I didn’t mess it up, you’re golden.
Ingredients You’ll Need
Time to gather your edible arsenal! No need for anything fancy here, just good quality basics.
For the Fudgy Brownie Base:
- 1/2 cup (113g) unsalted butter: The good stuff. If it’s salted, just skip the extra salt later.
- 1 cup (200g) granulated sugar: Sweet, sweet joy.
- 2 large eggs: Room temperature is ideal, but honestly, who plans that far ahead?
- 1 teaspoon vanilla extract: A must. Don’t skip it, it adds so much depth.
- 1/2 cup (60g) all-purpose flour: Just regular ol’ flour.
- 1/2 cup (45g) unsweetened cocoa powder: Dutch-processed for extra darkness, if you’re feeling fancy.
- 1/4 teaspoon salt: Balances out all that sweetness.
- 1/2 cup (85g) chocolate chips or chunks (optional, but highly recommended): Because more chocolate is always a good idea.
For the Dreamy Chocolate Mousse:
- 1 1/2 cups (360ml) heavy cream (cold): The star of the show! Make sure it’s cold for best whipping results.
- 1/4 cup (30g) powdered sugar: Also known as confectioners’ sugar. Helps stabilize the mousse.
- 1 teaspoon vanilla extract: Another dash for good measure.
- 8 ounces (226g) good quality semi-sweet or dark chocolate: **This is where you don’t skimp!** Get something you’d happily eat on its own.
For Garnish (Optional, but makes it look pro):
- A dusting of cocoa powder
- Chocolate shavings
- Fresh berries (raspberries are a personal fave!)
Step-by-Step Instructions
Alright, apron on (or not, I don’t judge!), let’s bake up some magic.
Part 1: The Fudgy Brownie Base
- Preheat your oven to 350°F (175°C). Lightly grease and flour an 8×8 inch (20×20 cm) square baking pan, or line with parchment paper for easy removal.
- In a medium microwave-safe bowl (or a saucepan over low heat), melt the butter. Once melted, stir in the granulated sugar.
- Whisk in the eggs one at a time, then add the vanilla extract. Mix until well combined and slightly lighter in color.
- In a separate bowl, whisk together the flour, cocoa powder, and salt.
- Gradually add the dry ingredients to the wet ingredients, mixing until just combined. Don’t overmix! Fold in the chocolate chips, if using.
- Pour the batter into your prepared pan and spread evenly. Bake for 20-25 minutes, or until a toothpick inserted into the center comes out with moist crumbs, not wet batter.
- Let the brownie cool completely in the pan. This is crucial! **Do not proceed until it’s cool.** Trust me on this.
Part 2: The Dreamy Chocolate Mousse
- While the brownie is chilling (or after), finely chop your good quality chocolate. Place it in a heatproof bowl.
- Melt the chocolate. You can do this gently over a double boiler or in the microwave in 30-second bursts, stirring well after each burst, until smooth. Let it cool slightly, but ensure it’s still liquid enough to pour. **Don’t let it get hot!**
- In a large, chilled bowl (using a cold bowl helps), pour the cold heavy cream, powdered sugar, and vanilla extract.
- Using an electric mixer, whip the cream mixture on medium-high speed until soft peaks form. You want it fluffy, but not stiff and clumpy.
- Gently fold about a third of the whipped cream into the slightly cooled melted chocolate to lighten it. Then, carefully fold the chocolate mixture into the remaining whipped cream until just combined and no streaks remain. **Be gentle!** You want to keep that glorious air in there.
Part 3: Assembly & Chill Out!
- Once your brownie base is completely cool, spread the chocolate mousse evenly over the top.
- Cover the pan loosely with plastic wrap and refrigerate for at least 4 hours, or ideally, overnight. This is where the magic happens and everything sets beautifully.
- When ready to serve, lift the brownie out of the pan using the parchment paper (if you used it). Slice into squares.
- Garnish with a dusting of cocoa powder, chocolate shavings, or fresh berries.
- Serve cold and bask in the adoration!
Common Mistakes to Avoid
Even though this recipe is pretty forgiving, a few rookie moves can derail your dessert dreams. Learn from my mistakes, people!
- Not letting the brownie cool completely: Seriously, don’t rush this. Warm brownie + mousse = sad, soupy mess. Patience, grasshopper.
- Overmixing the mousse: Once you add the chocolate to the whipped cream, mix just until combined. Overmixing will deflate the air and make your mousse dense and grainy. And nobody wants a dense mousse, am I right?
- Using low-quality chocolate: This isn’t the time for the cheap stuff. The chocolate is the star of the mousse. **Invest in good chocolate!**
- Not chilling long enough: Yes, it’s torture waiting, but the mousse needs time to set properly. Cutting into it too early will result in a messy, unmanageable situation.
- Thinking you don’t need to preheat the oven: Rookie mistake! Always preheat. It ensures even baking and prevents your brownie from being sad and undercooked in the middle.
Alternatives & Substitutions
Feeling adventurous? Or maybe you just ran out of something. No worries, we can totally improvise!
- Brownie Boost: Want to jazz up the brownie? Add a pinch of espresso powder to the dry ingredients for a deeper chocolate flavor. Or, swirl in some peanut butter or caramel before baking for a gooey surprise.
- Mousse Makeover: Feeling like white chocolate? Use good quality white chocolate instead of dark for a lighter, sweeter mousse. Or, add a splash of your favorite liqueur (like Kahlúa or Grand Marnier) to the melted chocolate for an adult twist.
- Pan Size Shuffle: An 8×8 pan gives you a nice thick brownie layer. If you use a 9×13 inch pan, your brownie will be thinner, so adjust baking time (less time!). You could also make individual portions in ramekins!
- Garnish Galore: Beyond the basics, try toasted nuts, a drizzle of salted caramel, or even a sprinkle of sea salt flakes for that fancy sweet-and-salty kick.
FAQ (Frequently Asked Questions)
Got questions? I’ve got answers, probably with a side of sass.
Q: Can I make this cake ahead of time?
A: Heck yeah! This cake actually gets better if you make it a day in advance. The flavors meld, and the mousse sets beautifully. It’s like magic, but with chocolate.
Q: What kind of chocolate should I really use for the mousse?
A: Seriously, the best you can afford for the mousse. Semi-sweet or dark (60-70% cacao) works wonderfully. Think Ghirardelli, Valrhona, or Lindt bars. Not chocolate chips, those have stabilizers that can make them harder to melt smoothly.
Q: My mousse is runny! What happened?
A: Ah, the dreaded runny mousse! A few culprits: your heavy cream wasn’t cold enough, you didn’t whip it to soft peaks, or your melted chocolate was too hot when you folded it in. Also, did you chill it long enough? Patience, my friend, patience!
Q: Can I use margarine instead of butter?
A: Well, technically yes, but why hurt your soul like that? Butter just tastes better, IMO, especially in a fudgy brownie. Go for the real deal if you can.
Q: How long does this cake last in the fridge?
A: Covered, it’ll last 3-4 days in the fridge. But honestly, I doubt it’ll stick around that long.
Q: Is it hard to cut neatly?
A: Once it’s properly chilled, it cuts like a dream! For super clean slices, run your knife under hot water and wipe it clean between each cut. Pro tip!
Final Thoughts
So there you have it, folks! Your new favorite dessert that’s ridiculously easy but looks like you just graduated from pastry school. This chocolate mousse cake with a brownie base is pure bliss, a guaranteed crowd-pleaser, and a fantastic way to treat yourself (because you absolutely deserve it). Now go impress someone—or yourself—with your new culinary skills. You’ve earned it!


