Ever have one of those days where your sweet tooth is screaming louder than your alarm clock, but the thought of a complicated bake makes you want to crawl back into bed? Yep, been there, bought the t-shirt. But guess what? Today, we’re making magic – the kind that looks super impressive but is secretly a breeze. Get ready to whip up a Chocolate Mousse Cake with Vanilla Frosting that’ll make you feel like a pastry wizard, even if your usual kitchen feat is microwaving popcorn. Let’s do this!
Why This Recipe is Awesome
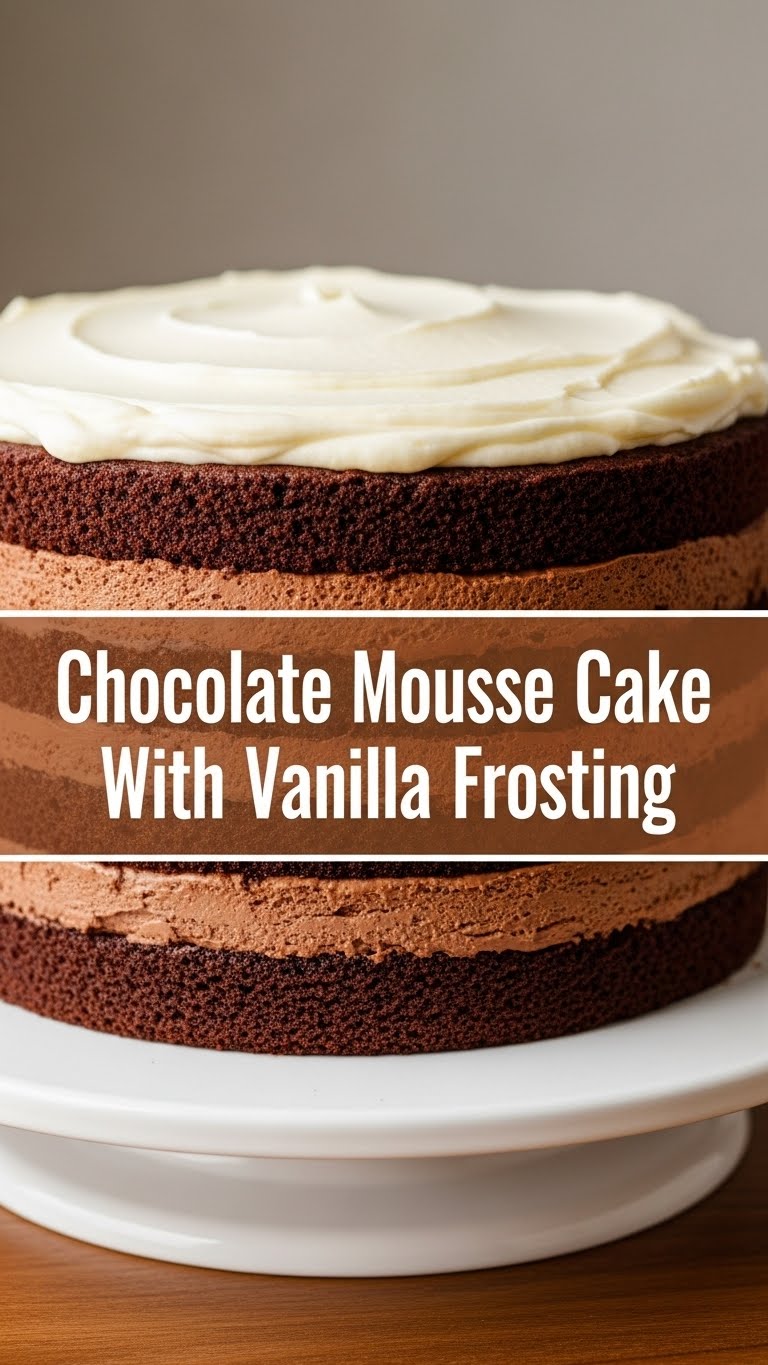
Seriously, this isn’t your grandma’s 17-step “sacrifice your weekend” kind of cake. This bad boy is deceptively fancy-looking, ridiculously delicious, and honestly, pretty hard to screw up. It’s got layers of moist chocolate cake (thank you, box mix, our unsung hero!), a dreamy, light-as-air chocolate mousse, and a fluffy, sweet vanilla frosting that ties it all together like a fancy bow. You’ll look like a Michelin-star chef, but you barely broke a sweat. **It’s practically fool-proof, even on a Monday morning.** You’ll impress everyone, and the only secret you have to keep is how easy it truly was. Win-win, right?
Ingredients You’ll Need
Time to gather your culinary squad! Don’t worry, nothing too exotic here.
- For the Chocolate Cake:
- 1 box (around 15.25 oz) chocolate cake mix (your secret weapon, shhh!)
- Ingredients called for on the cake mix box (usually eggs, oil, water) – the usual suspects.
- For the Chocolate Mousse:
- 1 cup heavy whipping cream (the fluffy cloud of joy)
- 4 oz semi-sweet chocolate, finely chopped or chocolate chips (dark, moody, perfect)
- 2 tablespoons granulated sugar (just a little kiss of sweetness)
- 1 teaspoon vanilla extract (the unsung hero that makes everything better)
- For the Vanilla Frosting:
- 1/2 cup (1 stick) unsalted butter, softened (because everything is better with butter)
- 2 cups powdered sugar, sifted (for that cloud-like sweetness, and to avoid lumps!)
- 2-3 tablespoons milk (any kind works, your preference!)
- 1 teaspoon vanilla extract (more vanilla, never a bad idea)
- A pinch of salt (to balance the sweetness, don’t skip this!)
Step-by-Step Instructions
Alright, apron on, good vibes only! Let’s get baking.
- Bake the Cake: Preheat your oven according to the cake mix instructions. Prepare your cake batter as directed on the box. Grease and flour two 8-inch round cake pans. Divide the batter evenly between them. Bake for the recommended time, or until a toothpick inserted into the center comes out clean. Let them cool in the pans for 10-15 minutes, then invert onto a wire rack to cool completely. **Patience, grasshopper! Seriously, they need to be totally cool.**
- Make the Mousse: While the cakes cool, melt your chopped semi-sweet chocolate. You can do this in a microwave in 30-second intervals, stirring in between, or over a double boiler. Once smooth, set it aside to cool slightly (but not solidify!). In a separate, chilled bowl, whip the heavy cream with sugar and vanilla extract until medium-soft peaks form. Gently fold the slightly cooled melted chocolate into the whipped cream until just combined and streak-free. Don’t overmix! Pop it in the fridge to chill for at least 30 minutes to firm up a bit.
- Whip Up the Frosting: In a large bowl, using an electric mixer, beat the softened butter on medium speed until creamy and light (about 2-3 minutes). Gradually add the sifted powdered sugar, alternating with the milk, starting and ending with sugar. Beat until smooth and fluffy. Stir in the vanilla extract and that pinch of salt. If it’s too thick, add more milk a teaspoon at a time. Too thin? Add a bit more powdered sugar.
- Assemble Your Masterpiece: Once your cake layers are completely cool (this is critical!), level them if needed with a serrated knife for a flat surface. Place one cake layer on your serving plate or cake stand. Spread about half of the chocolate mousse evenly over the first layer. Gently place the second cake layer on top. Now, slather the entire cake with your glorious vanilla frosting. Get creative with swirls or just go for a rustic look – it’s your cake!
- Chill Out: For best results, chill the assembled cake for at least an hour before serving. This helps the mousse and frosting set, making for cleaner slices and a more stable cake. Trust me, it’s worth the wait.
Common Mistakes to Avoid
We’ve all been there, my friend. Learn from my (many) past mistakes!
- Not Cooling the Cake Completely: Rookie mistake! If your cake layers are even slightly warm, your mousse will melt, and your frosting will slide right off like it’s on a waterslide. **Wait it out!**
- Overmixing the Mousse: Once you fold the chocolate into the whipped cream, stop when it’s just combined. Overmixing can deflate the cream, leaving you with a dense, sad mousse instead of light and airy.
- Hot Chocolate in Cold Cream: Make sure your melted chocolate for the mousse has cooled down a bit. If it’s too hot, it’ll melt your whipped cream, and you’ll have chocolate soup, not mousse.
- Skimping on Chill Time: Thinking you can skip the final chill? Nah. That time in the fridge sets everything beautifully, making your cake much easier to cut and serve, and much more stable. **Seriously, put it in the fridge!**
Alternatives & Substitutions
Feeling adventurous or missing an ingredient? No worries, we can totally improvise.
- Cake Mix Swap: Don’t have chocolate? A plain vanilla or yellow cake mix works beautifully here too! Just adjust the vibe from “chocolate explosion” to “vanilla dream with chocolate surprises.”
- Chocolate Choices: For the mousse, feel free to use milk chocolate for a sweeter, milder flavor, or even darker chocolate (70%+) if you’re a true cacao connoisseur. White chocolate mousse is also a delightful option!
- Frosting Flavor Fun: Want to switch up the frosting? Add a tablespoon of cocoa powder for a chocolate buttercream, a few drops of almond extract for a nutty twist, or even a little lemon zest for a bright, citrusy zing. The world is your oyster… or rather, your frosting bowl!
- Dairy-Free Vibes: If you’re dairy-free, you can absolutely use a dairy-free cake mix, and substitute the heavy cream for full-fat canned coconut cream (chilled, scoop out the thick part) for the mousse. Use a plant-based butter and milk for the frosting. IMO, it still tastes fab!
FAQ (Frequently Asked Questions)
- Can I make this cake ahead of time? Absolutely! This cake actually tastes even better the next day once all the flavors have had a chance to meld. Just keep it covered in the fridge.
- How long does this cake last? Stored properly in an airtight container in the refrigerator, it’ll happily last for 3-4 days. But let’s be real, it probably won’t make it that long.
- My mousse isn’t setting, what gives? Uh oh! It might be that your cream wasn’t cold enough or you didn’t whip it quite enough. Or, your melted chocolate was too hot. If it’s just a little loose, try chilling it longer. If it’s really runny, you might need to try re-whipping some cold cream and folding it in.
- Can I skip the mousse layer? Technically, yes, but why would you want to?! It’s a “Chocolate Mousse Cake,” after all! But if you’re in a super rush, a simple chocolate ganache or extra frosting would work.
- My frosting is too thin/thick. Help! No stress! If it’s too thin, add more sifted powdered sugar a tablespoon at a time. If it’s too thick, add more milk, a teaspoon at a time, until you reach your desired consistency.
- Can I use actual homemade chocolate cake instead of a mix? FYI, if you’re feeling ambitious and have a go-to chocolate cake recipe, go for it! Just make sure it yields two 8-inch layers. The box mix just makes life easier, that’s all.
Final Thoughts
You did it, friend! You just made a masterpiece of a Chocolate Mousse Cake with Vanilla Frosting. Go forth and conquer that sweet craving. Slice it up, take a proud pic (it’s mandatory!), and then dive face-first into that chocolatey, vanilla-y goodness. You deserve every single bite. Now go impress someone—or yourself—with your new culinary skills. You’ve earned it! Happy baking (and eating)!


