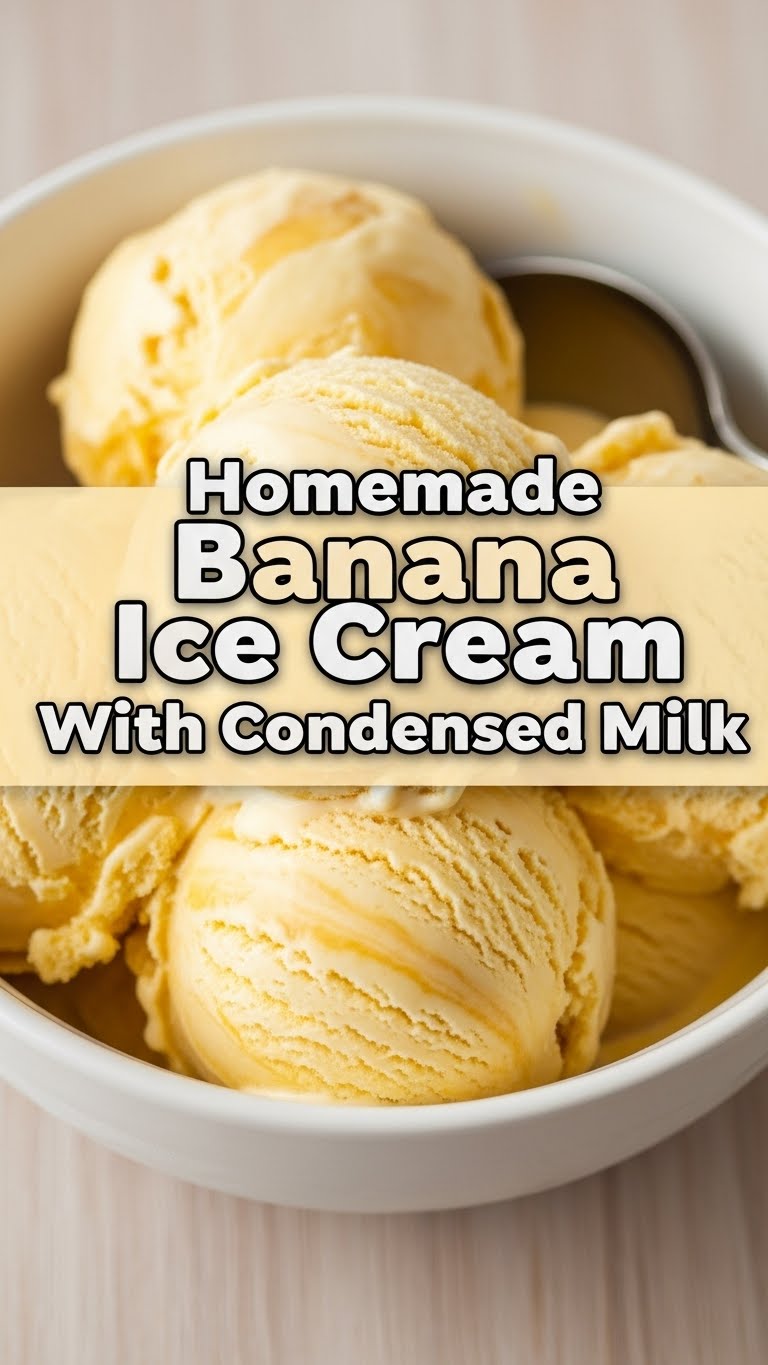
So you’re craving something ridiculously tasty but just can’t be bothered to spend your entire evening slaving away in the kitchen, huh? Same, friend, same. My mission in life (today, at least) is to bring you ultimate dessert gratification with minimal effort. And trust me, this Homemade Banana Ice Cream with Condensed Milk? It’s about to become your new best friend, your secret weapon, your reason to ignore your diet. Get ready!
Why This Recipe is Awesome
Okay, let’s be real. In the world of fancy desserts, this one probably won’t win any Michelin stars, but who cares? This recipe is the MVP of your lazy dessert dreams for so many reasons. First off, it’s pretty much **idiot-proof**. And I say that with love, having messed up my fair share of “easy” recipes. Seriously, if you can peel a banana and press a button on a blender, you’re golden. Secondly, we’re talking about minimal ingredients, zero churning, and basically instant gratification. No need for an expensive ice cream maker, no waiting for hours. It’s like magic, but with bananas and a whole lot of deliciousness. Plus, you can totally pretend it’s healthy because, hey, it has fruit!
Ingredients You’ll Need
Get ready for the shortest grocery list ever. You probably have most of this chilling in your pantry already!
- 3-4 Super Ripe Bananas: And I mean *super* ripe. We’re talking brown spots galore, almost-too-far-gone bananas. This is where all that natural sweetness comes from! Don’t skimp here; green bananas taste like sadness in ice cream form.
- ½ cup Sweetened Condensed Milk: This is the liquid gold, the velvety smooth magic that binds everything together and makes it so incredibly creamy. Do not confuse this with evaporated milk; that’s a whole different beast.
- A tiny pinch of salt (optional but recommended): Trust me on this. It doesn’t make it salty, it just magically enhances all the sweet flavors. It’s like a secret weapon!
- 1 teaspoon Vanilla Extract (optional): For that extra oomph and classic ice cream flavor. A little splash goes a long way.
Step-by-Step Instructions
- Prep Your Bananas: First things first, peel those ripe bananas. Slice them into roughly 1-inch thick pieces. This makes them easier to blend later. Now, spread them out on a baking sheet lined with parchment paper (so they don’t stick) and pop them into the freezer. You want them **frozen solid**, which usually takes at least 2-3 hours, or even better, overnight. This is non-negotiable!
- Get Blending: Once your banana slices are rock hard, toss them into a sturdy food processor or a high-powered blender. If you’re using a blender, you might need to stop and scrape down the sides a bit more.
- Add the Good Stuff: Pour in the sweetened condensed milk, add that little pinch of salt, and a splash of vanilla extract if you’re using it.
- Blend Until Creamy: Start blending! At first, it might look crumbly, almost like frozen banana bits. Keep going! It will go through stages: crumbly, then mashed-potato-like, and then, suddenly, it’ll transform into this wonderfully smooth, soft-serve-like ice cream. **Don’t over-blend**, or it might warm up too much.
- Serve or Freeze: You can totally dive in right now for a dreamy soft-serve experience. If you prefer a firmer, scoopable ice cream, transfer it to an airtight container and freeze it for another 1-2 hours. Any longer and it’ll get quite hard, so you’ll need to let it sit out for 10-15 minutes before scooping.
Common Mistakes to Avoid
- Using Under-ripe Bananas: As mentioned, this is a big no-no. You’ll end up with a less sweet, potentially bitter, and not-as-creamy result. Your taste buds will thank you for waiting.
- Not Freezing Bananas Long Enough: If they’re only partially frozen, you’ll end up with a banana smoothie, not ice cream. Be patient, my friend.
- Adding Too Much Liquid: Resist the urge to add extra milk or water to help it blend. This will dilute the flavor and make it icy instead of creamy. **Stick to the condensed milk ratio!**
- Over-Blending: While you need to blend until creamy, going on and on will generate heat and melt your ice cream. Blend until just smooth and then stop.
Alternatives & Substitutions
Feeling adventurous? Here are a few ways to tweak this glorious concoction:
- Different Sweeteners: Not a fan of condensed milk? You could try a splash of regular milk or cream with a tablespoon or two of maple syrup or honey, but be warned, the texture won’t be quite as rich or creamy. The condensed milk is truly the star here for that signature richness.
- Dairy-Free Version: Swap the regular sweetened condensed milk for a can of **coconut sweetened condensed milk**. It works like a charm and adds a lovely tropical hint!
- Flavor Boosters:
- **Chocolate Lover?** Add a tablespoon of cocoa powder or a handful of chocolate chips during the last few seconds of blending.
- **Nutty Professor?** Swirl in a tablespoon of peanut butter, almond butter, or even Nutella.
- **Spice It Up:** A pinch of cinnamon or nutmeg can really elevate the banana flavor.
- **Extra Fruit:** Add a handful of other frozen fruits like strawberries or mango chunks along with the bananas. Just be sure they’re also frozen solid!
FAQ (Frequently Asked Questions)
- Do I *really* need ripe bananas? Yes, absolutely! This is probably the most important tip. Ripe bananas are sweeter and have a softer texture when frozen, making them perfect for blending into ice cream. Trust the process!
- Can I use a regular blender instead of a food processor? You can, but it might require a bit more effort. A high-powered blender will work best, and you’ll definitely need to stop and scrape down the sides more often to ensure everything gets blended evenly. Patience is key here, IMO.
- How long does this homemade ice cream last in the freezer? It’s best enjoyed within the first few days for optimal creaminess. After that, it tends to get a bit harder and icier, but it’s still perfectly edible for up to a week or two. Just let it thaw for 10-15 minutes before scooping.
- What if my mixture is too thick to blend? If your blender/food processor is really struggling, you can add a tiny splash (like, a teaspoon at a time) of extra condensed milk or even regular milk to help it along. But really try to avoid adding too much!
- Can I add other mix-ins like nuts or cookies? For sure! Add them at the very end of the blending process, just enough to incorporate them without turning them into dust. Chocolate chips, chopped nuts, cookie pieces—go wild!
Final Thoughts
So there you have it! A ridiculously easy, unbelievably creamy, and utterly delicious banana ice cream that tastes like you put in way more effort than you actually did. It’s the perfect treat for a hot day, a sweet craving, or just because you deserve something awesome without a ton of fuss. Now go impress someone—or yourself—with your new culinary skills. You’ve earned it!

