So you’re craving something tasty but too lazy to spend forever in the kitchen, huh? Same. As in, “I want something delicious, refreshing, and maybe even a *little* bit healthy, but my sweatpants are glued to me, and the fridge is RIGHT THERE.” Well, my friend, you’ve come to the right place. Get ready to ditch the store-bought sugar bombs because we’re making homemade yogurt popsicles, and trust me, your future self (and your taste buds) will thank you. No fancy chef skills required, just a blender and a dream!
Why This Recipe is Awesome
Okay, let’s be real. This isn’t just “awesome”; it’s practically a life hack for summer. Why? Because it’s **idiot-proof**. Even I, who once burned water (don’t ask), can nail this. It’s incredibly versatile, super refreshing, and you get to control exactly what goes into it. Think fewer weird chemicals and more actual fruit. Plus, they’re perfect for those “oops, I forgot to buy a snack” moments, and they make you look like you have your life together. Winning!
Ingredients You’ll Need
Gather ’round, my aspiring popsicle artisan! Here’s what you’ll need for these chilly delights. Don’t worry, it’s a short list, and most of these are probably chilling (pun intended) in your fridge already.
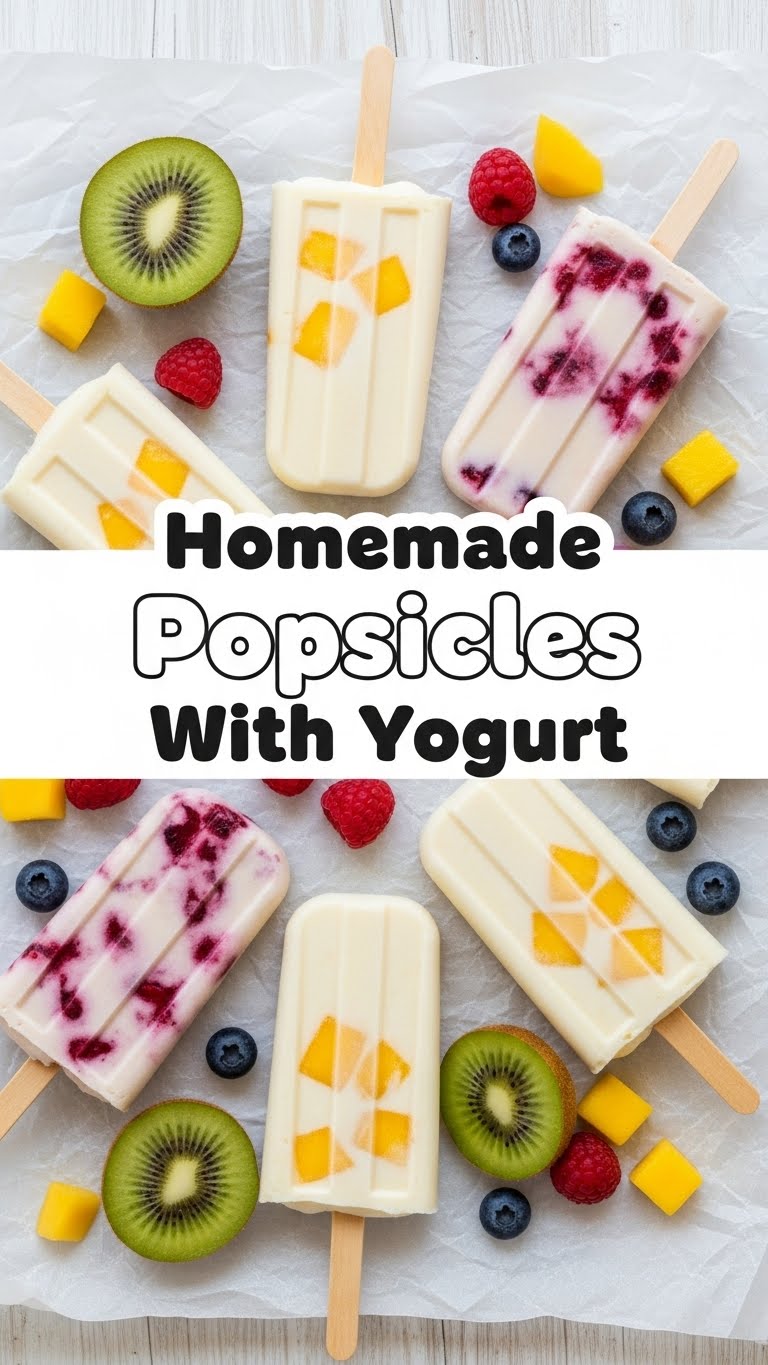
- Yogurt: About 2 cups. I usually go for plain Greek yogurt because it makes the popsicles super creamy and less icy. Full-fat or low-fat, your call! If you’re dairy-free, almond or coconut yogurt works beautifully too.
- Fruit of Choice: 1-1.5 cups. Fresh or frozen, whatever your heart desires! Berries (strawberries, blueberries, raspberries), mango, peaches, bananas… mix ‘n’ match for fun! Frozen fruit gives it an extra thick, frosty texture, FYI.
- Sweetener: 2-4 tablespoons. Honey, maple syrup, agave nectar – pick your poison. Adjust to your taste, depending on how sweet your fruit is and how much you like to live on the edge.
- Optional (but recommended!): A splash of vanilla extract (a teaspoon usually does the trick) for that extra “oomph,” or a squeeze of fresh lemon juice to brighten up berry flavors.
Step-by-Step Instructions
- Blend It Up: Toss your yogurt, fruit, and sweetener into a blender. If you’re using vanilla or lemon juice, now’s the time to add ’em.
- Smooth Operator: Blend until everything is super smooth and creamy. No one wants chunky popsicles unless, of course, that’s your vibe (no judgment here!). **Scrape down the sides** to make sure everything gets incorporated.
- Taste Test (Crucial Step!): Dip a spoon in and have a little taste. Does it need more sweetness? More tang? Adjust as needed! Remember, flavors can be a bit more subdued when frozen, so don’t be shy.
- Pour ‘Em In: Carefully pour your glorious mixture into your popsicle molds. **Don’t overfill them**—leave a little space at the top as they might expand slightly when freezing.
- Add the Sticks: Insert your popsicle sticks. If your molds have lids with stick slots, use ’em! If not, wait about an hour until the mixture is slightly firm, then poke the sticks in so they stand straight.
- Freeze Fest: Pop those beauties into the freezer. **Freeze for at least 4-6 hours**, or preferably overnight, to ensure they’re solid through and through. Patience, young grasshopper!
- Enjoy!: Once they’re rock solid, run the molds under warm water for a few seconds to loosen them up, then gently pull out your homemade masterpieces. Time to chill!
Common Mistakes to Avoid
We all make mistakes, darling. The key is learning from them! Here are a few face-palm moments to steer clear of:
- Not Blending Enough: Thinking chunky bits are “rustic.” No, honey, that’s just a lumpy popsicle. Blend until smooth, unless you *actually* want little fruit chunks (then go for it, rebel!).
- Overfilling the Molds: Rookie mistake! Your popsicles will expand, overflow, and create a sticky mess in your freezer. Nobody wants that kind of drama.
- Impatience is NOT a Virtue: Pulling them out too early will result in a sad, slushy stick. Give them their full freezing time. **Seriously, wait the full 4-6 hours.**
- Forgetting the Sticks: It happens. You pour, you freeze, you realize you have a block of frozen yogurt. Unless you have a spoon and no dignity, remember the sticks!
- Too Much Water: Adding too much liquid (like, if your fruit is super watery or you added extra juice) can make your popsicles icier. Stick to creamy yogurt as the base!
Alternatives & Substitutions
This recipe is basically a blank canvas for your creativity! Here are some fun ways to mix things up:
- Fruit Fanatic: Swap out berries for tropical vibes with pineapple and coconut yogurt. Or go decadent with banana and a swirl of peanut butter. IMO, mango is king for popsicles.
- Yogurt Varieties: Not a fan of Greek? Use regular plain yogurt (they’ll be a bit softer/icier). Dairy-free? Almond, soy, or coconut yogurt work like a charm. You can even use flavored yogurt, just adjust the added sweetener accordingly.
- Sweetener Swaps: Agave, stevia, or even a couple of dates (blend them in!) can replace honey or maple syrup. Get creative!
- Add-ins for Extra Pizzazz: Swirl in some granola for crunch, sprinkle in a few mini chocolate chips, or even add a pinch of cinnamon for a warm spice kick. A drizzle of chocolate *after* they’re frozen is also pure genius.
- Boost the Nutrients: A scoop of protein powder or chia seeds can make these even more substantial. Just remember chia seeds absorb liquid, so you might need a tiny splash more liquid.
FAQ (Frequently Asked Questions)
Got questions? I’ve got (casual, probably sarcastic) answers!
- Can I use regular yogurt instead of Greek?
Well, technically yes, but why hurt your chances of ultimate creaminess like that? Regular yogurt has more water, so your pops might be a tad icier. Still tasty, just… different. Embrace the Greek for superior texture!
- How long do these homemade popsicles last in the freezer?
If they somehow manage to escape your hungry clutches, they’ll usually last a couple of weeks in an airtight container in the freezer. Beyond that, they might start getting a bit frosty or freezer-burnt. Eat them fresh, people!
- I don’t have popsicle molds! What can I use?
No molds? No problem! Small paper cups (like Dixie cups), silicone muffin molds, or even an ice cube tray with toothpicks will work. Just be sure to find something that can hold a stick.
- My popsicles are too icy. What went wrong?
Ah, the dreaded ice crystal dilemma! This usually happens if there’s too much water in your mixture. Using Greek yogurt (or full-fat yogurt) and adding a bit less watery fruit helps a lot. Over-blending can also introduce more air, leading to iciness.
- How do I get the popsicles out of the mold easily?
Don’t wrestle them! A quick dip of the mold in a shallow bowl of warm (not hot!) water for about 10-15 seconds should loosen them right up. They should slide out with a gentle tug. Easy peasy!
- Can I make these savory? Like, a cucumber-dill yogurt popsicle?
Um… you *can*. I won’t stop you. But my friend, we might need to have a little chat about your life choices. For dessert pops, stick to sweet. For savory experiments, maybe keep it to yourself. 😉 (Unless it’s amazing, then share immediately!)
Final Thoughts
See? That wasn’t so hard, was it? You just whipped up a batch of delicious, refreshing, and genuinely satisfying homemade yogurt popsicles. You’re practically a culinary genius now! These aren’t just snacks; they’re tiny bursts of joy for your taste buds, perfect for hot days, snack attacks, or just because you deserve something yummy. Now go impress someone—or yourself—with your new culinary skills. You’ve earned it!


