So, you’re craving something ridiculously decadent, chocolatey, and impressive, but also… you know, don’t want to spend your entire weekend tethered to the kitchen, right? Yeah, me neither. Welcome to my happy place: the Chocolate Mousse Tart with Hazelnuts. It’s fancy without being fussy, and trust me, your tastebuds (and your Instagram feed) will thank you.
Why This Recipe is Awesome
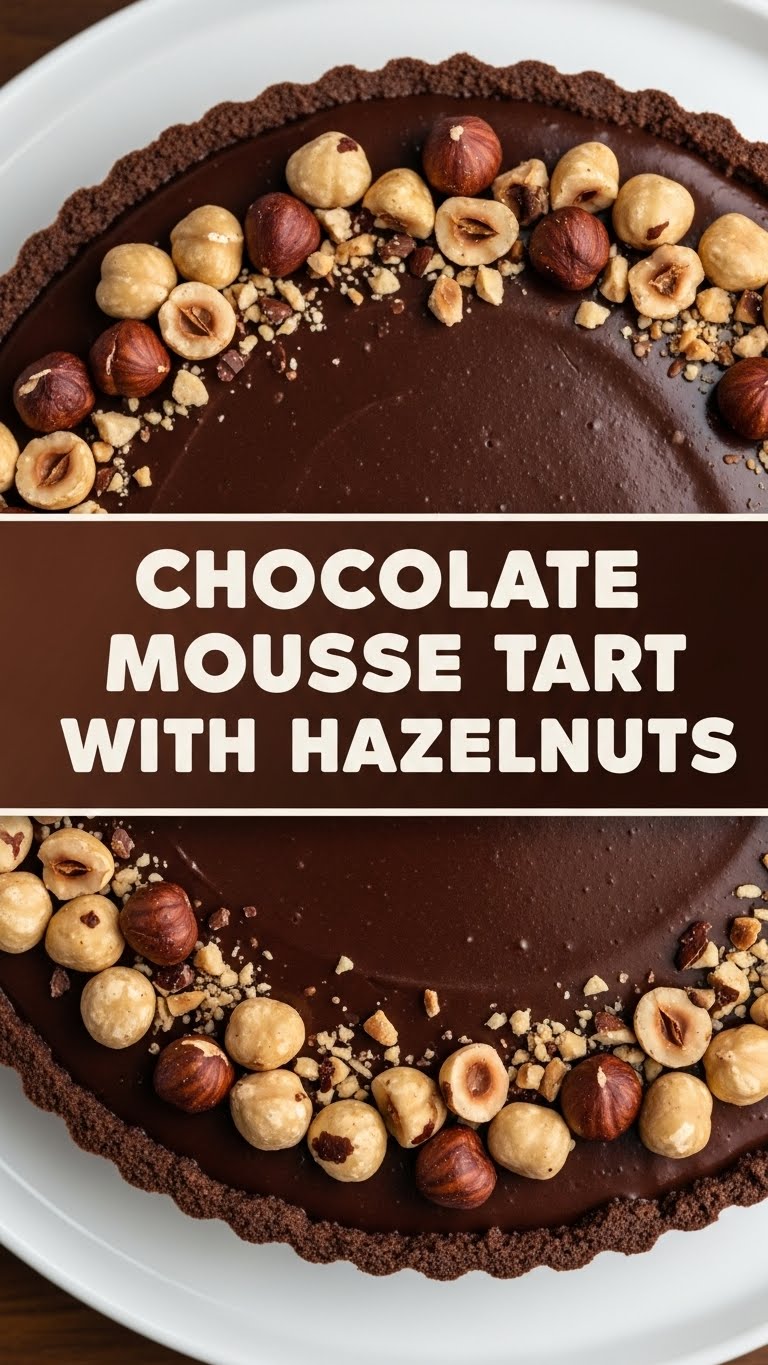
Okay, let’s be real. This isn’t just *another* dessert. This is THE dessert. Why? Because it’s the perfect blend of creamy, crunchy, rich, and just a little bit nutty. Plus, it looks like you spent all day slaving away, when in reality, it’s surprisingly straightforward. It’s practically idiot-proof, even I didn’t mess it up! Imagine sinking your teeth into a buttery, cocoa-rich crust, followed by a cloud of airy dark chocolate mousse, all topped with perfectly toasted, crunchy hazelnuts. It’s like a sophisticated candy bar got a glow-up and decided to become a tart. Your friends will think you’re a culinary wizard, and honestly, you might just start believing it yourself.
Ingredients You’ll Need
Gather your magic potion components! Quality matters here, especially for the chocolate. No sad, waxy stuff, please.
- For the Crust (aka the crunchy hug):
- 1 ½ cups all-purpose flour (the usual suspect)
- ½ cup unsweetened cocoa powder (the darker, the better!)
- ½ cup granulated sugar (just enough sweetness)
- ¼ teaspoon salt (to make everything pop)
- 1 cup (2 sticks) unsalted butter, COLD and cubed (yes, cold is key!)
- 1 large egg yolk (the binder of dreams)
- 2-3 tablespoons ice water (if needed, just a splash)
- For the Chocolate Mousse Filling (aka the cloud of happiness):
- 12 oz good quality dark chocolate (60-70% cacao is perfect), chopped (seriously, splurge a little)
- 1 ½ cups heavy cream, divided (we need that richness!)
- 2 tablespoons unsalted butter (because butter makes everything better)
- 1 teaspoon vanilla extract (a little warmth never hurt anyone)
- Pinch of salt (again, for balance!)
- For the Hazelnut Topping (aka the crunch factor):
- ¾ cup hazelnuts, toasted and roughly chopped (don’t skip the toasting, trust me!)
- Optional Garnish:
- A dusting of cocoa powder or a sprinkle of flaky sea salt (for extra oomph!)
Step-by-Step Instructions
Time to get your hands a little dirty (in the best way possible!).
- Whip Up the Crust: In a food processor, pulse flour, cocoa powder, sugar, and salt. Add the cold, cubed butter and pulse until it resembles coarse crumbs. Dribble in the egg yolk and pulse until the dough starts to come together. If it’s too dry, add ice water a tablespoon at a time.
- Chill Out, Dough: Turn the dough out onto a lightly floured surface, gather it into a disk, and wrap it in plastic. Pop it in the fridge for at least 30 minutes. This prevents shrinking and makes it easier to handle.
- Bake the Base: Preheat your oven to 375°F (190°C). Roll out your chilled dough on a floured surface to an 11-inch circle. Carefully transfer it to a 9-inch tart pan with a removable bottom. Press it gently into the pan, trim the edges, and prick the bottom all over with a fork.
- Blind Bake Like a Boss: Line the crust with parchment paper and fill with pie weights or dried beans. Bake for 15 minutes, then remove the paper and weights and bake for another 10-12 minutes, or until the crust is firm and set. Let it cool completely on a wire rack.
- Make the Mousse Magic: In a medium saucepan, heat 1 cup of the heavy cream until just simmering (don’t boil!). Remove from heat. Add the chopped dark chocolate, 2 tablespoons of butter, and a pinch of salt to the hot cream. Let it sit for 5 minutes, then stir until smooth and glossy. Stir in the vanilla extract.
- Whip it Good: In a separate bowl, whip the remaining ½ cup of heavy cream until soft peaks form. Gently fold this whipped cream into the chocolate mixture until just combined. Don’t overmix!
- Assemble Your Masterpiece: Pour the luscious chocolate mousse filling into your cooled tart crust. Smooth the top with a spatula. Sprinkle generously with your toasted, chopped hazelnuts.
- The Chill Factor: Refrigerate for at least 3-4 hours, or until the mousse is firm enough to slice. Overnight is even better, IMO.
- Serve and Shine: Carefully remove the tart from its pan. Dust with cocoa powder or flaky sea salt if you’re feeling extra fancy. Slice, serve, and bask in the glory!
Common Mistakes to Avoid
Nobody’s perfect, but we can avoid these common pitfalls!
- Not Chilling the Dough Enough: Your dough will be a sticky, unmanageable mess that shrinks like crazy when baked. Patience is a virtue here!
- Overworking the Dough: If you knead it like bread dough, your crust will be tough, not tender and flaky. Handle it gently, like a delicate flower.
- Skipping the Blind Bake: Rookie mistake! You’ll end up with a soggy bottom (the horror!). Blind baking ensures a crisp, sturdy base.
- Using Low-Quality Chocolate: This tart lives and dies by its chocolate. If you use cheap, waxy stuff, it’ll taste like… well, cheap, waxy stuff. Invest in good dark chocolate.
- Not Chilling the Tart Long Enough: Trying to slice a warm mousse tart is like trying to catch smoke. It’ll be a gloopy mess. Let it firm up in the fridge.
Alternatives & Substitutions
Feeling adventurous? Or maybe you just ran out of something key? I gotchu.
- Nut-Free Zone: If hazelnuts aren’t your jam (or someone has an allergy), feel free to omit them entirely. Or, swap them for toasted almonds or pistachios for a different flavor profile.
- Crust Swap: Too lazy to make a crust from scratch? A pre-made graham cracker or Oreo cookie crust would be a delicious (and super easy) shortcut. Just press it into the pan and skip the baking.
- Lighter Chocolate: While dark chocolate is my ride-or-die for this, you could use milk chocolate for a sweeter, milder tart. Just adjust the sugar in the mousse if you do, as milk chocolate is already sweeter.
- Boozy Boost: A tablespoon of coffee liqueur, orange liqueur (like Grand Marnier), or even a splash of good quality rum or brandy folded into the chocolate mousse mixture can add a sophisticated kick.
- Spice It Up: A pinch of cayenne pepper or chili powder in the chocolate mousse can give it a surprising, delightful heat!
FAQ (Frequently Asked Questions)
You’ve got questions, I’ve got answers (mostly humorous ones).
- Can I make this ahead of time? Absolutely! This tart is actually even better the next day as the flavors meld and the mousse fully sets. So go ahead, be a planner!
- What’s the best kind of chocolate to use? Good quality dark chocolate, ideally 60-70% cacao. Think brands like Ghirardelli, Lindt, or high-quality baking bars. Avoid chocolate chips unless they’re specifically designed for melting smoothly, FYI.
- Do I *really* have to toast the hazelnuts? Yes! Yes, you do! Toasting brings out their natural oils and deepens their flavor. It takes like 5 minutes and makes all the difference.
- My crust is cracking when I roll it out, help! Your dough is probably too cold or you’re overworking it. Let it sit at room temperature for a few minutes to soften slightly, or if it’s super crumbly, press it directly into the tart pan instead of rolling.
- How long will this last in the fridge? It’s best within 3-4 days, covered. But let’s be honest, it probably won’t last that long.
- Can I use a different size tart pan? You can, but you might need to adjust baking times for the crust and the amount of filling. A slightly smaller pan will give you a thicker tart, a larger one a thinner tart.
- Is this truly easy for a baking newbie? I’m intimidated! Yes, **you got this!** The steps are straightforward, and there aren’t many places to go wrong if you follow the instructions. Trust the process, and trust yourself.
Final Thoughts
So there you have it, folks! Your new favorite chocolate tart recipe. It’s rich, it’s luxurious, it’s got that delightful hazelnut crunch, and it’s surprisingly chill to make. Now go forth and conquer that kitchen! Impress your friends, dazzle your family, or just hoard it all for yourself (no judgment here, I’ve done it). You’ve earned it, you magnificent culinary genius!


