So you’ve just spent a full day adulting (or, let’s be real, a full day just *existing*), and now your brain is screaming for something utterly delicious, easy, and requires zero actual baking skills. You’ve come to the right place, my friend. Because today, we’re not just making dessert; we’re crafting a masterpiece of laziness and pure joy: the legendary Ice Cream Pie with Cool Whip. Get ready to impress yourself (and maybe anyone else lucky enough to be in your orbit).
Why This Recipe is Awesome
Okay, let’s be brutally honest: this isn’t just a recipe; it’s a life hack. Why is it awesome? Let me count the ways:
- It’s practically **idiot-proof**. Seriously, if I can do it without accidentally setting off the smoke alarm, so can you.
- **No baking required!** Put your oven mitts away, darling. We’re chilling, not baking.
- **Minimal effort, maximum reward.** You spend like, 15 minutes of actual “work,” and then you get a dessert that looks like it took you hours. Your secret is safe with me.
- It’s **customizable AF**. Want chocolate? Vanilla? Rainbow swirl? Go wild! This pie is your canvas.
- Did I mention **Cool Whip**? Because that fluffy cloud of goodness is non-negotiable here.
Ingredients You’ll Need
Gather ’round, my fellow culinary adventurers. Here’s what you’ll need to assemble your frozen dream pie:
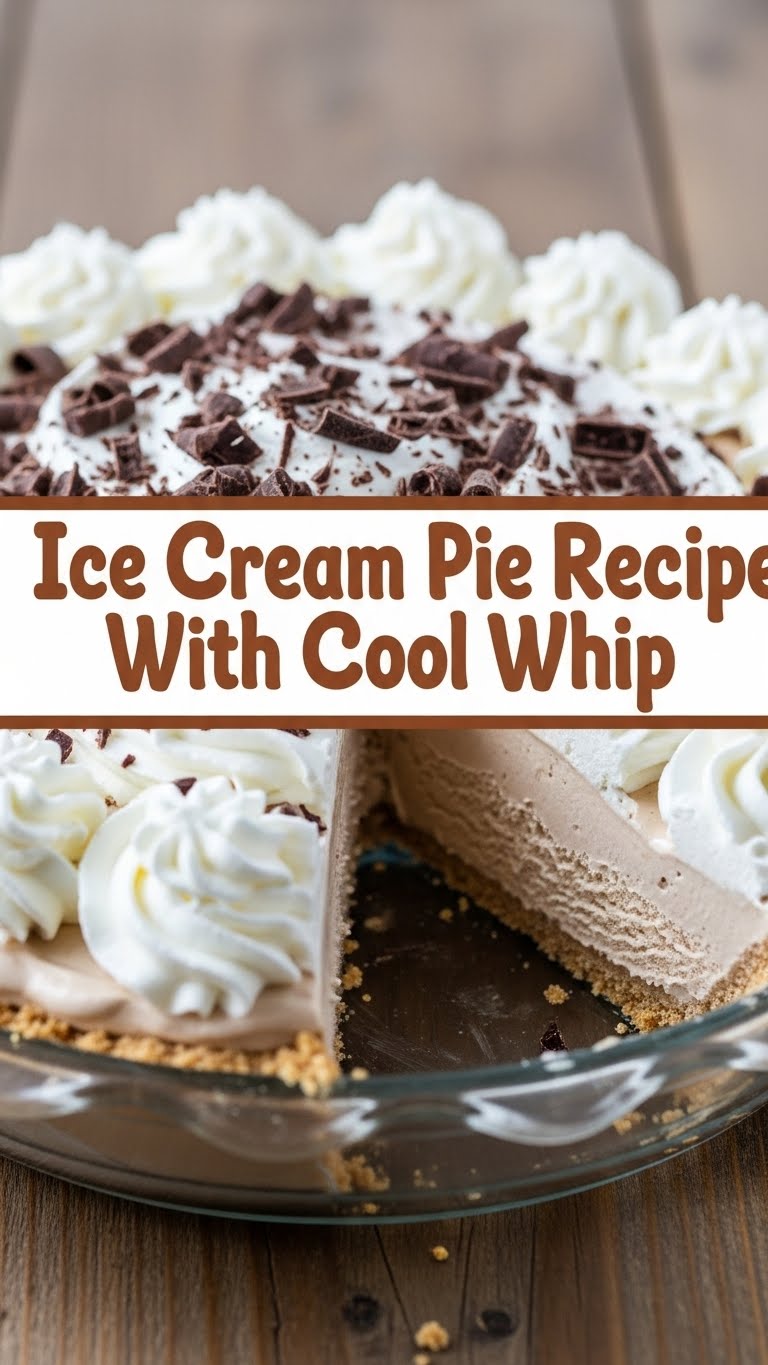
- 1 pre-made pie crust (9-inch): Graham cracker, Oreo, shortbread – whatever tickles your fancy! Go store-bought for ultimate chill vibes, or if you’re feeling fancy (and have 5 extra minutes), crush some Oreos and mix with melted butter. But like, why?
- 1.5 quarts (about 6 cups) of your favorite ice cream: Pick a winner! Vanilla, chocolate, mint chip, cookie dough – this is where your personality shines. Make sure it’s slightly softened when you’re ready to use it, but not a melted puddle. We’re going for “spreadable,” not “soup.”
- 1 (8 oz) container of Cool Whip, thawed: The hero we didn’t know we needed, but absolutely deserve. Don’t even *think* about substituting with homemade whipped cream here. It’s just not the same vibe for this particular masterpiece.
- Optional toppings (because life’s too short for plain pie): Chocolate syrup, sprinkles, crushed candy bars, fresh berries, hot fudge, caramel… you get the picture. Go crazy or keep it classy. Your pie, your rules!
Step-by-Step Instructions
Alright, apron on (optional, let’s be real), let’s get this show on the road!
- Prep Your Crust: If you went with a pre-made crust (good choice!), just unwrap it. If you’re a rebel and made your own from crushed cookies, press it firmly into your pie plate and pop it in the freezer for about 10-15 minutes to firm up. This helps prevent a soggy bottom. Nobody wants a soggy bottom, am I right?
- Soften the Ice Cream: Take your chosen ice cream out of the freezer about 10-15 minutes before you plan to use it. You want it soft enough to scoop and spread easily, but not totally melted. Think “soft-serve” consistency.
- Layer the Love: Scoop the slightly softened ice cream into your prepared pie crust. Use the back of a spoon or an offset spatula to spread it evenly all the way to the edges. Don’t be shy; make sure it’s packed in there nicely.
- First Chill Session: Pop that pie back into the freezer. Let it firm up for at least 1-2 hours. **This is a crucial step!** You want that ice cream layer solid before the next step.
- Top with Cool Whip: Once your ice cream layer is rock-solid, take the pie out. Gently spread the thawed Cool Whip all over the top, making pretty swirls or just a smooth, glorious layer.
- The Grand Freeze Finale: Return the pie to the freezer for another 2-4 hours, or ideally, overnight. You want it firm enough to slice beautifully without turning into a mushy mess.
- Garnish and Serve: When you’re ready to serve, take the pie out of the freezer about 10-15 minutes before slicing. Add your fabulous toppings right before serving. Slice it up, serve it cold, and bask in the glory!
Common Mistakes to Avoid
Nobody’s perfect, but we can avoid some classic blunders. Learn from my past (sometimes messy) experiences:
- Using Rock-Hard Ice Cream: Trying to scoop and spread ice cream straight from the depths of your freezer is a recipe for broken spoons and frustrated sighs. Let it soften a bit!
- **Not Freezing Enough Between Layers:** This is probably the biggest rookie mistake. If your ice cream isn’t firm before you add the Cool Whip, everything just mixes together into a sad, sad puddle. **Patience, young grasshopper!**
- Over-Thawing the Cool Whip: You want it thawed and spoonable, but not liquid. Too warm, and it won’t hold its shape nicely on top of your pie.
- Eating It All Before Photo Evidence: Seriously, snap a pic. Your friends won’t believe how easy (and delicious) this was otherwise.
Alternatives & Substitutions
Feeling adventurous? Or maybe you just ran out of something? No worries, I got you!
- Crust Swap: No graham crackers? Use crushed shortbread, vanilla wafers, or even pretzels for a sweet and salty twist! Just mix with melted butter and press.
- Ice Cream Flavor Frenzy: Don’t limit yourself to one flavor! Try layering two complementary flavors, like chocolate and coffee, or strawberry and vanilla. Oh, the possibilities!
- Whipped Cream Confession: Okay, fine, if you *really* want to make homemade whipped cream, go for it! Just know that Cool Whip holds its shape longer and doesn’t melt as fast. It’s a texture thing, IMO.
- Topping Extravaganza: No chocolate syrup? Drizzle with caramel, peanut butter sauce, or a fruit compote. Crushed cookies, mini marshmallows, toasted nuts – literally anything goes!
FAQ (Frequently Asked Questions)
Got questions? I’ve probably asked them myself at 2 AM while staring into the fridge. Let’s answer ’em!
Q: Can I use regular whipped cream instead of Cool Whip?
A: Well, technically yes, but why hurt your soul like that? Cool Whip is specifically designed to hold up better when frozen and thawed. Homemade whipped cream tends to get a bit icy and watery. But hey, you do you!
Q: How long does ice cream pie last in the freezer?
A: If stored properly (tightly wrapped in plastic wrap and then foil), it can last for up to 2-3 weeks. But let’s be real, it won’t last that long. It’ll be gone way before then!
Q: Can I make this ahead of time for a party?
A: Absolutely! In fact, it’s encouraged. Make it the day before, pop it in the freezer, and just pull it out when you’re ready to impress. Ultimate host move!
Q: My ice cream is too hard to spread. What do I do?
A: Put it in the microwave for 10-15 second intervals, stirring in between, until it’s spreadable. Don’t nuke it into oblivion, though!
Q: What if I don’t have a pie plate? Can I use a springform pan?
A: You clever duck, yes! A springform pan works wonderfully, especially if you want those clean, dramatic slices. Just make sure to freeze it really well before releasing the sides.
Q: Is this considered breakfast if I add fruit?
A: My therapist says we shouldn’t label things. So, yes. It’s whatever you want it to be. 😉
Final Thoughts
And there you have it, folks! Your very own, incredibly easy, ridiculously delicious Ice Cream Pie with Cool Whip. You’ve just unlocked a new level of dessert wizardry with minimal effort. Go forth and conquer your sweet cravings! Now go impress someone—or yourself—with your new culinary skills. You’ve earned it!


