So you’re craving something tasty but too lazy to spend forever in the kitchen, huh? Same. Like, who has time for a multi-layered cake when you just want something warm, cozy, and apple-y? Not me, friend. Which is exactly why we’re diving into the glorious, low-stress world of Apple Crostata with Ice Cream. It’s basically pie’s chill, rustic cousin who doesn’t care about perfection. And honestly? We love her for it.
Why This Recipe is Awesome
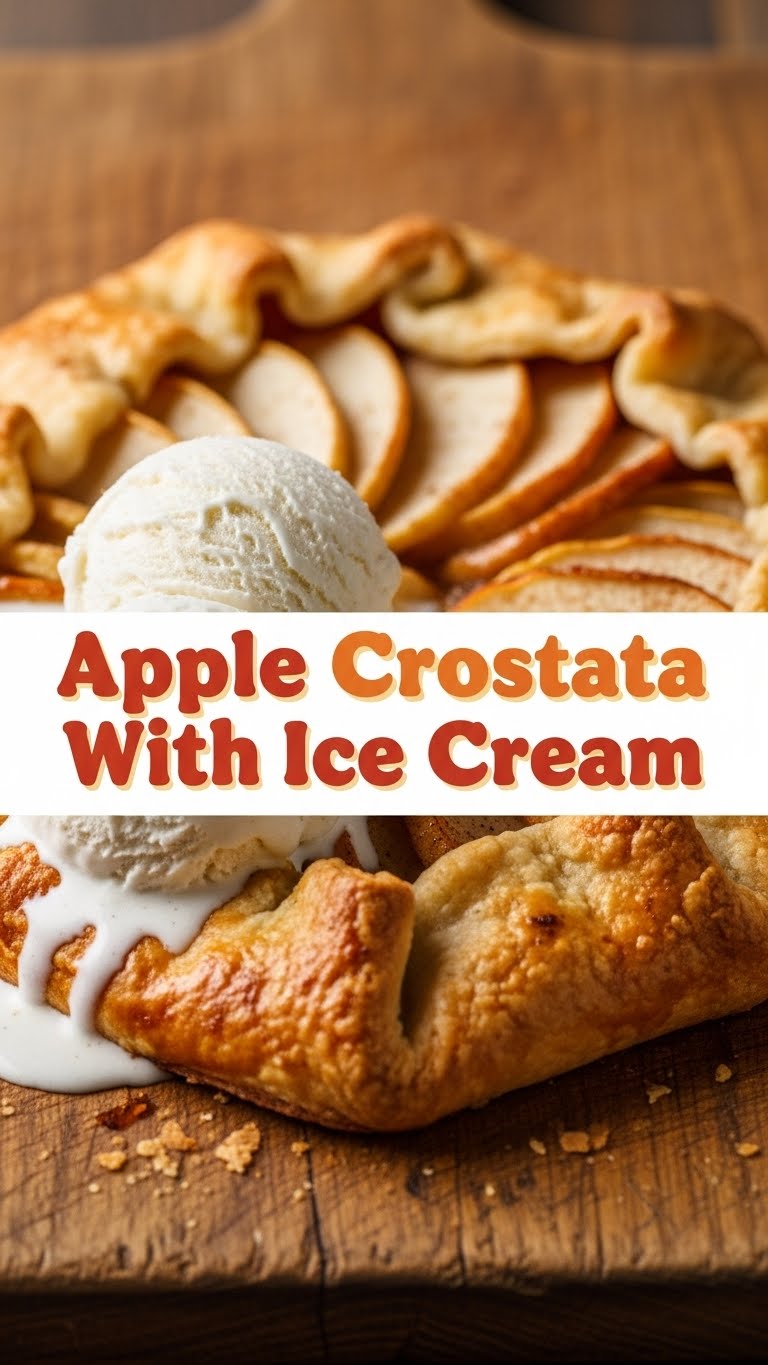
Okay, first things first: this isn’t just “awesome,” it’s practically a life hack for dessert lovers. Seriously. It’s **idiot-proof**, and I say that with love, having messed up my fair share of complicated bakes. You don’t need fancy equipment, a pastry degree, or even the patience of a saint. It’s rustic, which means messy edges are *artistic*, not a sign of failure. Plus, it smells divine while baking, filling your home with that comforting apple-cinnamon vibe. And when you top it with a scoop of melty vanilla ice cream? Forget about it. Total bliss, minimal fuss. It’s a win-win-win situation.
Ingredients You’ll Need
Gather ’round, my little culinary apprentice! Here’s your shopping list. Don’t stress too much, most of this stuff is probably lurking in your pantry already.
- For the Crust (the “I swear it’s homemade” part):
- 1 ¼ cups all-purpose flour (the basic stuff, no need for fancy ancient grains unless you’re feeling adventurous)
- ½ teaspoon salt (just a pinch to make everything pop)
- ½ cup (1 stick) unsalted butter, **ice cold and cubed** (this is key for flaky magic!)
- ¼ cup ice water (literally, water with ice in it. Helps keep that butter chilly.)
- For the Apple Filling (the “heart of the matter”):
- 3-4 medium apples (Granny Smith, Honeycrisp, Fuji – a mix is fun! Just nothing too soft or they’ll turn to mush. We want texture!)
- ¼ cup granulated sugar (or a smidge more if your apples are super tart)
- 1 tablespoon all-purpose flour (helps thicken the juices, no soggy bottom for us!)
- ½ teaspoon ground cinnamon (the MVP of apple desserts)
- Pinch of nutmeg (optional, but gives it that extra hug)
- 1 tablespoon lemon juice (prevents browning and brightens flavors – essential!)
- 1 tablespoon unsalted butter, cut into tiny dots (for richness and a glossy finish)
- For Assembly & Serving (the “finishing touches”):
- 1 egg, whisked (for an egg wash – gives it that gorgeous golden glow)
- 1 tablespoon turbinado sugar (or regular granulated, for a sparkly crunch)
- Vanilla ice cream (non-negotiable, IMO)
Step-by-Step Instructions
Alright, let’s get our hands (a little) dirty! Follow these simple steps, and you’ll be a crostata pro in no time.
Step 1: Make that Fabulous Crust
- In a large bowl, whisk together the flour and salt. Then, scatter your **ice-cold butter cubes** over the flour mixture.
- Using your fingertips (or a pastry blender, if you’re fancy), quickly work the butter into the flour until it resembles coarse crumbs with some pea-sized butter chunks still visible. This is crucial for flakiness, FYI.
- Gradually add the ice water, a tablespoon at a time, mixing gently until the dough just comes together. Don’t overmix! You want it shaggy, not smooth.
- Form the dough into a disk, wrap it in plastic wrap, and chill it in the fridge for at least 30 minutes. This lets the gluten relax and the butter firm up.
Step 2: Prep Those Apples
- While your dough chills, peel, core, and slice your apples thinly. Aim for about ¼-inch thick.
- In a separate bowl, toss the apple slices with sugar, flour, cinnamon, nutmeg (if using), and lemon juice until they’re all nicely coated. Set aside.
Step 3: Assemble Your Crostata Masterpiece
- Preheat your oven to **400°F (200°C)**. Line a baking sheet with parchment paper.
- On a lightly floured surface, roll out your chilled dough into a rough 12-inch circle. Don’t worry about perfection; rustic is the name of the game!
- Carefully transfer the rolled dough onto your prepared baking sheet.
- Arrange the apple filling in the center of the dough, leaving a 1 ½ to 2-inch border all around the edges. Dot the top of the apples with those tiny butter bits.
- Fold the dough border up and over the apples, pleating it as you go. Again, rustic!
- Brush the exposed crust with the whisked egg wash and sprinkle generously with turbinado sugar.
Step 4: Bake It Till It’s Golden!
- Bake for 35-45 minutes, or until the crust is deeply golden brown and the apples are tender and bubbly.
- Let it cool on the baking sheet for at least 15-20 minutes before slicing. This allows the filling to set up a bit.
Step 5: The Grand Finale
- Slice, serve warm with a generous scoop (or two, no judgment!) of vanilla ice cream. Enjoy your creation!
Common Mistakes to Avoid
Listen, we all make mistakes, but let’s try to avoid these rookie blunders, shall we?
- **Warm Butter Woe:** Thinking you can get away with soft butter for the crust? Nope. **Cold butter is your BFF** for that glorious flakiness. Warm butter equals tough, sad crust. Don’t do it.
- **Overworking the Dough:** Seriously, just mix it until it *just* comes together. The more you fuss, the tougher your crust gets. Be gentle, treat it with respect.
- **The Soggy Bottom Blues:** Not adding flour to your apple filling, or using super watery apples, can lead to a sad, soggy crust underneath. We want crisp, not squish!
- **Skipping the Chill Time:** That 30 minutes in the fridge isn’t just for funsies. It helps the dough relax and prevents shrinkage in the oven. Patience, young padawan!
- **Forgetting to Preheat:** Rookie mistake number one! Your oven needs to be at temperature *before* your crostata goes in for proper baking.
Alternatives & Substitutions
Feeling creative? Or just missing an ingredient? No worries, here are some ideas to mix things up!
- **Fruit Frenzy:** Not an apple fan? Or just want variety? This recipe works beautifully with pears, peaches (peeled!), berries, or even a mix! Just adjust sugar based on fruit sweetness.
- **Spice It Up:** Instead of just cinnamon, try apple pie spice, a pinch of cardamom, or a tiny grating of fresh ginger with your apples. So good!
- **Crust Shortcuts:** Feeling extra lazy (no judgment, remember?)? You can totally use a good quality store-bought pie crust. Just make sure it’s a single crust. **Pro tip:** blind bake it for 10-15 minutes before adding the filling if your fruit is super juicy, to prevent a soggy bottom.
- **Sweetener Swap:** Brown sugar can be used instead of granulated for a deeper, molasses-y flavor. Maple syrup in the apple filling? Oh, yes, that works too!
- **Vegan Vibes:** Swap butter for a plant-based stick butter alternative and use an “egg” wash made with plant milk (almond, soy) and a pinch of sugar.
FAQ (Frequently Asked Questions)
Got questions? I’ve got (casual) answers!
- Can I make the dough ahead of time? Absolutely! You can keep the dough disk wrapped in the fridge for up to 2-3 days, or even freeze it for a month. Just thaw it in the fridge overnight before rolling.
- What kind of apples are best? A mix is divine! Granny Smiths for tartness and firm texture, combined with Honeycrisp or Fuji for sweetness and crunch. Avoid Red Delicious; they just don’t bake well.
- My crust looks pale, but the apples are done. Help! Move it to a lower rack in the oven for a bit, or tent the edges with foil if they’re getting *too* dark while the middle bakes. Also, check your oven temp – it might be running a little cool.
- Can I use margarine instead of butter? Well, technically yes, but why hurt your soul like that? Butter just tastes better and gives you that glorious flakiness. If you *must*, use a high-quality stick margarine, not the tub stuff.
- How do I store leftovers? Pop ’em in an airtight container in the fridge for up to 3 days. Reheat gently in the oven or microwave, but honestly, it’s best fresh and warm!
- Can I skip the lemon juice? You *can*, but I wouldn’t recommend it. Lemon juice brightens the apple flavor and, more importantly, stops your apples from browning into a sad, rusty mess.
Final Thoughts
So there you have it, folks! Your new favorite low-stress, high-reward dessert. See? I told you it was easy. You’ve just whipped up something that looks fancy but was surprisingly chill to make. Go ahead, pat yourself on the back, you culinary genius! Now go impress someone—or yourself—with your new skills. You’ve earned it, especially that scoop of ice cream on top. Happy baking (and eating)!


