So you’re craving something warm, comforting, and utterly delicious, but the thought of a complicated recipe makes you want to just order takeout? Been there, my friend, been there. But what if I told you there’s a way to get that incredible homemade apple pie (with ice cream, obviously) without needing a culinary degree or sacrificing your entire weekend? Get ready, because we’re about to dive into some seriously good, seriously achievable pie magic!
Why This Recipe is Awesome
Because it’s practically magic! You’ll look like a baking wizard without actually needing a wand (or years of culinary school). This recipe is simple enough for a beginner, forgiving enough for when you inevitably get distracted by cat videos, and delicious enough to make everyone think you’re a genius. Seriously, it’s pretty much **idiot-proof, even I didn’t mess it up!** Plus, pie and ice cream? A match made in heaven, trust me. It’s the ultimate comfort food hug that you can actually make yourself.
Ingredients You’ll Need
Alright, gather your goodies! Nothing too wild here, just the classics.
For the Crust (the foundation of all greatness):
- 2 ½ cups all-purpose flour (the magical dust that makes everything stick together)
- 1 teaspoon salt (enhances everything, like a good friend)
- 1 cup (2 sticks) unsalted butter, ice cold and cubed (the secret to flaky perfection, no warm butter allowed! Seriously, put it in the freezer for 15 mins before you start.)
- ½ cup ice water (literally, ice cubes should be chilling in it – it keeps the butter happy and solid)
For the Filling (the sweet, gooey heart):
- 6-8 medium apples (a mix of Granny Smith for tartness and Honeycrisp for sweetness is ideal. Don’t just pick any random apple off the tree, unless it’s an apple tree you own, then, by all means, forage!)
- ¾ cup granulated sugar (for sweetness, duh)
- ¼ cup packed light brown sugar (adds depth, like a good plot twist)
- 2 tablespoons all-purpose flour (to thicken that glorious goo)
- 1 teaspoon ground cinnamon (smells like heaven, tastes even better)
- ¼ teaspoon ground nutmeg (cinnamon’s less famous but equally important sidekick)
- 1 tablespoon lemon juice (prevents browning and adds zing, like a sassy remark)
- 2 tablespoons unsalted butter, cut into small pieces (for extra richness, because why not?)
For Serving (the grand finale):
- Vanilla ice cream (non-negotiable, unless you’re allergic, then… get well soon. Or find an awesome dairy-free alternative!)
Step-by-Step Instructions
Don’t be intimidated, these steps are short, sweet, and to the point. You got this!
Crust First (Don’t skip leg day!):
- In a large bowl, whisk together the flour and salt. Add your super cold butter cubes.
- Using a pastry blender (or your fingers, but work fast!), cut the butter into the flour until it resembles coarse crumbs with some pea-sized pieces remaining. **This is key for flakiness, so don’t be shy with those butter chunks!**
- Gradually add the ice water, 1 tablespoon at a time, mixing until the dough just comes together. Don’t overmix, or you’ll have tough crust – booo!
- Divide the dough in half, flatten each into a disc, wrap them in plastic, and chill for at least 30 minutes. **Patience, young padawan, it’s worth it.**
Filling Up (The good stuff!):
- Peel, core, and slice your apples. In a big bowl, gently toss the sliced apples with both sugars, flour, cinnamon, nutmeg, and lemon juice. Set aside and let those flavors mingle.
Assembly (This is where the magic happens!):
- Preheat your oven to 425°F (220°C).
- On a lightly floured surface, roll out one dough disc into a 12-inch circle. Carefully transfer it to a 9-inch pie plate. Trim any excess, leaving about a ½-inch overhang.
- Pour the apple filling into the crust, mounding it slightly in the center. Dot the top with those small pieces of butter you pre-cut.
- Roll out the second dough disc. You can make a full top crust (cut a few slits in it!) or get fancy with a lattice (if you’re feeling ambitious, you go!). Place it over the apples.
- Trim and crimp the edges of the pie to seal everything in. If you’re using a full top crust, remember those slits – they let out steam and prevent pie explosions. **Nobody wants an exploded pie, trust me.**
- **Optional but highly recommended:** Brush the top with an egg wash (1 egg + 1 tbsp water, whisked) and sprinkle with a little extra sugar for a gorgeous golden, sparkly finish.
Baking (The aroma will make you swoon!):
- Bake for 15 minutes at 425°F (220°C). This initial high heat gives your crust a nice boost.
- Then, reduce the oven temperature to 375°F (190°C) and bake for another 35-45 minutes, or until the crust is golden brown and the filling is bubbly. **If the crust edges start to brown too quickly, just cover them loosely with aluminum foil.**
- Let the pie cool for at least 2-3 hours before slicing. **This is the hardest part, I know, but the filling needs time to set!** Resist the urge to dive in immediately.
Serving (The glorious payoff!):
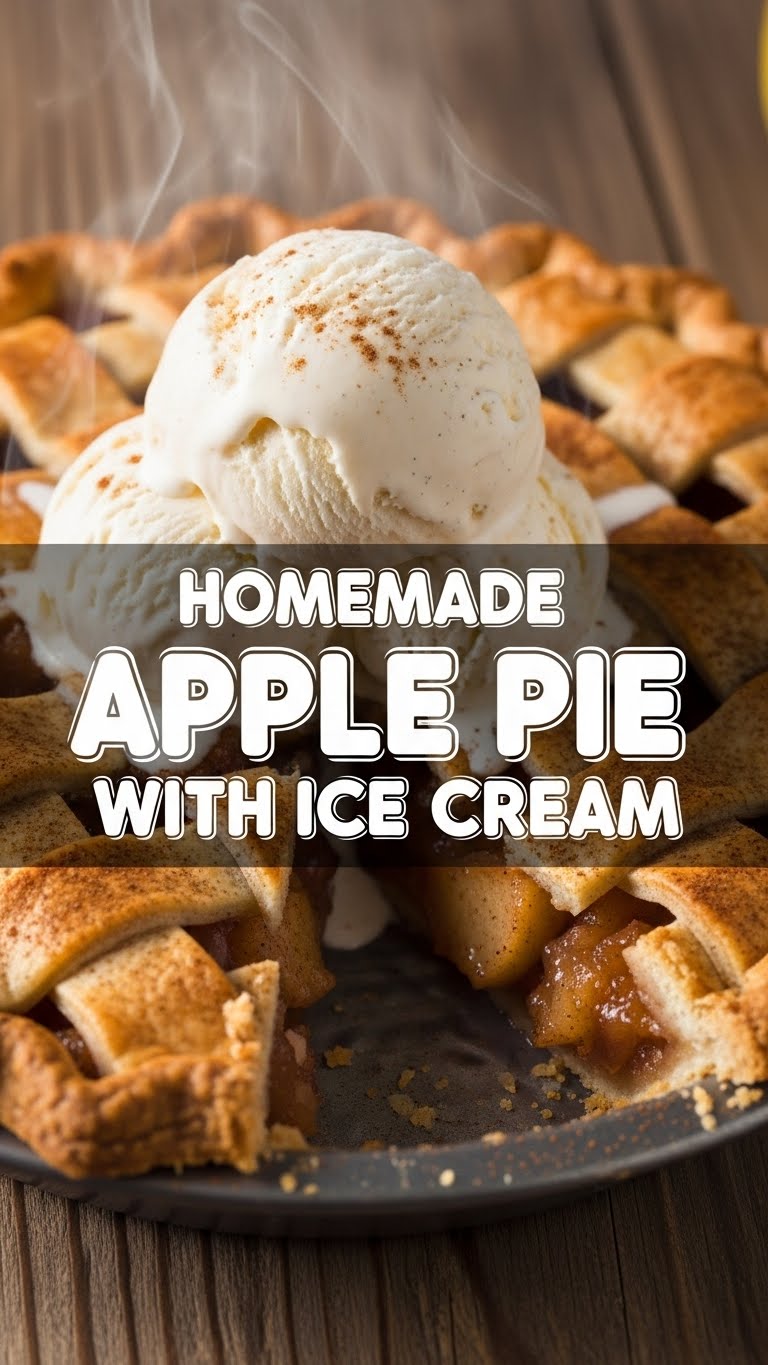
- Serve warm with a generous scoop (or three) of vanilla ice cream. Enjoy your masterpiece!
Common Mistakes to Avoid
We’ve all been there, so let’s dodge these bullet points of despair:
- Warm Butter: Using warm butter in the crust? No, no, no! That’s how you get tough, sad crust instead of flaky, dreamy crust. **Keep that butter chilled!**
- Overmixing Dough: Kneading the dough like it’s your arch-nemesis? Chill out! Overmixing develops gluten, making the crust tough. Mix just until it comes together, then stop.
- Not Chilling Dough: Skipping the chill time for the dough? You’re basically asking for a messy, hard-to-roll disaster. **Let it chill, it’s worth the wait.**
- Not Letting it Cool: Cutting into the pie fresh out of the oven? Impatient much? The filling will run everywhere, and you’ll have a delicious, soupy mess. **Give it time to set, I beg you!**
- Forgetting Vents: Sealing the top crust without cutting any vents? Congrats, you’ve built a delicious bomb! Steam needs to escape, or things get messy. Rookie mistake!
Alternatives & Substitutions
Flexibility is key, my friend. Don’t have exactly what the recipe calls for? No stress!
- Crust: Don’t want to make your own crust? Store-bought frozen pie crust is totally acceptable! No judgment here, **we’re all about ease.** Just make sure you get two, one for the bottom, one for the top.
- Apples: Can’t find Granny Smith and Honeycrisp? Use a mix of firm, tart, and sweet apples like Braeburn, Fuji, or Golden Delicious. **Avoid Red Delicious, they’re… just not pie apples.** Seriously, don’t do it.
- Spices: Feel free to add a pinch of ground cloves or allspice for extra warmth if you’re feeling adventurous. Or leave them out if you’re a cinnamon purist.
- Ice Cream: Vanilla is classic for a reason, but caramel swirl, pecan, or even a nice cinnamon ice cream would be stellar. Or make it a la mode with homemade whipped cream, you fancy thing!
FAQ (Frequently Asked Questions)
Got questions? I’ve got (casual and humorous) answers!
- Can I use margarine instead of butter? Well, technically yes, but why hurt your soul like that? Butter provides that unparalleled flavor and flakiness. **Don’t skimp here, IMO!** Your pie deserves real butter.
- My crust always shrinks. Help! You might be overworking the dough or not chilling it enough. Also, don’t stretch the dough into the pie plate; gently ease it in. Give it a good chill after assembling the pie too.
- How do I know when the apples are cooked? You should see the filling bubbling vigorously through the vents in the top crust. Also, if you gently insert a knife through a vent, it should feel tender, not resistant.
- Can I make this ahead of time? Absolutely! You can assemble the pie (unbaked) and freeze it for up to 3 months. When ready to bake, pop it directly from the freezer into a preheated oven, adding about 15-20 minutes to the baking time. Or, bake it a day ahead and gently reheat before serving.
- What if my crust is browning too fast? Easy peasy! Loosely cover the edges of your pie with aluminum foil during baking. This acts like a little hat for your crust, protecting it from getting too dark.
- Do I really need to use ice water? Yes, my friend, **FYI**, cold water helps keep the butter solid, which creates those beautiful pockets of steam that make your crust flaky. Warm water melts the butter, making a tough, sad crust. Science!
Final Thoughts
There you have it! Your very own, show-stopping apple pie, ready to be devoured with a scoop (or two, or three, who’s counting?) of ice cream. This isn’t just a dessert; it’s a warm, sweet, crispy-crusted triumph. Now go impress someone—or yourself, which is arguably more important—with your new culinary skills. You’ve earned it! Seriously, go make some pie. Your future self will thank you.


