So you’re craving something tasty but too lazy to spend forever in the kitchen, huh? Same. And maybe you’ve got a secret stash of peanut butter, some Oreos eyeing you from the pantry, and a freezer full of ice cream just begging for purpose? Oh honey, you’ve come to the right place. Today, we’re making a **Peanut Butter Ice Cream Cake with Oreo Crust** that’s so ridiculously easy and delicious, you’ll wonder why you ever bothered with actual baking.
Why This Recipe is Awesome
Look, I get it. Life’s busy. But your dessert game doesn’t have to suffer. This isn’t just a recipe; it’s a lifestyle choice.
It’s idiot-proof, even I didn’t mess it up, and trust me, I’ve set off the smoke detector making toast. Seriously though, no baking, minimal dishes, and maximum flavor. Plus, it combines the holy trinity: peanut butter, chocolate, and ice cream. Need I say more? It’s basically happiness in cake form, and you deserve all the happiness.
Ingredients You’ll Need
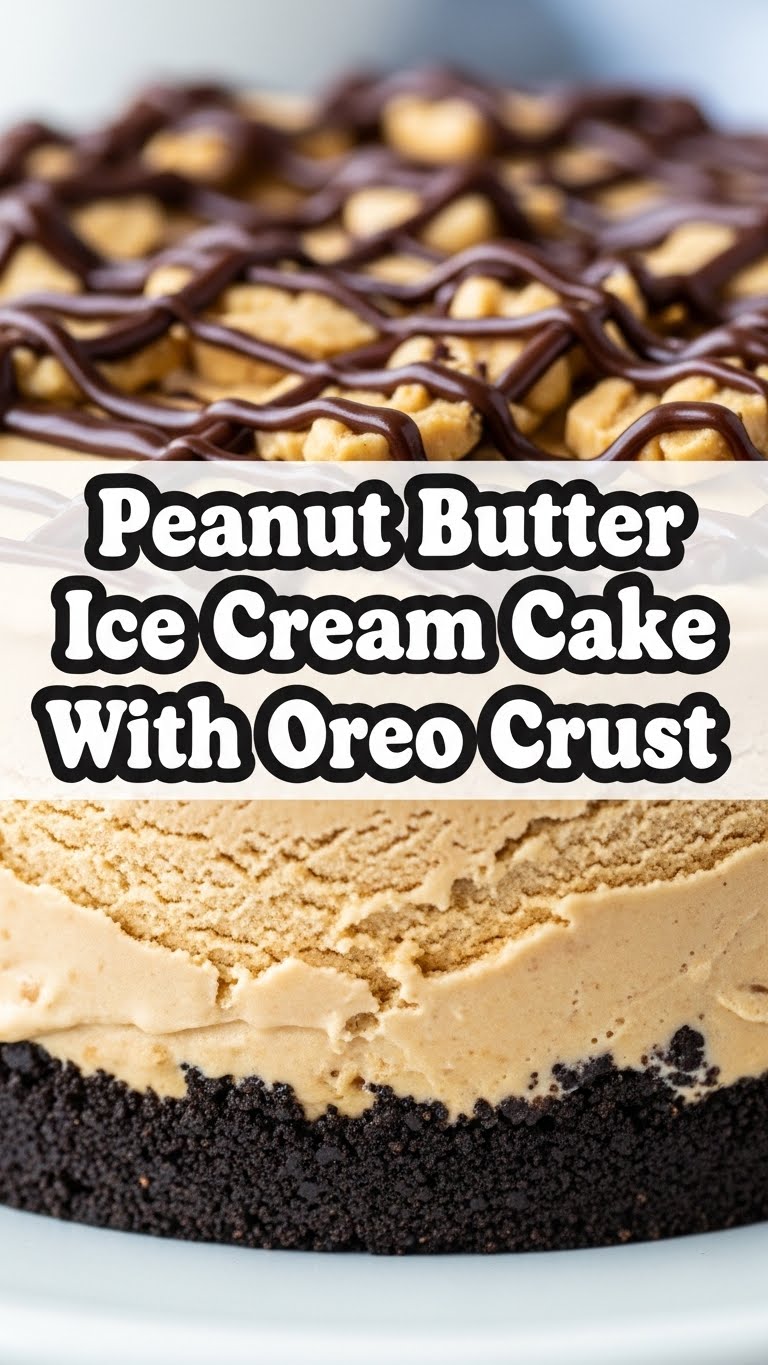
- Oreos (about 30-36 cookies): The OG, but any chocolate sandwich cookie works. Don’t cheap out here, your soul will know.
- Unsalted Butter (6 tablespoons), melted: Because butter makes everything better, duh.
- Creamy Peanut Butter (1 cup): The star of the show! Go for good quality. Crunchy? You do you, but creamy blends better here.
- Powdered Sugar (1 cup): For that silky smooth filling. Don’t skip sifting if yours is lumpy, it’s worth it.
- Vanilla Extract (1 teaspoon): A flavor hug for the peanut butter.
- Heavy Cream (1/2 cup): To whip up some fluffy magic.
- Vanilla Ice Cream (1.5 quarts, softened): Or whatever flavor tickles your fancy! Chocolate would be divine too. Pro tip: Let it sit on the counter for 15-20 mins before you start.
- Chocolate Syrup/Hot Fudge (for drizzling): Optional, but highly recommended for that “extra” factor.
- Chopped Peanut Butter Cups or Peanuts: For garnish, because presentation matters, even if you’re just eating it in your PJs.
Step-by-Step Instructions
- Crush the Oreos: Grab a food processor and pulse those Oreos until they’re fine crumbs. No food processor? Stick ’em in a Ziploc bag and unleash your inner Hulk with a rolling pin.
- Make the Crust: Pour the melted butter over the Oreo crumbs and mix well until it looks like wet sand. Press this mixture firmly into the bottom of a 9-inch springform pan. Use the back of a spoon or your clean hands to get it nice and compact.
- Chill the Crust: Pop the pan in the freezer for at least 15-20 minutes while you get started on the filling. This helps it set and prevents a crumbly mess later.
- Whip the Peanut Butter Filling: In a large bowl, beat together the softened peanut butter, powdered sugar, and vanilla extract until smooth. Then, gradually add the heavy cream and beat on medium-high speed until it’s light and fluffy, almost like a mousse. Don’t overmix!
- Layer the Ice Cream: Take your softened vanilla ice cream and spread about half of it evenly over your chilled Oreo crust. Use an offset spatula or the back of a spoon.
- Add the Peanut Butter Layer: Carefully spoon and spread the peanut butter mixture over the ice cream layer. Try to be gentle so you don’t mix the layers too much.
- Top with More Ice Cream: Finish with the remaining softened ice cream, spreading it evenly to create the top layer.
- Freeze it Solid: Cover the springform pan with plastic wrap and transfer it to the freezer. You absolutely need to freeze it for at least 4-6 hours, or even better, overnight. Patience is a virtue, especially when ice cream cake is involved.
- Garnish and Serve: Once frozen solid, remove the cake from the springform pan (run a warm knife around the edges if it’s sticking). Drizzle with chocolate syrup, sprinkle with chopped peanut butter cups or peanuts, slice, and bask in the glory.
Common Mistakes to Avoid
- Not Softening the Ice Cream Enough (or Too Much!): Too hard, and you’ll break your spoon. Too soft, and it’s a soupy mess. Aim for spreadable, not melted.
- Skipping the Freezer Time for the Crust: You want a solid base, not a crumbly avalanche when you slice. Don’t be that person.
- Not Freezing the Final Cake Long Enough: This isn’t a race, folks! A premature slice means a sad, melted mess. Patience, my friend, patience.
- Overmixing the Peanut Butter Filling: Once it’s fluffy, stop. Overmixing can make it dense.
- Using Natural Peanut Butter with Oil Separation: Stick to the creamy, no-stir varieties for this one. The oil separation in natural PBs can mess with the texture.
Alternatives & Substitutions
- Crust: Not an Oreo fan (gasp!)? Use Graham crackers, Nilla wafers, or even digestive biscuits. Just crush ’em and mix with butter.
- Ice Cream Flavor: Vanilla is classic, but chocolate, coffee, or even a good peanut butter swirl ice cream would be *chef’s kiss*. Experiment!
- Peanut Butter: If you have a nut allergy (or just dislike PB), try Biscoff spread for a similar vibe, or even sunbutter. Just make sure it’s creamy.
- Toppings: Go wild! Caramel sauce, whipped cream, sprinkles, crushed candies, more Oreos… the world is your oyster.
FAQ (Frequently Asked Questions)
- Do I really need a springform pan? You can use a regular 9-inch round cake pan lined with parchment paper and a foil sling to lift it out, but a springform pan makes your life infinitely easier. Trust me on this.
- Can I make this ahead of time? Absolutely! It’s actually better made a day or two in advance. More time for the flavors to meld and for it to freeze super solid.
- How long does it last in the freezer? Tightly covered, it’ll keep well for about a week. After that, the texture might start to get a bit icy, but it’ll still taste amazing.
- My ice cream melted too much while I was layering. Help! Don’t panic! Pop the pan back in the freezer for 15-20 minutes between layers if needed. Slow and steady wins the race here.
- Can I use light peanut butter or low-fat cream? Well, you *could*, but why hurt your soul like that? For the best texture and flavor, stick to the full-fat versions. This is a treat, after all!
- Can I add more chocolate? Is that even a question? Of course! Add chocolate chips to the peanut butter layer, or chop up a Hershey’s bar and scatter it between the ice cream layers. You do you!
Final Thoughts
See? Told you it was easy! Now you’ve got this show-stopping, no-bake masterpiece just waiting to impress whoever’s lucky enough to share it with you (or just you, no judgment here!). So go on, grab those ingredients, put on some tunes, and get ready to create some delicious magic. **You’ve earned this dessert, seriously.** Now go impress someone—or yourself—with your new culinary skills. You’ve totally got this!


