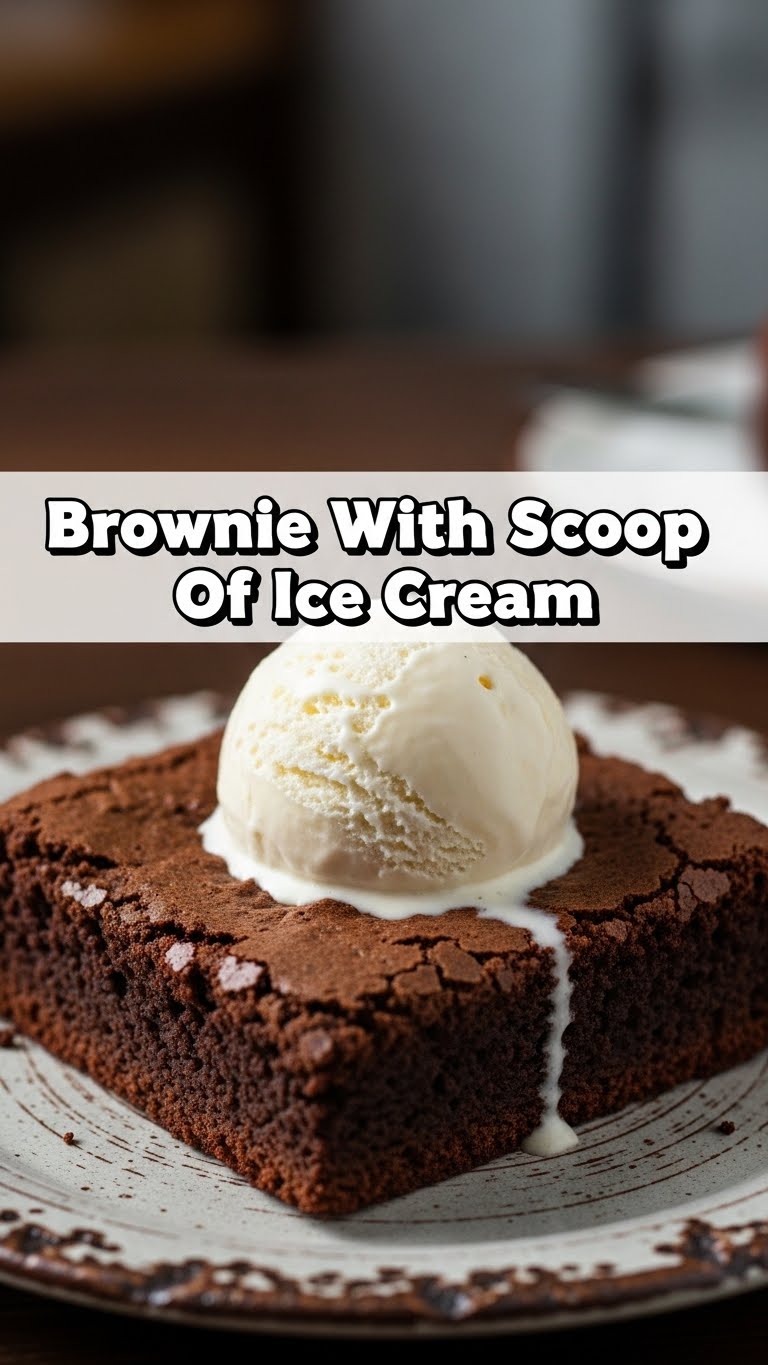
So you’re craving something tasty but too lazy to spend forever in the kitchen, huh? Same, friend, same. We’ve all been there: staring into the fridge, then the pantry, then back at the fridge, wishing a magical dessert would just *appear*. Well, today’s your lucky day, because I’m about to drop the recipe for a fudgy brownie that’s so easy, it practically bakes itself. And because we don’t do things halfway, we’re topping it with a glorious scoop (or three) of ice cream. Get ready to have your mind (and taste buds) blown without breaking a sweat!
Why This Recipe is Awesome
Okay, let’s be real. There are a gazillion brownie recipes out there. So why *this* one? Because it’s practically idiot-proof. Seriously, even I, a person who once set off the fire alarm trying to make toast, can nail this. It requires minimal dishes (hallelujah!), uses ingredients you probably already have lurking in your pantry, and the reward? A warm, gooey, chocolatey masterpiece begging for a cold, creamy companion. It’s perfect for impressing a date, bribing a roommate, or, let’s be honest, just shoveling into your face while binging your favorite show. No judgment here.
Ingredients You’ll Need
Gather ’round, my sweet-toothed comrades! Here’s your simple shopping list. Don’t worry, nothing too exotic, unless you consider chocolate chips exotic (which, to be fair, they *are* a little bit magical).
- 1/2 cup (113g) unsalted butter: Don’t even think about margarine unless you want to hurt my feelings. Butter makes it better.
- 1 cup (200g) granulated sugar: Sweetness, baby!
- 2 large eggs: Room temp if you’re fancy, but straight from the fridge works too, we’re not baking for the Queen.
- 1 teaspoon vanilla extract: The secret MVP, seriously. Don’t skip it.
- 1/2 cup (60g) all-purpose flour: Just plain old flour, no need for anything complex.
- 1/2 cup (45g) unsweetened cocoa powder: The good stuff. Not hot chocolate mix, please!
- 1/4 teaspoon salt: Balances everything out and makes the chocolate sing.
- 1/2 cup chocolate chips (optional, but highly recommended): Because why have plain chocolate when you can have *more* chocolate?
- Your favorite ice cream: Vanilla, chocolate, salted caramel… the world is your oyster!
Step-by-Step Instructions
Alright, apron on (or not, who cares?), let’s get baking! These steps are so easy, you could probably do them blindfolded. But please don’t, for safety reasons.
- Preheat & Prep: First things first, get that oven fired up to 350°F (175°C). Then, grab an 8×8 inch baking pan and line it with parchment paper, leaving a little overhang on the sides. This makes lifting the brownies out SO much easier, trust me.
- Melt the Butter: In a microwave-safe bowl or small saucepan, melt your butter. You want it fully melted, but not burnt, obvs.
- Whisk the Wet Stuff: Pour the melted butter into a medium mixing bowl. Add the granulated sugar and whisk them together for about a minute until combined. Now, crack in your two eggs, one at a time, whisking well after each addition. Finally, stir in the vanilla extract. It should look glossy and delicious.
- Combine Dry Ingredients: In a separate, smaller bowl, whisk together the flour, cocoa powder, and salt. Make sure there are no lumpy bits of cocoa powder lurking.
- Mix ‘Em Up: Gently add the dry ingredients to the wet ingredients. Mix just until *barely* combined. Do not overmix! Overmixing leads to tough, cakey brownies, and we want fudgy goodness, right?
- Fold in Chips (if using): If you’re using chocolate chips (and why wouldn’t you?), gently fold them into the batter.
- Bake Time! Pour the glorious batter into your prepared baking pan and spread it evenly. Pop it into the preheated oven for 20-25 minutes. How do you know they’re done? A toothpick inserted into the center should come out with moist crumbs, but not raw batter.
- Cool & Serve: Let the brownies cool in the pan for at least 15-20 minutes before lifting them out using the parchment paper overhang. This helps them set. Once they’re slightly cooled (or completely, if you have self-control), cut into squares. Serve warm with a generous scoop (or two, or three) of your favorite ice cream. Prepare for instant bliss!
Common Mistakes to Avoid
Look, we all make mistakes. It’s part of the human experience. But let’s try to avoid these common brownie blunders so your dessert dreams don’t turn into a nightmare.
- Overmixing: I said it once, I’ll say it again:
DO NOT OVERMIX! As soon as you add the dry ingredients, mix just until no streaks of flour remain. Seriously, stop there. - Overbaking: Nobody wants a dry, crumbly brownie. Keep an eye on the clock and use that toothpick test. When it comes out with moist crumbs, pull ’em out! A slightly underbaked brownie is a fudgy brownie.
- Not Lining the Pan: Trying to pry warm brownies from an unlined pan is a recipe for disaster and frustration. Use that parchment paper!
- Cutting Them Too Soon: I know, the smell is intoxicating. But resist the urge to cut them the second they come out of the oven. They need a little time to set up, or you’ll have a warm, delicious, but crumbly mess.
- Eating All the Raw Batter: Okay, not a “mistake” in terms of recipe outcome, but your stomach might disagree later. Plus, raw eggs, y’know? A little lick is fine, but save your appetite for the main event.
Alternatives & Substitutions
Feeling adventurous? Or just missing an ingredient? No stress! Here are some ways to jazz up or adapt this recipe.
- Butter Swap: If you’re out of butter, you can use an equal amount of melted coconut oil for a slightly different (but still delicious) flavor profile. Vegetable oil works too, but butter just hits different, IMO.
- Flour Power: For a gluten-free version, swap out the all-purpose flour for a 1:1 gluten-free baking blend.
- Chocolate Chip Frenzy: Don’t have semi-sweet? Use milk chocolate, dark chocolate, white chocolate, or even a mix! Feeling wild? Throw in some peanut butter chips or a handful of chopped nuts (walnuts or pecans are classic!).
- Flavor Boosters: A pinch of instant espresso powder (1/2 tsp) can deepen the chocolate flavor without making it taste like coffee. A sprinkle of sea salt flakes on top before baking is also a game-changer.
- Ice Cream Extravaganza: Don’t limit yourself to vanilla! Caramel swirl, mint chip, strawberry… whatever your heart desires. Or hey, serve it with some whipped cream if ice cream isn’t your jam.
FAQ (Frequently Asked Questions)
- Can I use oil instead of butter? Well, technically yes, but why hurt your soul like that? Butter provides a richer flavor and fudgier texture that oil just can’t quite replicate. If you *must*, use a neutral oil like vegetable or canola.
- How do I know when my brownies are done without overbaking? The toothpick test is your best friend! Insert it into the center. If it comes out with wet batter, bake a few more minutes. If it comes out clean, you’ve overbaked. The sweet spot is moist crumbs, but no liquid batter.
- My brownies are cakey, what went wrong? Ah, a classic! You likely overmixed the batter after adding the flour. Remember, mix just until combined. Or, you might have overbaked them.
- Can I make these ahead of time? Absolutely! Brownies are great for making in advance. Store them in an airtight container at room temperature for up to 3-4 days. You can always warm them up slightly before serving with ice cream.
- What kind of cocoa powder should I use? Unsweetened natural cocoa powder works perfectly here. Dutch-processed cocoa will give you a darker, less acidic brownie, which is also great, but adjust your leavening if you go that route (this recipe assumes natural cocoa).
- Help! My brownies are too thin! Did you use a pan larger than 8×8 inches? A larger pan will spread the batter thinner. For thicker brownies, stick to the specified pan size.
Final Thoughts
So there you have it! Your new go-to recipe for when that sweet tooth starts acting up. This brownie and ice cream combo is more than just a dessert; it’s a hug in a bowl, a celebration of chocolate, and a testament to how easy deliciousness can be. Now go impress someone—or yourself—with your new culinary skills. You’ve earned it! Seriously, go make these. You won’t regret it.

