So, you’ve just binged three seasons of that show, and now you’re hit with a sudden, intense craving for something utterly divine, but your energy levels are at ‘sloth on a sabbatical,’ right? Been there, my friend, been there. Good news! Today we’re whipping up a treat that screams “fancy dessert” but secretly whispers “I literally threw this together in minutes.” Get ready for **Chocolate-Covered Ice Cream With Nuts**, because your future self is going to thank your current, slightly lazy, genius self.
Why This Recipe is Awesome
Let’s be real, most recipes require effort, commitment, and sometimes, actual baking skills. Not this one! This gem is the culinary equivalent of putting on sweatpants—comfortable, satisfying, and zero fuss. It’s practically idiot-proof; **even I didn’t mess it up**, which is saying something. There’s no oven involved, minimal cleanup (if you’re careful, that is), and the payoff is a ridiculously delicious, customizable, crunchy, creamy dream. Plus, you get to play with melted chocolate, and who doesn’t love that?
Ingredients You’ll Need
- **Your Favorite Ice Cream (1 large tub):** Vanilla is a classic, but don’t let anyone tell you not to use mint chocolate chip or strawberry. Live your best life.
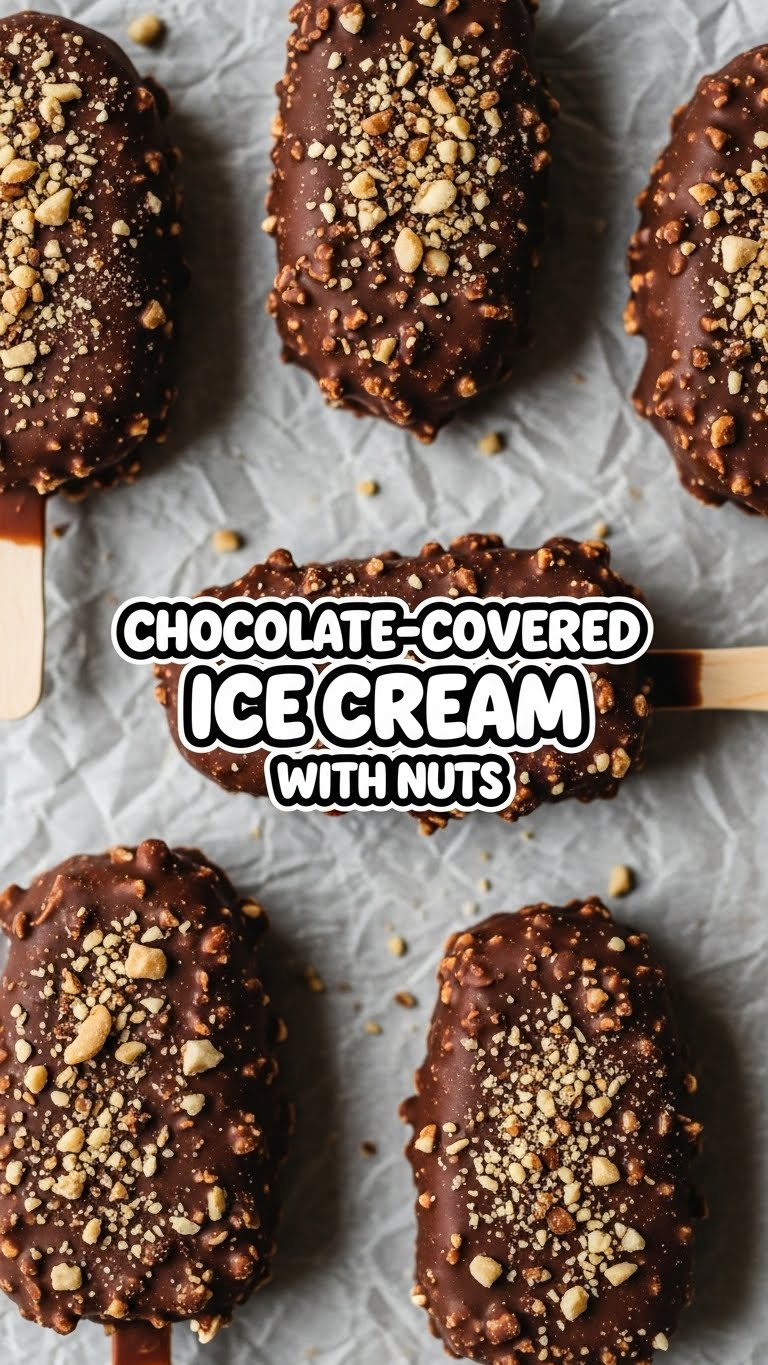
- **Good Quality Melting Chocolate (10-12 oz / ~300g):** This is where you don’t skimp. Think chocolate bars meant for melting, not those sad little chocolate chips that often refuse to fully cooperate. Dark, milk, or a mix—your call! We’re aiming for silky smooth, not lumpy disappointment.
- **Chopped Nuts (1 cup):** Peanuts, almonds, walnuts, pecans—whatever gives you that satisfying crunch. You can even mix ’em up!
- **Coconut Oil (1-2 tsp, optional but recommended):** A tiny bit helps the chocolate melt smoother and gives it a gorgeous sheen. Also helps it set a bit quicker!
- **Parchment Paper & a Baking Sheet:** Essential for no-stick freezing.
- **Popsicle Sticks or Skewers (optional):** If you want to make them hand-held. Otherwise, just roll ’em into balls.
Step-by-Step Instructions
- **Scoop & Shape:** Line a baking sheet with parchment paper. Scoop out generous balls of ice cream. If your ice cream is super hard, let it soften just enough to scoop easily, but not melt. Roll them gently into fairly uniform balls. If using sticks, gently insert one into each ball.
- **Freeze for Glory:** Place your ice cream balls (with or without sticks) on the parchment-lined tray. Now, here’s the crucial part: **freeze them until they’re rock hard.** This usually takes at least 2-3 hours, or even overnight. Patience, young grasshopper.
- **Melt That Chocolate:** While your ice cream is getting its chill on, prepare your chocolate. Chop your good quality chocolate into small pieces. Melt it gently either in a double boiler (bain-marie) or in the microwave in 30-second intervals, stirring well after each, until smooth. **Stir in the coconut oil** if using; it makes the chocolate beautifully dippable.
- **Prep Your Toppings:** Spread your chopped nuts (and any other fun toppings like sprinkles or shredded coconut) on a separate plate or shallow dish.
- **Dip & Dazzle:** Work quickly! Take one super-frozen ice cream ball from the freezer. Dip it into the melted chocolate, twirling it to ensure an even coating. Let any excess chocolate drip off back into the bowl.
- **Roll in the Goodness:** Immediately transfer the chocolate-covered ball to your plate of nuts. Gently roll it around until it’s coated to your liking.
- **Back to the Chill:** Place the newly coated ice cream ball back onto your parchment-lined baking sheet. Repeat with the remaining ice cream balls, working swiftly to keep everything frozen. **Pop them back into the freezer immediately** for at least 15-20 minutes, or until the chocolate is completely set.
- **Devour with Gusto:** That’s it! Once firm, these beauties are ready to be enjoyed. Try not to eat them all in one go (unless you really want to, no judgment here).
Common Mistakes to Avoid
- **The Impatient Freeze:** Not freezing the ice cream long enough before dipping. Rookie mistake! You’ll end up with a sad, soupy mess that slides right off the stick, not a majestic chocolate-covered orb. **Don’t rush the freeze!**
- **Overheating the Chocolate:** Burnt chocolate tastes awful, and scorched chocolate seizes up. Gentle heat is your friend. Don’t nuke it into oblivion or leave it unattended on the stove.
- **Water, Chocolate’s Arch Nemesis:** Even a tiny drop of water can make your beautiful melted chocolate seize and become clumpy. Ensure all your bowls, spatulas, and hands are bone dry.
- **Thin Chocolate Coating:** While a thin coating can be nice, sometimes people use too little chocolate, leading to bare spots or a weak shell. Make sure you have enough chocolate for a good, satisfying dip.
Alternatives & Substitutions
This recipe is practically begging for your creative touch! Don’t be afraid to experiment.
- **Ice Cream Flavors:** Beyond vanilla, consider coffee ice cream with dark chocolate and almonds, or strawberry ice cream with white chocolate and sprinkles.
- **Toppings Galore:** Instead of just nuts, try crushed pretzels for a salty crunch, shredded coconut, mini M&M’s, crushed Oreos, or even a sprinkle of flaky sea salt on dark chocolate for that gourmet touch.
- **Chocolate Varieties:** You can use milk, dark, or white chocolate. For an adult twist, add a tiny splash of liqueur (like Kahlúa or Grand Marnier) to the melted chocolate before dipping. **FYI**, a little goes a long way!
- **No Sticks? No Problem!** Just roll the ice cream into balls and serve them in little cups or on a plate. A fork works just as well as a stick, IMO.
FAQ (Frequently Asked Questions)
- **Do I really need to freeze the ice cream so long?** Oh, absolutely! Unless you enjoy a melting, chocolate-covered puddle of despair, that pre-dip freeze is non-negotiable.
- **Can I use regular chocolate chips?** You *can*, but they often contain stabilizers that prevent them from melting as smoothly as good quality melting chocolate or baking bars. Save yourself the frustration and get the good stuff for a glossy, crack-free coating.
- **What if my chocolate seizes?** If it suddenly turns clumpy and unworkable, try stirring in a tiny bit of vegetable oil or shortening (like half a teaspoon at a time) and stir vigorously. It sometimes saves it, but no promises!
- **How long do they last in the freezer?** If they survive your family for more than an hour (a big IF!), they’re good for about 1-2 weeks, stored in an airtight container.
- **Can I skip the nuts?** Absolutely! But then it’s just chocolate-covered ice cream. Still delicious, just less “crunch-tastic.” Go nuts (or don’t!).
- **Can I make these dairy-free?** **OMG yes!** Use a good dairy-free ice cream (there are so many amazing almond milk, coconut milk, or oat milk options now!) and dairy-free chocolate. Easy peasy and just as delicious.
Final Thoughts
See? Told ya it was easy! Now you’ve got these ridiculously delicious, fancy-looking treats that took minimal effort but deliver maximum satisfaction. They’re perfect for impressing guests, bribing children, or just treating yourself after a long day of, well, existing. Now go forth and conquer your cravings, you magnificent dessert wizard! You’ve earned it!


