So you’re craving something that looks like it belongs in a fairytale but tastes like pure, unadulterated joy, and you absolutely refuse to spend an entire Saturday slaving away in the kitchen? My friend, you’ve stumbled into the right digital corner. We’re talking about a Pink Ice Cream Cone with a Gold Swirl, a dessert so fabulous it practically demands a tiny tiara. And guess what? It’s ridiculously easy. You’re welcome.
Why This Recipe is Awesome
Because it’s practically magic, that’s why! This isn’t just ice cream; it’s an edible mood enhancer. Seriously, this recipe is so straightforward, even I (who once set fire to a toaster, don’t ask) can whip it up without a hitch. It’s no-churn, which means no fancy ice cream maker required—just a bowl, a whisk, and a freezer. Plus, pink and gold? You’ll be the envy of every Instagram feed. It’s almost *too* pretty to eat… almost. It’s idiot-proof, even I didn’t mess it up!
Ingredients You’ll Need
- 2 cups (480ml) heavy whipping cream: This is where the magic happens. Don’t skimp, this ain’t a diet.
- 1 (14-ounce/397g) can sweetened condensed milk: Your sweet, sweet shortcut to no-churn heaven. It’s basically a hug in a can.
- 1 teaspoon vanilla extract: Because vanilla makes everything better, duh.
- Pink food coloring (gel works best): A few drops for that perfect blush hue. Or, if you’re feeling extra, a quarter cup of finely pureed raspberries or strawberries (strained!) for natural pink goodness.
- Waffle cones or sugar cones: The crunchy canvas for your edible masterpiece. Get the good ones, you deserve it.
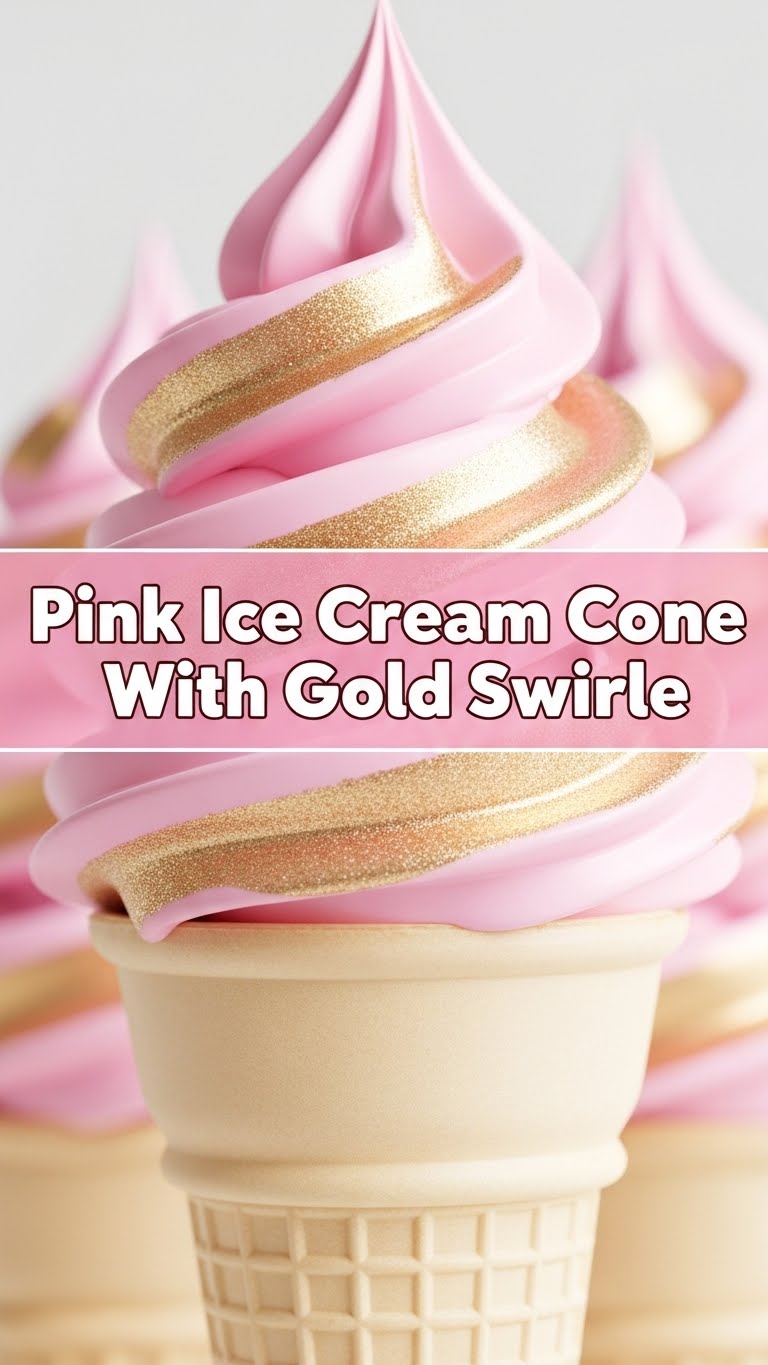
- Edible gold dust or spray: This is the “swirl” part. You can find it in the baking aisle. This is where you get fancy without actually being fancy.
Step-by-Step Instructions
- First things first, grab a large, chilled mixing bowl and a whisk (or your electric mixer if you’re not into arm workouts). Pour in your heavy whipping cream.
- Whip that cream until it forms beautiful, stiff peaks. We’re talking cloud-like, hold-their-shape peaks. Don’t over-whip unless you want butter for dinner!
- In a separate bowl, combine the sweetened condensed milk and vanilla extract. Stir ’em together until they’re best friends.
- Now, gently fold the condensed milk mixture into your whipped cream. Do it in stages, being careful not to deflate all that lovely air you just whisked in. Think light and airy, like a fluffy dream.
- Add a few drops of pink food coloring (or your fruit puree) and fold it in until you reach your desired shade of fabulous pink. Start with a little, you can always add more.
- Spoon your gorgeous pink ice cream mixture into a freezer-safe container. Smooth the top if you’re feeling particular.
- Pop it into the freezer for at least 6 hours, or ideally, overnight. Patience, my friend, is a virtue, especially when it comes to perfect ice cream.
- Once your ice cream is perfectly set, it’s cone decorating time! Grab your cones and that edible gold dust or spray. If using dust, mix a tiny bit with a drop of clear alcohol (like vodka) or lemon extract to make a paint.
- Channel your inner artist and paint/spray a pretty gold swirl (or polka dots, or stripes, who cares?!) onto the rim or side of your cones. Let it dry for a minute.
- Scoop generous amounts of your pink ice cream into your fancy gold-swirled cones. Serve immediately and bask in the glory of your culinary genius.
Common Mistakes to Avoid
- Over-whipping the cream: Rookies often turn their perfect peaks into grainy butter. Stop when it’s stiff, not separated.
- Not freezing long enough: Unless you’re aiming for a pink soup, give your ice cream the proper chill time. Nobody likes a runny cone.
- Using warm bowls/utensils for whipping cream: Chill everything, including the bowl and whisk, for faster and better results. It’s a game changer, trust me.
- Forgetting the edible gold: Then it’s just ‘Pink Ice Cream Cone’, which is fine, but less *sparkly*. Don’t deny yourself the extra glam!
Alternatives & Substitutions
Feeling adventurous? Or maybe you just ran out of something vital. No worries!
- Pink Flavor: Instead of food coloring, blend up some frozen raspberries or strawberries (about a quarter cup) and strain out the seeds for a natural, fruity pink. Just fold it in at the same stage as the food coloring. IMO, this adds a lovely depth of flavor.
- Cones: No waffle cones? Sugar cones work great, or even waffle bowls if you’re prone to drips (or just want to eat it with a spoon, no judgment).
- Gold Swirl: If gold isn’t your vibe, or you can’t find it, try silver edible dust, some fancy sprinkles, or a drizzle of melted white chocolate for a different kind of chic. Or skip it; it’ll still be delicious!
FAQ (Frequently Asked Questions)
Got questions? I’ve got answers (mostly humorous ones).
- Can I use light cream instead of heavy cream? Well, technically yes, but why hurt your soul like that? It won’t be as rich, thick, or dreamy. Live a little!
- How long does this no-churn ice cream last in the freezer? In your freezer, maybe a week or two, but it’s best enjoyed within the first few days. In your belly, about 30 seconds.
- Do I *have* to use edible gold dust? No, you don’t *have* to, but why would you deny yourself this level of fabulousness? It’s the “swirl” part of the “gold swirl,” after all!
- Can kids help make this? Absolutely! Especially with the folding and the inevitable licking of the bowl. Just supervise the whipping part.
- Is this healthy? Honey, it’s ice cream. Let’s not ask questions we don’t want the answer to. Enjoy it!
- What if my ice cream doesn’t get hard enough? Make sure your freezer is set to its coldest setting. Also, ensure your container is well-sealed to prevent ice crystals. Give it more time, sometimes freezers are just slowpokes.
Final Thoughts
See? I told you it was easy peasy, lemon squeezy (except, you know, pink and gold). You’ve just created a show-stopping dessert that tastes as good as it looks, all without breaking a sweat or needing a culinary degree. Now go impress someone—or yourself—with your new culinary skills. You’ve earned it, you glorious dessert wizard! Don’t forget to send me pics!


