So you’re craving something that screams “fancy restaurant dessert” but also whispers “I made this while wearing pajamas and binge-watching reality TV,” huh? Same. High five! Today, my friend, we’re diving headfirst into the creamy, dreamy world of Caramel Custard, because honestly, life’s too short for boring desserts. And we’re not just stopping there; we’re pairing it with ice cream because, well, why not? Let’s get cooking (or, you know, just assembling awesomeness).
Why This Recipe is Awesome
Okay, let’s talk brass tacks. Why should you bother with *this* particular recipe? Because it’s a total game-changer, that’s why! First off, it looks incredibly impressive. Like, “Oh, did you just graduate from culinary school?” impressive. But here’s the kicker: it’s embarrassingly easy. Seriously, it’s practically **idiot-proof**. I made it, and my usual kitchen feats involve burning toast, so trust me on this one.
It’s also super comforting, rich, and that sweet, slightly bitter caramel just sings with the smooth custard. Plus, it’s a make-ahead champion! Whip it up the day before, chill it, and then just flip and serve when you’re ready to wow. Less stress, more dessert. That’s the motto, IMO.
Ingredients You’ll Need
Gather your troops! These aren’t just ingredients; they’re your secret weapons for deliciousness. Keep it simple, keep it real.
- **For the Caramel:**
- **½ cup granulated sugar:** The star of our show, destined for a golden transformation.
- **2 tablespoons water:** Just a little H2O to help our sugar along.
- **For the Custard:**
- **3 large eggs:** The backbone of our creamy custard. Don’t skimp on the size!
- **½ cup granulated sugar:** Sweetness for the soul.
- **2 cups whole milk:** Go full-fat, baby! For that rich, velvety texture you crave. (Don’t even *think* about skim milk here. We’re not health nuts today.)
- **1 teaspoon vanilla extract:** A splash of magic. Good quality makes a difference!
- **Pinch of salt:** Because even sweet things need a little balance.
- **For Serving:**
- **Your favorite vanilla ice cream:** Or really, any ice cream you fancy. But classic vanilla? Chef’s kiss!
Step-by-Step Instructions
- **Get your oven prepped:** Preheat your oven to 325°F (160°C). Grab some ramekins (around 4-6 oz each), usually 4-6 of them, and set them aside. Oh, and put a kettle of water on to boil for later – you’ll thank me.
- **Caramel time!** In a small, heavy-bottomed saucepan, combine the ½ cup sugar and 2 tablespoons of water. Cook over medium heat, swirling the pan occasionally (don’t stir with a spoon, you’ll make it crystallize!), until it turns a beautiful amber color. This takes patience, so don’t rush it! **Keep an eye on it**, it goes from perfect to burnt in a nanosecond.
- **Pour the magic:** Carefully (it’s hot!) and quickly pour the hot caramel into the bottom of each ramekin, tilting them to coat the bottom evenly. Set them aside to let the caramel harden.
- **Custard chaos (the good kind):** In a large bowl, gently whisk together the eggs, ½ cup sugar, vanilla extract, and salt until just combined. Don’t go crazy and make it super foamy; we want smooth custard, not an aerated mess.
- **Heat the milk:** Warm the milk in a separate saucepan over medium heat until it’s steamy, but not boiling. **Don’t let it boil!**
- **Combine forces:** Slowly, and I mean *slowly*, pour the warm milk into the egg mixture while continuously whisking. This is called “tempering” and it prevents you from making scrambled eggs. You’re welcome.
- **Strain for smoothness:** For an extra-silky custard (and to catch any bits of cooked egg or undissolved sugar), pour the custard mixture through a fine-mesh sieve into a clean bowl or a large measuring cup with a spout.
- **Fill ‘er up:** Pour the strained custard mixture over the hardened caramel in each ramekin.
- **Water bath wonderland:** Arrange your ramekins in a larger baking dish. Carefully pour the hot water (from your kettle!) into the baking dish until it comes halfway up the sides of the ramekins. This water bath (bain-marie, if you’re fancy) helps the custard cook gently and evenly, preventing it from cracking or turning rubbery.
- **Bake until wobbly:** Carefully transfer the baking dish to your preheated oven. Bake for 40-50 minutes, or until the edges are set but the center still has a slight wobble when gently shaken.
- **Cool down, baby:** Remove the baking dish from the oven, then carefully lift the ramekins out of the water bath. Let them cool completely on a wire rack.
- **Chill out:** Once cool, cover each ramekin with plastic wrap and chill them in the refrigerator for at least 4 hours, or even better, overnight. **Patience is a virtue here!**
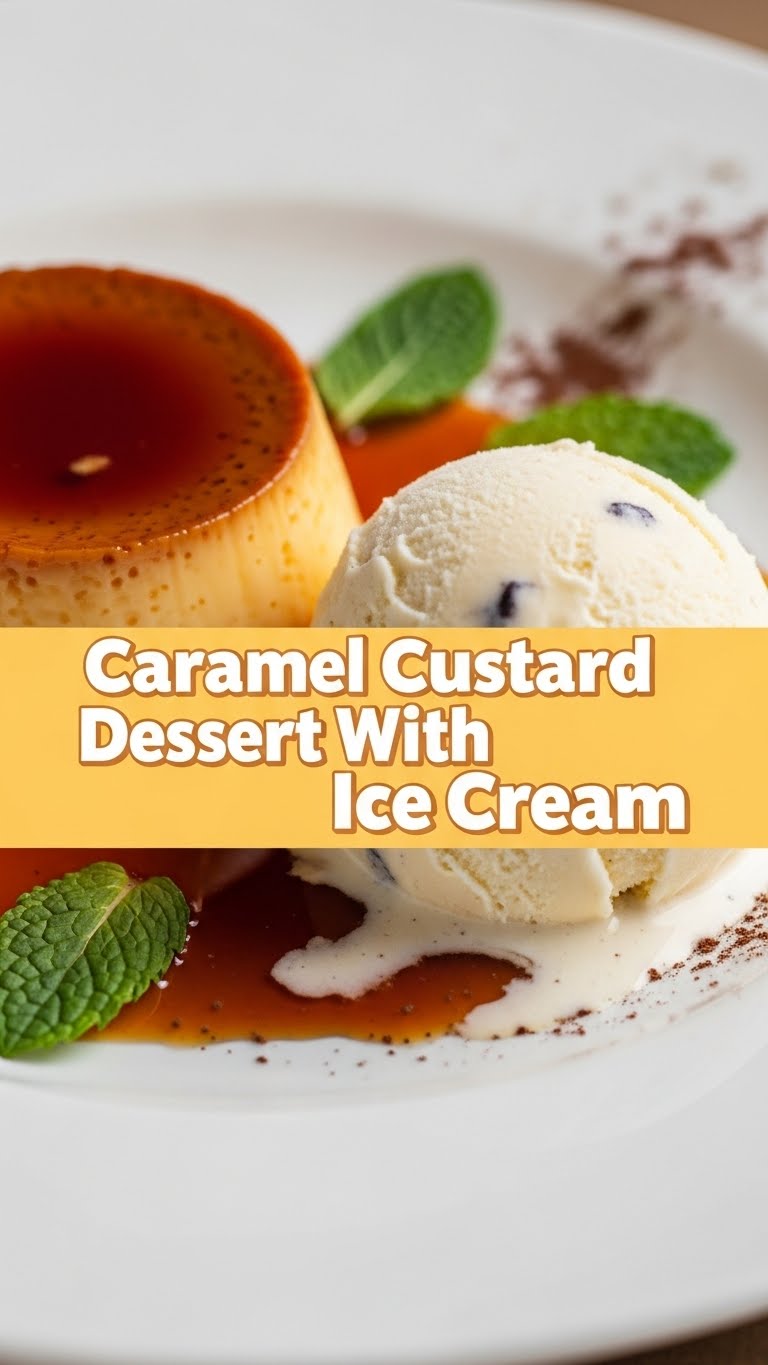
- **The grand finale:** When you’re ready to serve, run a thin knife around the edge of each ramekin. Place a serving plate upside down over the ramekin, then quickly and confidently flip it over. The custard should slide out, revealing that gorgeous caramel sauce pooling around it. Serve immediately with a generous scoop (or two, I’m not judging) of vanilla ice cream. Divine!
Common Mistakes to Avoid
Nobody’s perfect, especially in the kitchen. But here are some blunders to dodge, because we learn from mistakes, preferably not our own.
- **Burning the caramel:** This is probably the biggest rookie mistake. **Seriously, don’t walk away from the caramel.** It goes from perfect to a bitter, smoky mess in seconds. If it burns, start over. Your taste buds will thank you.
- **Over-whisking the custard:** Whipping too much air into your eggs can lead to a bubbly, aerated custard with an odd texture. We want smooth and silky, not foamy.
- **Skipping the water bath:** Thinking you can just throw the ramekins in the oven without a water bath? Rookie move. You’ll end up with a rubbery, cracked, and generally sad custard. **The water bath is essential for a silky texture.**
- **Not chilling long enough:** Impatience is a virtue sometimes, but not here. If you unmold too early, your custard might just collapse into a sweet puddle. Give it the full chill time.
- **Overcooking the custard:** If it’s firm all the way through, it’s overcooked. A slight wobble in the center is what you’re aiming for. Overcooked custard tends to be tough or even develop a weird, scrambled-egg like texture. Eww.
Alternatives & Substitutions
Feeling adventurous? Or just realized you’re missing an ingredient? Here are some simple swaps and additions:
- **Milk swap:** While whole milk is king for richness, you can use 2% milk in a pinch. Just know it might be slightly less decadent. **Don’t use skim milk, though.** I won’t even pretend that’s okay.
- **Flavor variations:** Swap out vanilla extract for almond extract for a nutty twist. A tiny pinch of cinnamon or a grating of nutmeg in the custard can also be lovely. Or, if you’re feeling extra, infuse your milk with a vanilla bean pod while warming it.
- **Sweetener twist:** You could try using brown sugar for a deeper, molasses-y caramel. Just be careful, it burns a little faster.
- **Serving suggestions:** Not feeling the ice cream vibe? (Are you okay?) Serve it with a dollop of freshly whipped cream, some fresh berries, or a sprinkle of toasted coconut flakes for extra texture.
- **Individual vs. Family Style:** If you don’t have ramekins, you can bake it in a single 8 or 9-inch round cake pan (still in a water bath!). Just adjust baking time—it will take longer. But honestly, individual portions are so much cuter!
FAQ (Frequently Asked Questions)
Got questions? I’ve got answers. And probably some sass.
- **Can I make caramel custard ahead of time?** Absolutely, you rockstar! In fact, it tastes even better the next day after a good chill. So go forth and conquer your meal prep!
- **How do I know my custard is cooked properly?** Give the ramekin a gentle wiggle. If the edges are set and the center has a slight, delicate wobble (like Jell-O, not liquid), it’s done! If it looks like a swimming pool, give it more time.
- **My caramel hardened too quickly in the ramekins. What now?** Don’t panic! You can gently warm the ramekins in a warm water bath for a minute or two to loosen it up, or if it’s really stuck, try placing them on a warm baking sheet for a bit. Or just embrace the caramel-solidified-to-the-bottom situation; it’ll still taste great.
- **Can I use any kind of eggs?** Large eggs are best for consistency. Free-range, organic, happy-chicken eggs will likely give you richer flavor and color, but standard large eggs work perfectly fine. Don’t use small eggs, unless you plan to use more.
- **Why did my custard get bubbles or tiny holes?** Likely a couple of reasons: you either whisked the eggs too vigorously (introducing too much air), or the milk was too hot when you poured it in, causing the eggs to cook unevenly. Strain your mixture, and let it sit for a few minutes before baking to let any bubbles dissipate.
- **Do I *have* to serve it with ice cream?** Well, technically no, you *don’t have to*. But why deny yourself such a delightful experience? The cold, creamy ice cream is the perfect counterpoint to the rich, slightly bitter caramel and smooth custard. It’s like they were made for each other. Trust me.
Final Thoughts
And there you have it, my friend! You just made a dessert that looks like it took hours, but was secretly (our little secret!) super chill. Now you’ve got this amazing Caramel Custard, perfectly wobbly, beautifully sweet, and ready to impress anyone who dares to taste it. Go ahead, pat yourself on the back. You’ve earned it!
Now go forth and impress someone—or just yourself, honestly—with your new culinary skills. You deserve a treat, and this one is pretty darn good. Enjoy every single creamy, caramelly bite!


