So you’re craving something warm, cozy, and utterly delicious but the thought of spending hours in the kitchen makes you want to curl up with a Netflix marathon instead? Trust me, I get it. We’ve all been there, staring into the abyss of our pantry, wishing a magical dessert would just appear. Well, today, my friend, we’re making magic happen – the kind that involves minimal fuss and maximum flavor. Get ready for **Pumpkin Bread with Pie Filling**!
Why This Recipe is Awesome
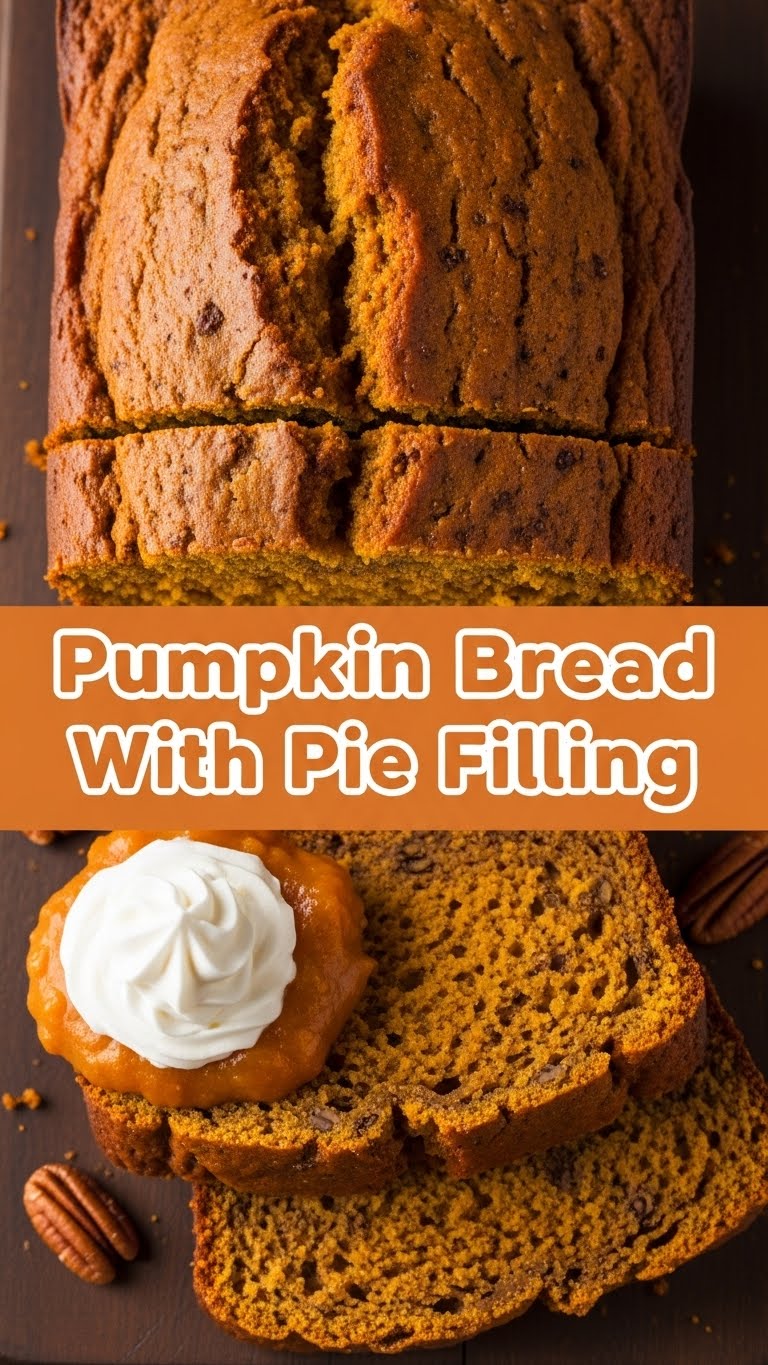
Okay, let’s be real. There are a million pumpkin bread recipes out there. So why this one? Because it’s not just pumpkin bread; it’s pumpkin bread with a secret weapon: a gooey, spiced layer of pumpkin pie filling baked right in. It’s like a two-for-one deal on comfort food! Plus, it’s so ridiculously simple, it’s practically idiot-proof. Seriously, even I didn’t mess it up, and my kitchen adventures often involve questionable smoke alarms. You get all the best parts of a moist pumpkin loaf AND a creamy pumpkin pie, all wrapped up in one glorious, sliceable package. Less faff, more yum. Win-win, if you ask me!
Ingredients You’ll Need
Gather your troops, folks! Here’s what we’re wrangling for this autumnal masterpiece:
- For the Bread:
- 2 cups All-Purpose Flour: The backbone of our operation.
- 1 ½ cups Granulated Sugar: Sweetness, baby!
- 1 tsp Baking Soda: Our fluffy-maker.
- ½ tsp Baking Powder: Double agent for extra lift.
- 1 tsp Salt: Don’t skip it; it balances everything out.
- 2 tsp Pumpkin Pie Spice: Or your own blend of cinnamon, nutmeg, ginger, and cloves if you’re feeling fancy.
- 2 Large Eggs: Room temp, please!
- ½ cup Vegetable Oil: Keeps it moist and tender. Canola works too.
- 1 cup Pumpkin Puree (NOT pie filling!): This is just plain pumpkin. FYI, the can will explicitly state “puree.”
- 1 tsp Vanilla Extract: A little extra warmth.
- For the Pie Filling Layer:
- 1 (15-oz) can Pumpkin Pie Filling: This is your secret weapon. The can will say “pie filling” or “pie mix.” It’s already spiced and sweetened – genius, right?
- Optional Mix-ins (because why not?):
- ½ cup Chocolate Chips: Because chocolate makes everything better.
- ½ cup Chopped Pecans or Walnuts: For a little crunch.
Step-by-Step Instructions
- Preheat & Prep: First things first, get that oven screaming hot to 350°F (175°C). Then, grab a 9×5-inch loaf pan and give it a good spray with non-stick spray or butter it up and flour it. No stick-age allowed!
- Whisk the Dry Stuff: In a large bowl, whisk together your flour, sugar, baking soda, baking powder, salt, and pumpkin pie spice. Make sure there are no lumpy bits. This sets the stage for a smooth operation.
- Mix the Wet Stuff: In a separate medium bowl, beat those eggs lightly. Then, whisk in the oil, pumpkin puree (remember, NOT pie filling for this part!), and vanilla extract until everything is nicely combined and looks gloriously orange.
- Combine & Don’t Overmix: Pour the wet ingredients into the dry ingredients. Stir them together just until everything is combined. Stop right when you see no more dry streaks! Overmixing is the enemy of tender bread, making it tough and sad. If you’re adding chocolate chips or nuts, fold them in now.
- The Layering Magic: Spoon about half of your pumpkin bread batter into the prepared loaf pan. Spread it out as evenly as you can. Now, for the fun part: gently spoon the entire can of pumpkin pie filling over this first layer of batter. Try to keep it somewhat in the middle, away from the very edges.
- Top It Off: Carefully dollop the remaining pumpkin bread batter over the pie filling layer. Use the back of a spoon or an offset spatula to gently spread it out, trying to cover the pie filling as much as possible without mixing it all up.
- Bake It Up: Pop that beautiful pan into your preheated oven. Bake for about 60-70 minutes. You’ll know it’s done when a toothpick inserted into the *bread* (not the gooey pie filling layer) comes out clean, or with just a few moist crumbs.
- Cool Down: Let the bread cool in the pan for about 10-15 minutes. This gives it a chance to set up. Then, carefully run a knife around the edges, invert it onto a wire rack, and let it cool completely before slicing. Trust me, waiting is the hardest part, but it’s worth it for clean slices!
Common Mistakes to Avoid
- The Great Pumpkin Puree vs. Pie Filling Mix-Up: This is probably the number one blunder. Remember: **puree** goes into the bread batter (it’s just pumpkin), and **pie filling** is the luscious layer in the middle (it’s already spiced and sweetened). Read those labels carefully, folks!
- Overmixing the Batter: As mentioned, tough bread is no fun. Mix just until combined. A few lumps are totally fine; flour streaks are not.
- Not Greasing Your Pan Properly: Ever had a perfectly baked loaf stick to the pan and crumble into oblivion? Devastating. Don’t let it happen to you. Grease it well, and maybe even flour it for extra assurance.
- Impatience is NOT a Virtue: Slicing into a hot loaf is tempting, but the filling needs time to set. Let it cool; your future self will thank you for those neat slices.
- “I Don’t Need to Preheat the Oven”: Rookie mistake. Preheat! It ensures even baking from the start. Your oven isn’t a microwave; it needs time to get its act together.
Alternatives & Substitutions
Feeling adventurous? Or maybe you just ran out of something key. No worries, we can totally improvise:
- No Vegetable Oil? Melted unsalted butter works beautifully for an even richer flavor, or even a light olive oil if you’re really in a pinch (though it might subtly change the taste).
- Missing Pumpkin Pie Spice? DIY it! Combine 1 ½ tsp cinnamon, ½ tsp ground ginger, ¼ tsp ground nutmeg, and a pinch of ground cloves. Boom, you’re a spice master.
- Want More Texture? Feel free to swap out the chocolate chips/nuts for dried cranberries, golden raisins, or even candied ginger bits. Just fold them into the batter with the other optional mix-ins.
- Not a Pumpkin Pie Filling Fan? While this recipe is *about* the pumpkin pie filling, you could experiment with other canned pie fillings like apple or cherry for a different twist. Just remember it won’t be “Pumpkin Bread with Pie Filling” then, will it? But hey, your kitchen, your rules!
FAQ (Frequently Asked Questions)
Because I know you have questions, and I have answers (mostly humorous ones):
- Can I use fresh pumpkin puree?
You absolutely can! Just make sure it’s roasted, pureed, and then drained of any excess liquid. Store-bought is just easier, IMO, but fresh is definitely a flex!
- My pumpkin bread came out dry, what happened?
Oh no! Probably overmixed the batter, or baked it too long. Remember, a toothpick with a few moist crumbs is perfect; bone-dry means it’s overdone. Next time, pull it out a few minutes earlier!
- Can I make this into muffins?
Heck yes! Just fill muffin liners about two-thirds full, layer in the pie filling, and top with more batter. Bake for 20-25 minutes, or until a toothpick comes out clean. Adjust baking time accordingly!
- How long does this glorious bread last?
At room temperature, tightly wrapped, it’ll be good for 3-4 days. In the fridge, up to a week. You can also freeze slices for a quick grab-and-go treat. Just make sure it’s well-wrapped to avoid freezer burn.
- Is this considered healthy?
Are we still friends? It’s delicious, and it brings joy! That’s healthy for the soul, right? For actual nutritional health, it’s a treat, so enjoy it in moderation. Or don’t. I won’t judge.
- Can I use margarine instead of oil?
Well, technically yes, but why hurt your soul like that? If you’re looking for that buttery richness, just go for real butter. Margarine is kinda like a sad imitation, bless its heart.
Final Thoughts
So there you have it, folks! A recipe that’s sure to make your kitchen smell like autumn exploded in the best possible way. This Pumpkin Bread with Pie Filling isn’t just a dessert; it’s a hug in food form, a delightful mashup that’ll impress anyone who tries it (especially when you casually mention there’s a *pie* hidden inside). Go on, whip up a loaf, slice into that warm, spiced goodness, and pat yourself on the back. You’ve earned it! Now go impress someone—or yourself—with your new culinary skills. Happy baking!


