So, you’re craving something warm, spicy, and utterly delicious, but your taste buds are also whispering sweet, dark secrets of chocolate? And let’s be real, you’re *also* too fabulous to make something boring. Same, friend, same! Forget your grandma’s plain ol’ pumpkin pie (bless her heart, it was fine). We’re leveling up. We’re getting spicy, we’re getting dark, we’re making a **Pumpkin Pie with a Chocolate Crust**. Prepare for your life to change.
Why This Recipe is Awesome
Okay, so you might be thinking, “Pumpkin and chocolate? Is this some kind of culinary fever dream?” And to that, I say: **Yes, a delicious one!** This isn’t just a recipe; it’s a personality statement. It screams, “I appreciate tradition, but I’m also here for a good time!” It’s *ridiculously* easy, tastes like autumn went to a rock concert, and honestly, even your most cynical friend will ask for the recipe. Plus, it’s pretty darn hard to mess up. Even if you usually burn water, you’ve got this. No fancy techniques, just pure, unadulterated deliciousness.
Ingredients You’ll Need
Get ready to raid your pantry (or make a quick, dramatic dash to the store).
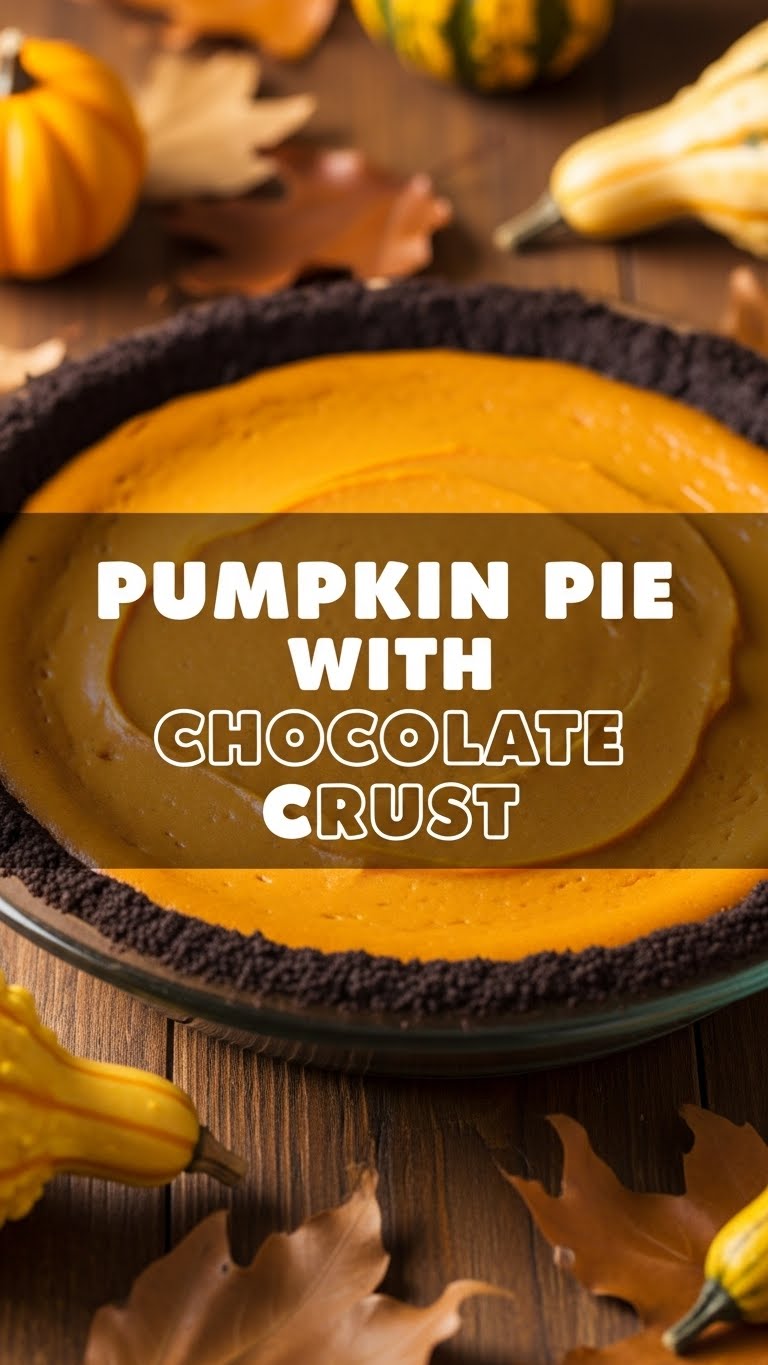
For the Chocolate Crust:
- **1 ½ cups all-purpose flour:** The basic building block of dreams.
- **½ cup unsweetened cocoa powder:** The dark magic. Use good quality, because life’s too short for bad chocolate.
- **½ teaspoon salt:** Balances the sweetness, like a wise sage.
- **½ cup unsalted butter (1 stick), very cold and cubed:** The colder, the flakier. Don’t skimp, don’t melt.
- **¼ cup ice water (or slightly more if needed):** Your secret weapon for a perfect dough.
- **¼ cup granulated sugar:** Just enough sweetness to make it shine.
For the Pumpkin Filling:
- **1 (15-ounce) can pumpkin puree:** NOT pumpkin pie filling. We’re not here for shortcuts that ruin flavor.
- **1 (14-ounce) can sweetened condensed milk:** The creamy, sweet backbone.
- **2 large eggs:** Binders of destiny.
- **1 teaspoon ground cinnamon:** Essential spice.
- **½ teaspoon ground ginger:** Adds that zing!
- **¼ teaspoon ground nutmeg:** Warmth and coziness.
- **⅛ teaspoon ground cloves:** Just a touch, for depth.
- **Pinch of salt:** Enhances all those lovely spices.
Step-by-Step Instructions
Deep breaths, you’ve got this. We’re going to make some pie magic!
Step 1: Get That Crust Together
- In a large bowl, whisk together your flour, cocoa powder, sugar, and salt. Make sure it’s all happy and combined.
- Add your super cold, cubed butter. Now, using a pastry blender, your fingers, or a food processor (if you’re fancy), cut the butter into the dry ingredients until it resembles coarse crumbs with some pea-sized pieces remaining. This is key for flakiness!
- Gradually add the ice water, one tablespoon at a time, mixing until the dough just comes together. Be careful not to overmix; nobody wants a tough crust.
- Form the dough into a disk, wrap it in plastic, and pop it in the fridge for at least 30 minutes. Chill time is non-negotiable, FYI!
Step 2: Preheat and Roll
- Preheat your oven to 425°F (220°C).
- On a lightly floured surface, roll out your chilled dough into a 12-inch circle. Gently transfer it to a 9-inch pie plate. Trim the edges and crimp them however your heart desires.
- Prick the bottom of the crust a few times with a fork. This helps prevent puffing.
- For extra crispy edges, you can do a quick **blind bake**: Line the crust with parchment paper, fill with pie weights or dried beans, and bake for 10-12 minutes. Remove weights and parchment, then bake for another 5 minutes until lightly set. (Totally optional, but nice for extra security against a soggy bottom.)
Step 3: Whip Up the Filling
- In a large bowl, whisk together the pumpkin puree, sweetened condensed milk, eggs, cinnamon, ginger, nutmeg, cloves, and salt until smooth and well combined. It should smell incredible!
Step 4: Assemble and Bake
- Pour the pumpkin filling into your prepared (and maybe blind-baked) chocolate crust. Don’t overfill!
- Reduce the oven temperature to 350°F (175°C). Seriously, don’t forget this step.
- Carefully transfer the pie to the preheated oven. Bake for 50-60 minutes, or until a knife inserted near the center comes out clean (or mostly clean). The center might still be a *little* wobbly, but it will set as it cools.
Step 5: The Hardest Part – Waiting!
- Remove the pie from the oven and let it cool completely on a wire rack. **Seriously, let it cool!** This allows it to set properly. Ideally, chill it for at least 3-4 hours, or even overnight, before slicing.
- Slice, serve, and bask in the glory of your epic creation. A dollop of whipped cream is practically mandatory.
Common Mistakes to Avoid
We’ve all been there, friend. Learn from my pie-making blunders:
- **Not preheating the oven:** Rookie mistake! Your pie needs a hot welcome to bake properly.
- **Using warm butter for the crust:** Say goodbye to flakiness, hello to sadness. **Cold butter is your BFF here.**
- **Overmixing the crust dough:** Leads to a tough, dense crust. Mix until *just* combined, then back away slowly.
- **Using pumpkin pie filling instead of puree:** This is the equivalent of showing up to a fancy dinner in sweatpants when everyone else is in black tie. They are NOT the same thing.
- **Cutting into the pie too soon:** Patience, grasshopper! Your pie needs time to set. Otherwise, you’ll have a delicious, but messy, puddle.
Alternatives & Substitutions
Feeling feisty? Want to mix it up? I got you.
- **Spice it up (or down):** Not a fan of cloves? Leave ’em out! Want more kick? Add a tiny pinch of cayenne pepper to the filling – it’s surprisingly good!
- **Different Fats for the Crust:** You *could* use shortening for part of the butter for an even flakier crust, but IMO, butter wins on flavor every time. Coconut oil (solid, cold) could also work for a vegan option, but the flavor will be different.
- **Nutty Crust:** Add a couple of tablespoons of finely ground almonds or pecans to your crust flour mix for an extra layer of flavor and texture.
- **Topping Variations:** Instead of plain whipped cream, try a coffee-infused whipped cream, or a dusting of extra cocoa powder. A light drizzle of caramel sauce wouldn’t hurt anyone either, just sayin’.
FAQ (Frequently Asked Questions)
- **Q: Can I make the crust ahead of time?** Absolutely! You can keep the dough in the fridge for up to 3 days, or freeze it for a month. Just let it thaw a bit before rolling. Easy peasy!
- **Q: My pie cracked on top, is it ruined?** Honey, that’s character! Just cover it with a generous mountain of whipped cream and pretend it was an intentional, rustic touch. No one will ever know.
- **Q: Can I use fresh pumpkin instead of canned?** Yes, but it’s a bit more work. You’ll need to roast, puree, and drain it really well. Canned is just easier and delivers consistent results for this recipe.
- **Q: How do I store leftover pie?** Cover it loosely with plastic wrap or foil and store it in the refrigerator for up to 3-4 days. It actually tastes even better the next day!
- **Q: Can I use margarine instead of butter?** Well, technically yes, but why hurt your soul (and your pie’s flavor) like that? Butter just tastes better, period.
Final Thoughts
There you have it, folks! A pumpkin pie that dares to be different, with a dark, chocolatey secret that everyone will fall in love with. You’ve tackled the dough, mastered the filling, and now you have a show-stopping dessert that proves you’re not afraid to shake things up. Now go impress someone—or yourself—with your new culinary skills. You’ve earned it (and probably deserve another slice!).


