Ever found yourself staring into the freezer, muttering “There *must* be an easier way to dessert glory?” Yeah, me too. And guess what? There totally is! Get ready to have your mind blown (and your sweet tooth satisfied) with an ice cream cake so ridiculously simple, you’ll wonder why you ever bothered with actual baking. This isn’t just a recipe; it’s a life hack for anyone who loves dessert but hates dishes.
Why This Recipe is Awesome
Okay, let’s be real. We all want to look like culinary geniuses without actually, you know, *being* one. This recipe is your secret weapon. Why is it awesome? Let me count the ways:
- No oven required! Say goodbye to sweating over a hot stove and hello to chilling out.
- Minimal dishes! We’re talking a handful, tops. Your dishwasher (or your hands) will thank you.
- It’s practically idiot-proof. Seriously, if you can stack things, you can make this. I didn’t mess it up, so you definitely won’t.
- Customizable AF! (See? Slang!) Want more chocolate? Go for it. Obsessed with caramel? Drench it!
- Tastes like you spent hours, but actually took about 15 minutes of active effort. Maximum impact, minimal effort.
Ingredients You’ll Need
Gather your troops, folks! These are the humble heroes that will transform into a dessert legend. No fancy stuff, just good old freezer aisle magic.
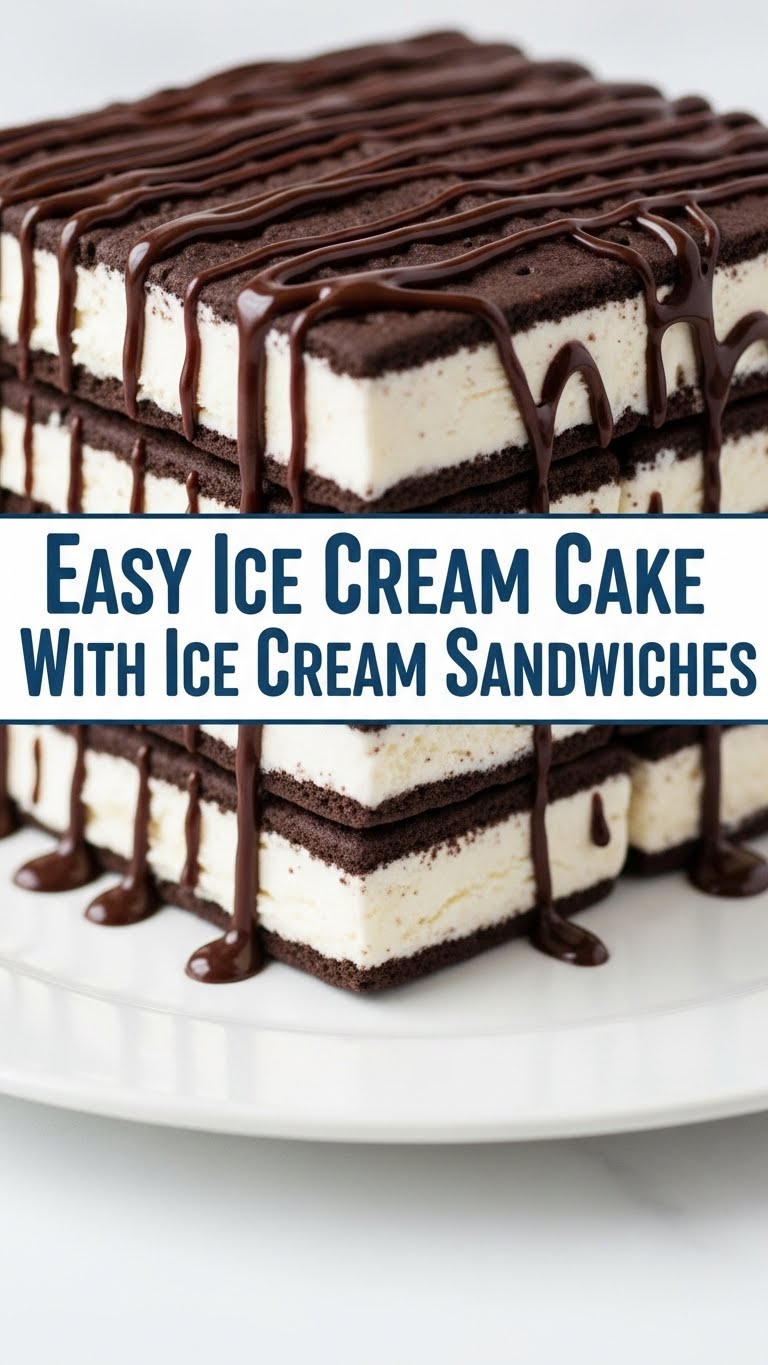
- 12-18 Ice Cream Sandwiches: The unsung heroes of the freezer. Grab classic vanilla, or get wild with chocolate or mint for extra flair.
- 1 large (16 oz) container frozen whipped topping: Like Cool Whip. This is your fluffy, cloud-like binder. Make sure it’s thawed in the fridge for a few hours before you start.
- 1 jar (12-16 oz) hot fudge sauce: Because chocolate. Duh.
- 1 jar (12-16 oz) caramel sauce: For that extra sticky, gooey goodness.
- Sprinkles, chocolate shavings, or chopped candy bars: Your finishing touch! This is where you make it look like you actually tried.
- (Optional) An 8×8 or 9×13 inch baking pan, or a 9-inch springform pan: The vessel for your masterpiece. A springform makes for easier slicing, but any pan works!
Step-by-Step Instructions
Alright, superstar. Time to put those ingredients to work. This is so easy, you might just do a happy dance (I won’t judge).
- Line Your Pan: If you’re using a regular baking pan, line it with parchment paper or plastic wrap, leaving an overhang on the sides. This makes lifting the cake out later a total breeze. If you’re using a springform, no need to line, just make sure the bottom is locked in place!
- Lay the Foundation: Unwrap half of your ice cream sandwiches. Arrange them in a single layer at the bottom of your chosen pan, cutting them if needed to fit snugly. Don’t leave any gaps! This is your cake base.
- Whipped Wonder: Gently spread about half of your thawed whipped topping evenly over the ice cream sandwich layer. Be careful not to squish the sandwiches too much.
- Saucy Situation: Drizzle about half of your hot fudge sauce and half of your caramel sauce over the whipped topping. Go wild here, but remember you have another layer!
- Repeat the Magic: Place the remaining unwrapped ice cream sandwiches over the sauce layer, again fitting them snugly. Follow with the rest of the whipped topping, then the remaining hot fudge and caramel sauces.
- Deck it Out: Now for the fun part! Sprinkle your chosen toppings (sprinkles, candy, etc.) liberally over the top. The more, the merrier, IMO.
- Freeze for Glory: Cover the pan loosely with plastic wrap or foil. Pop it into the freezer for at least 4-6 hours, or ideally, overnight. This is crucial for it to set properly!
- Slice and Devour: When you’re ready to serve, take the cake out of the freezer about 10-15 minutes before slicing to let it soften just a tiny bit. Use the parchment/plastic wrap overhang to lift it out (if applicable), or release the springform. Slice with a sharp knife (running it under hot water helps!) and enjoy your culinary triumph!
Common Mistakes to Avoid
Even though this recipe is basically foolproof, there are a few rookie errors that can turn your dessert dream into a gooey nightmare. Don’t be that person!
- Not Freezing Long Enough: This isn’t a “let’s peek after 30 minutes” kind of deal. You need serious freeze time for it to set up. Otherwise, you’ll have a puddle of deliciousness, not a cake. Patience, young grasshopper!
- Using Frozen Whipped Topping Straight from the Freezer: Nope, nope, nope. It needs to be thawed in the fridge first to be spreadable. Trying to spread frozen whipped topping is a recipe for ripped sandwiches and frustration.
- Forgetting to Line Your Pan (if not using springform): Trust me, you’ll be prying a delicious but stubborn dessert from the bottom of your pan, potentially ruining its structural integrity. The overhang is your friend.
- Eating All the Ingredients Before Assembly: I know, I know, the temptation is real. But try to save *some* for the actual cake. You can always buy more for “taste testing” later.
Alternatives & Substitutions
Feeling creative? This cake is your canvas! Here are some ideas to shake things up:
- Ice Cream Sandwich Swap: Don’t stick to vanilla! Try chocolate ice cream sandwiches for a super chocolatey cake, or mint chip for a refreshing twist. Heck, mix and match!
- Whipped Topping Wonders: While Cool Whip is easy, you could totally make homemade whipped cream if you’re feeling fancy. Just be aware it might not hold its shape quite as firmly after freezing.
- Sauce Sensation: Swap out the fudge or caramel for strawberry sauce, peanut butter sauce, or even a white chocolate ganache. Why not all three?
- Topping Extravaganza: The sky’s the limit! Crushed Oreos, mini chocolate chips, chopped Snickers bars, M&Ms, sliced bananas, toasted nuts – whatever makes your heart sing.
- Diet-Friendly (Sort Of): Use sugar-free ice cream sandwiches, sugar-free whipped topping, and sugar-free sauces. It’ll still be delicious, just… different.
FAQ (Frequently Asked Questions)
Got questions? I’ve got answers! (Mostly.)
- Do I *have* to freeze it for hours? Yes! Unless you’re aiming for an ice cream soup dessert, which, surprisingly, is not the goal here. The longer it freezes, the better it sets.
- Can I make it ahead of time for a party? Absolutely! This cake is a fantastic make-ahead dessert. In fact, it’s often better when it’s had a good, long chill. Just cover it well to prevent freezer burn.
- What if I don’t have a springform pan? No biggie! Any 8×8 or 9×13 inch baking pan works perfectly. Just remember to line it for easy removal, as mentioned above.
- Is it really that easy? Like, *really*? For real! It’s one of those recipes that looks impressive but requires minimal skill. Even my perpetually kitchen-challenged cousin managed it.
- Can I use any kind of ice cream sandwiches? Yep! The thicker, creamier ones tend to hold up a bit better, but any standard ice cream sandwich will do the trick.
- Will my friends be impressed? Duh! You just made an ice cream cake from scratch (ish). Prepare for compliments and requests for the recipe.
Final Thoughts
See? I told you it was easy! You’ve just unlocked dessert superpower with literally almost no effort. This ice cream sandwich cake is perfect for impromptu gatherings, lazy Sundays, or just when that insatiable sweet craving hits. Go forth and conquer those cravings!
Now go impress someone—or yourself—with your new culinary skills. You’ve earned it, you magnificent dessert architect, you!


