So, you’re craving something warm, comforting, and absolutely delicious but the thought of making a pie crust from scratch makes you want to curl up and cry into a tub of ice cream, right? Been there, done that, bought the T-shirt. But what if I told you there’s a way to get that rustic, homemade apple pie vibe without the drama? Enter your new best friend: **Rustic Apple Pie with Puff Pastry!**
Why This Recipe is Awesome
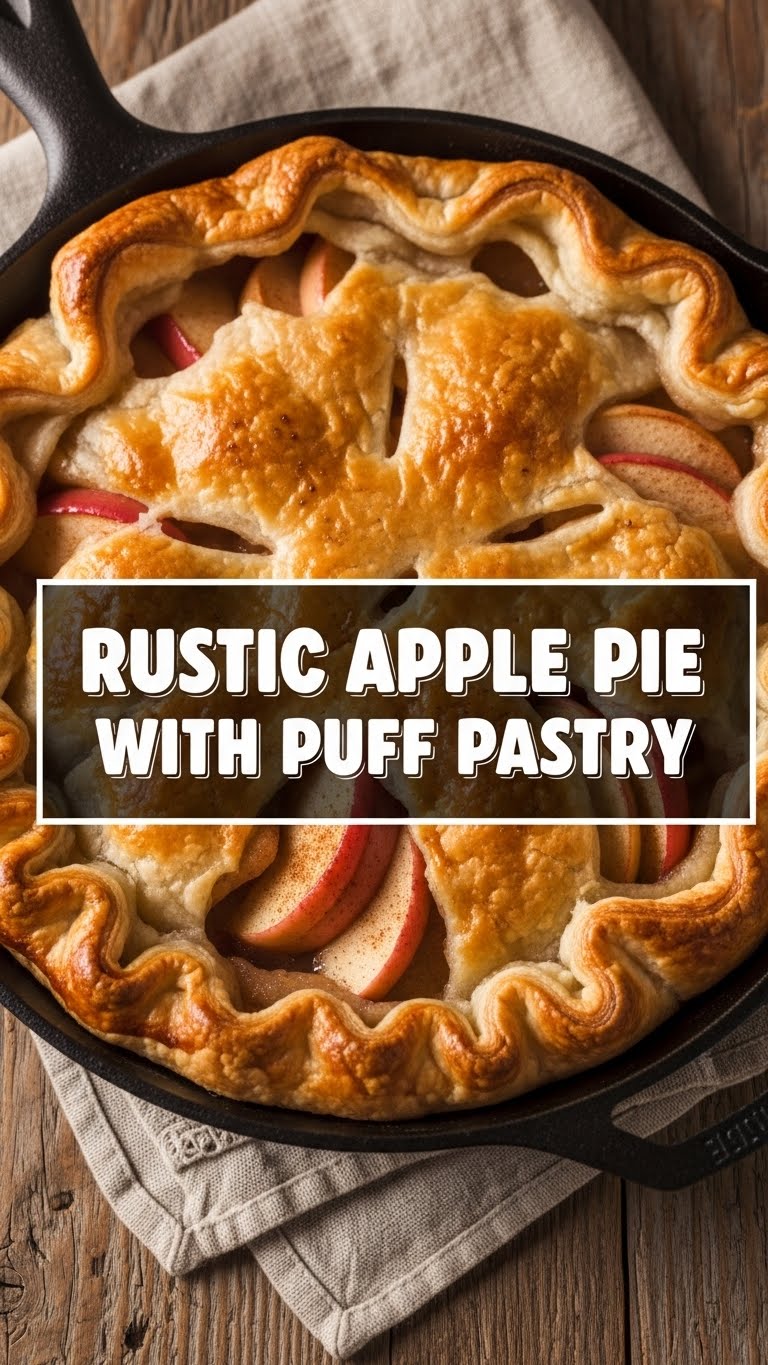
Because let’s be real, life’s too short for bad pie crusts and unnecessary kitchen stress. This recipe is basically your cheat code to looking like a baking genius. We’re ditching the traditional, finicky pie dough for glorious, buttery, store-bought puff pastry. It bakes up flaky, golden, and *chef’s kiss* perfect every single time. Seriously, it’s so idiot-proof, even my cat could probably manage it (if she had opposable thumbs and a sweet tooth). Plus, it’s rustic, which basically means it’s supposed to look a little messy and charming. No need for perfection here, folks!
Ingredients You’ll Need
Gather your troops! Here’s what you’ll need to make this magic happen:
- **1 sheet of frozen puff pastry, thawed:** The real MVP of this operation. Don’t skip the thawing part unless you want to snap it in half.
- **3-4 medium apples:** Granny Smith, Honeycrisp, Fuji, or a mix! Just make sure they’re firm and good for baking. We’re not making applesauce here.
- **1/4 cup granulated sugar:** Or a little more if your apples are super tart, you sweet tooth!
- **1 tablespoon all-purpose flour:** This little guy helps thicken the filling so you don’t get a watery mess.
- **1 teaspoon ground cinnamon:** Because apples and cinnamon are soulmates.
- **1/4 teaspoon ground nutmeg:** Cinnamon’s sassy sidekick, adds depth.
- **Pinch of salt:** Don’t question it. It makes everything taste better.
- **1 tablespoon unsalted butter, cut into small pieces:** Adds richness and melts into a delicious pool.
- **1 large egg, beaten with 1 tablespoon water (for egg wash):** For that gorgeous golden sheen. Like makeup for your pie.
- **Optional: A sprinkle of turbinado sugar:** For extra sparkle and crunch on top.
Step-by-Step Instructions
- **Preheat Your Oven & Prep Your Pan:** First things first, get that oven screaming hot to **400°F (200°C)**. Line a baking sheet with parchment paper. Trust me, parchment is your friend here.
- **Peel, Core, & Slice Those Apples:** Get your apples ready! Peel ’em, core ’em, and slice ’em into roughly 1/4-inch thick pieces. Aim for uniform slices so they cook evenly.
- **Mix the Filling:** In a large bowl, combine your sliced apples, granulated sugar, flour, cinnamon, nutmeg, and salt. Give it a good, gentle toss until the apples are all coated. They should look happy.
- **Roll Out the Pastry:** On your parchment-lined baking sheet, carefully unroll your thawed puff pastry. If it’s creased, a quick, gentle roll with a rolling pin can smooth it out. Don’t make it paper-thin, though; we want that glorious puff!
- **Pile on the Apples:** Arrange the apple mixture in the center of the puff pastry, leaving about a 1.5 to 2-inch border all around. It’ll look like a little mountain of apples. Scatter those small pieces of butter over the apple mound.
- **Fold and Tuck:** Now for the “rustic” part! Gently fold the pastry edges up and over the apples, overlapping slightly as you go. Pinch and pleat the corners to seal them up a bit, creating that charming free-form look. Don’t stress about making it perfect; imperfections are part of the charm!
- **Egg Wash & Sugar Sprinkle:** Brush the folded pastry edges with your egg wash. This gives it that beautiful golden shine. If you’re feeling fancy (and who isn’t?), sprinkle a little turbinado sugar over the egg-washed crust for extra sparkle and crunch.
- **Bake It Up!** Pop that beauty into your preheated oven. Bake for **30-35 minutes**, or until the pastry is deeply golden brown and puffed up like a proud peacock, and the apples are tender when poked with a knife.
- **Cool & Devour:** Let your pie cool on the baking sheet for at least 15-20 minutes before attempting to slice it. Those juices need to set! Then, slice, serve, and bask in the glory. A scoop of vanilla ice cream is practically mandatory.
Common Mistakes to Avoid
Alright, listen up, buttercups. Don’t pull a rookie move!
- **Not thawing the pastry properly:** Trying to unfold frozen puff pastry is like trying to bend steel with your mind. It’ll crack and shatter. **Always thaw it in the fridge overnight or at room temp for about 30-45 mins.**
- **Overfilling the pie:** More is not always more, especially when it comes to pie filling. Too many apples and your pastry won’t fold nicely, and you’ll have a lava flow of juice.
- **Forgetting the flour in the filling:** Without it, you’re looking at a soggy bottom and a runny mess. The flour is your secret weapon against watery pie.
- **Not preheating the oven:** Seriously, this is a non-negotiable. Puff pastry needs that initial blast of heat to do its puffing magic. **Don’t skip the preheat!**
- **Cutting it too soon:** I know, I know, it smells heavenly. But those hot apple juices need time to cool and thicken. Patience, grasshopper!
Alternatives & Substitutions
Feeling adventurous? Or just missing an ingredient? No stress, we got options!
- **Different Fruits:** Not an apple fanatic? Or just want to mix it up? Pears, peaches, berries, or a combo of any of these would be divine! Just adjust sugar based on fruit sweetness.
- **Spice It Up:** Beyond cinnamon and nutmeg, feel free to add a pinch of cardamom, a tiny bit of ginger, or even a dash of allspice for a different vibe. Experiment!
- **Sugar Swap:** You can totally use brown sugar instead of granulated for a deeper, more caramel-y flavor. Maple syrup is also a wild card that can work, but reduce other liquids a bit.
- **Dairy-Free:** If you’re avoiding dairy, most puff pastries (check the label!) are accidentally vegan. Use a plant-based butter alternative for dotting the apples, and swap the egg wash for a plant-based milk wash.
FAQ (Frequently Asked Questions)
- **Q: Can I use any kind of apple?** A: Technically yes, but some are better! **For best results, use firm, tart-sweet baking apples** like Granny Smith, Honeycrisp, Fuji, or Braeburn. Soft apples turn to mush.
- **Q: What if my puff pastry cracks when I unroll it?** A: Don’t panic! You can usually gently press the cracks together with your fingers, or even use a tiny dab of water to help seal them. It’s rustic, remember? A little crack adds character!
- **Q: Can I make this ahead of time?** A: You can prep the apple filling a few hours ahead and keep it in the fridge. Assemble and bake just before serving for the freshest, flakiest results. You *can* bake it ahead, but the pastry will soften a bit.
- **Q: My pie isn’t getting golden! What gives?** A: Did you use the egg wash? That’s key for browning. Also, ovens can be quirky. If it’s still pale but cooked through, you can give it an extra 5 minutes, or move it to a higher rack if it’s too low.
- **Q: Can I add nuts or dried fruit?** A: Heck yes! A handful of chopped walnuts or pecans, or some dried cranberries or raisins, would be a fantastic addition to the apple filling. Just toss them in with the apples.
- **Q: How do I store leftovers?** A: If there *are* leftovers (highly unlikely, IMO), store them loosely covered at room temperature for a day, or in the fridge for up to 3 days. Reheat gently in the oven for a bit of crispness.
Final Thoughts
There you have it, future pie master! You’ve just unlocked the secret to easy, impressive, and utterly delicious apple pie. No more stressing over perfect crimps or soggy bottoms. This rustic beauty is all about enjoying the process (and the eating!). Now go impress someone—or yourself—with your new culinary skills. You’ve earned it!


