Alright, my culinary compadre, so you’ve hit that sweet spot between ‘I need dessert NOW’ and ‘I really don’t want to turn on the oven,’ right? Good news! We’re about to make something ridiculously easy, super satisfying, and genuinely *cool* (pun intended) without breaking a sweat. FYI, it’s also incredibly delicious.
Why This Recipe is Awesome
Why is this recipe the best thing since, well, sliced bread (but like, dessert bread)? First off, it’s basically a fancy-pants dessert that requires zero actual cooking. Yeah, you heard me. We’re talking assembly-line genius here. Secondly, it’s surprisingly wholesome. We’re using *yogurt*, people! Practically health food, if you squint a little. Plus, it’s entirely customizable, so you can go wild. And honestly, IMO, it’s so simple, even my cat could probably manage it if she had opposable thumbs and an interest in chocolate.
Ingredients You’ll Need
- Greek Yogurt: The thicker, the better. Full-fat, because we’re treating ourselves, not just existing. Or low-fat if you’re *trying* to be good.
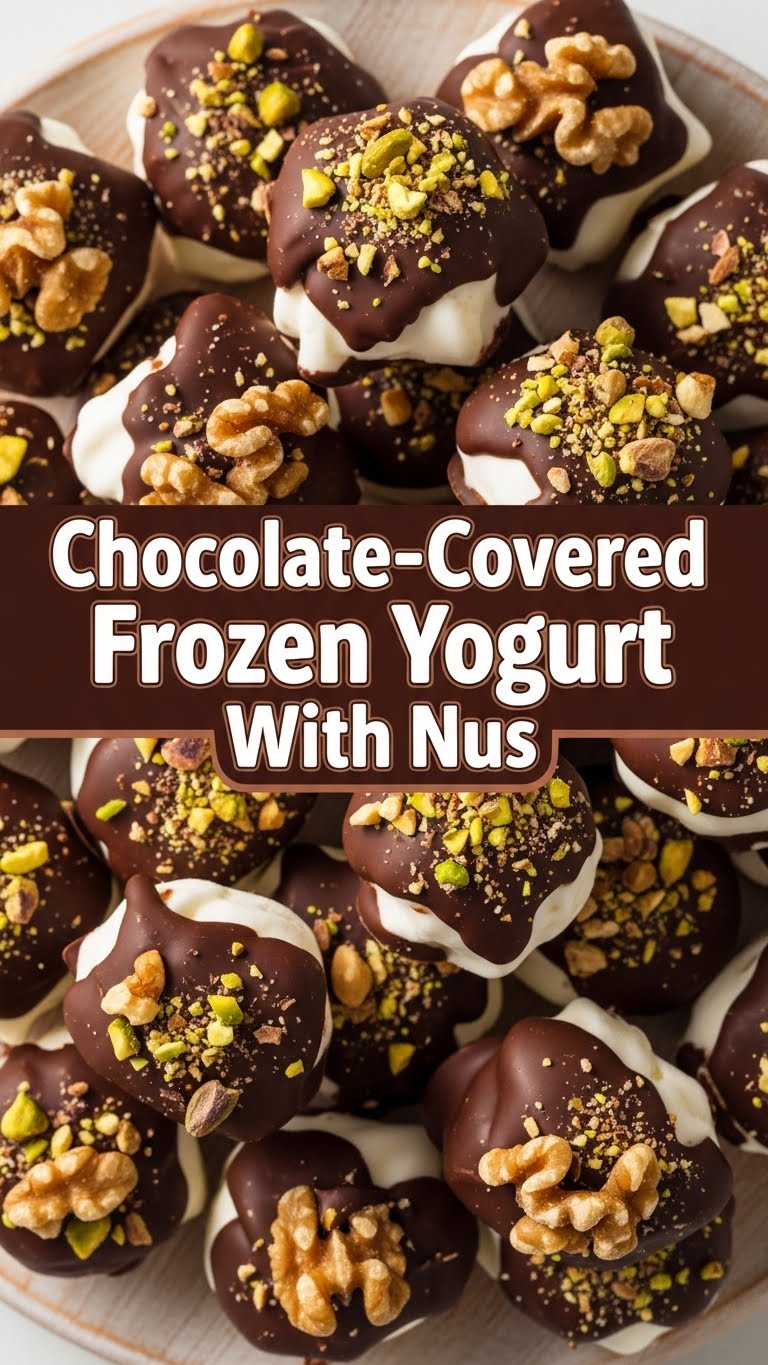
- Chocolate Chips: Semi-sweet is classic, but hey, dark if you’re feeling sophisticated, or milk if you’re a sweet tooth. Your call, champ.
- Coconut Oil: Just a tiny bit, to make the chocolate melt super smooth and coat everything like a dream. Don’t skip this, it’s magic.
- Your Favorite Nuts: Chopped, roasted, salted – whatever makes your heart sing. Pecans, walnuts, almonds, pistachios – go nuts! (See what I did there?)
- Optional Fun Stuff: A dash of sea salt, a drizzle of honey, some sprinkles for extra pizzazz.
Step-by-Step Instructions
Line ‘Em Up: Grab a baking sheet and line it with parchment paper. This is your non-stick superhero, ready to prevent a sticky situation.
Dollop the Yogurt: Spoon generous dollops of Greek yogurt onto the parchment paper. Don’t be shy! Use the back of your spoon to gently flatten each dollop into a disc, about 2-3 inches wide. You want them thick enough to hold up their end of the bargain.
Sprinkle Away: Now for the fun part! Sprinkle your chopped nuts (and any other optional goodies like a pinch of sea salt) over the yogurt discs. Press them down *gently* so they stick. This is where the magic starts to happen.
Freeze Time! Pop the baking sheet into the freezer for at least **1.5 to 2 hours**. You want these babies rock solid, no wobbly bits allowed. Don’t rush it, trust the process.
Melt the Chocolate Magic: Once your yogurt discs are frozen, it’s chocolate time! In a microwave-safe bowl, combine your chocolate chips and coconut oil. Microwave in **30-second intervals**, stirring well after each, until it’s gloriously smooth and melted. Be careful not to burn it – nobody likes burnt chocolate!
Dip & Drip: Take the frozen yogurt discs out of the freezer. One by one, dip half or fully coat each disc in the melted chocolate. Let any excess drip off before placing it back on the parchment paper. You can also just drizzle if you’re feeling less adventurous or want a lighter touch.
Back to the Chill: Immediately pop the chocolate-covered discs back into the freezer for another **15-30 minutes**, just until the chocolate hardens completely. This final freeze ensures everything is perfectly set.
Devour! Peel them off the parchment paper and enjoy your delicious, homemade, fancy-ish treat! You’ve earned this moment of pure bliss.
Common Mistakes to Avoid
Thin Yogurt Discs: If your yogurt discs are too thin, they’ll snap and crack when you try to dip them. **Go for at least half an inch thick!** We want substantial bites, not sad crumbs. Learn from my past mistakes.
Warm Yogurt: Trying to dip soft, slightly thawed yogurt into chocolate is a recipe for a messy disaster. **Ensure your yogurt is *completely* frozen solid.** Patience, young grasshopper, it really pays off here.
Overheating Chocolate: Burnt chocolate is a tragedy and tastes like sadness. Always use short bursts in the microwave and stir diligently. If it looks grainy, you’ve probably gone too far. And yes, a double boiler works too, if you’re feeling extra fancy.
Skipping the Coconut Oil: Without it, your chocolate coating might be brittle and difficult to work with. The coconut oil makes it silky smooth and gives it that perfect “snap” when frozen. It’s a small step, but a mighty one!
Alternatives & Substitutions
Yogurt Choices: Not a Greek yogurt fan? You could use regular full-fat plain yogurt, but be warned, it might be a bit softer and harder to work with. You could also try dairy-free yogurts like coconut or almond if you’re avoiding dairy – just make sure they’re nice and thick for best results.
Nut Varieties: Not into pecans? Try chopped pistachios for a gourmet vibe, or crushed peanuts for a salty-sweet kick. Don’t have nuts? Granola works, or even crushed pretzels for that salty crunch. The world is your oyster… or, well, your yogurt bite!
Chocolate Flavors: Milk, dark, white, even sugar-free chocolate works. Feel free to mix and match. You could even swirl in a bit of peanut butter into your melted chocolate for an extra layer of yum! Imagine the possibilities!
Extra Toppings: Beyond nuts, think dried fruit (cranberries, cherries), a sprinkle of shredded coconut before the chocolate hardens, or even a dash of cayenne pepper for a spicy kick! Get creative!
FAQ (Frequently Asked Questions)
“Can I use regular yogurt instead of Greek?” Technically, yes, but your discs might be a bit softer and harder to handle. Greek yogurt’s thickness is what makes these so sturdy and satisfying. So, stick to Greek if you can, your future self will thank you for the extra structure!
“How long do these last in the freezer?” If stored in an airtight container, they can last up to a month! But let’s be real, are they *really* going to last that long? Probably not in my house!
“My chocolate seized! What happened?” Ah, the dreaded seize! This usually happens if water gets into your chocolate, or if it overheats. Next time, be super careful with moisture, and use those short microwave bursts. Chocolate can be finicky, but you’ll master it!
“Can I add fruit *inside* the yogurt?” You totally can! Small berries like raspberries or blueberries would be delightful. Just gently press them into the yogurt discs before freezing. A little burst of fruity goodness!
“Do I *have* to use coconut oil?” While not strictly *mandatory*, it makes the chocolate so much smoother for dipping and gives it a better texture when frozen. It’s highly recommended for that perfect snap! Trust me on this one.
“Are these actually healthy?” Define “healthy,” my friend! They’ve got yogurt (probiotics!), nuts (protein, healthy fats!), and chocolate (antioxidants!). So, yes, for a dessert, they’re a pretty good choice. Everything in moderation, right? Wink wink.
Final Thoughts
And there you have it, folks! Your very own batch of ridiculously easy, totally delicious, and deceptively fancy chocolate-covered frozen yogurt bites. You just basically made a gourmet dessert with minimal effort and maximum deliciousness. Go on, pat yourself on the back! You’ve officially leveled up your snack game. Now go impress someone—or yourself, which is arguably more important—with your new culinary skills. You’ve earned it! Seriously, try not to eat them all in one go. (No judgment if you do, though!)


