So, you’re eyeing that perfect dessert that screams “cozy autumn vibes” but also “I’m a kitchen wizard!” without actually, you know, needing to *be* a kitchen wizard? You, my friend, are in the right place. Because today, we’re not just making apple pie. Oh no. We’re elevating it. We’re giving it a glow-up. We’re pairing it with a silky, dreamy custard sauce that will make you question every life choice you’ve made until this delicious moment. Let’s do this!
Why This Recipe is Awesome
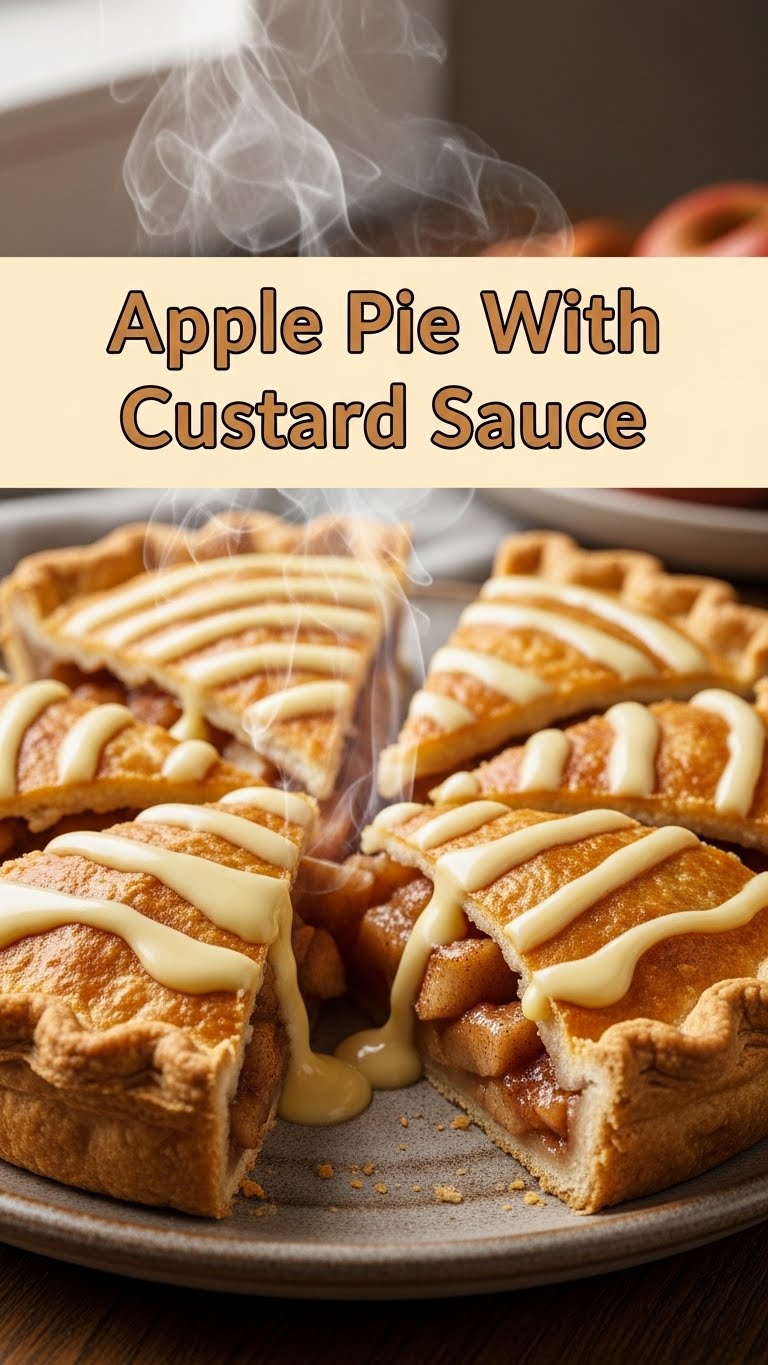
Okay, let’s be real. Apple pie is classic, right? But sometimes “classic” can translate to “a little… expected.” This recipe? It takes that beloved, comforting hug of an apple pie and gives it a sophisticated, creamy companion. Think of it as apple pie’s cooler, more worldly best friend. Plus, it’s pretty darn hard to mess up, even if your usual culinary adventures end with the smoke detector screaming for mercy. It’s truly idiot-proof, and I say that with love, having tested its limits myself. You get the tart sweetness of apples, the flaky crust, and then BAM! A rich, vanilla-kissed custard that just ties it all together in a beautiful, delicious bow. You’ll look like a culinary genius, and frankly, you deserve it.
Ingredients You’ll Need
Gather ’round, my little culinary apprentice! Here’s your shopping list. Don’t worry, nothing too exotic here. Unless you consider fresh apples exotic, in which case, we need to chat. 😉
For the Pie:
- 1 (14.1-oz) box refrigerated pie crusts (2 crusts): Let’s not pretend we’re making our own pastry today. Life’s too short, and these are perfectly fine!
- 6-7 medium apples: A mix is best! Think 4 Granny Smith (for that essential tartness) and 2-3 sweeter ones like Honeycrisp, Fuji, or Golden Delicious. Peeled, cored, and sliced about ¼-inch thick.
- ½ cup granulated sugar: Adjust if your apples are super sweet or super tart. You’re the boss!
- ¼ cup packed light brown sugar: Adds a lovely depth of flavor.
- 2 tablespoons all-purpose flour or cornstarch: This is your secret weapon against a watery pie. No one likes a soggy bottom!
- 1 teaspoon ground cinnamon: Because what’s apple pie without it?
- ¼ teaspoon ground nutmeg: Just a pinch for that cozy warmth.
- Pinch of salt: Balances all that sweetness.
- 2 tablespoons unsalted butter: Cut into small pieces, for dotting over the filling.
- 1 egg (for egg wash): Whisked with a tablespoon of water or milk for that golden, shiny crust.
For the Custard Sauce:
- 2 large egg yolks: Separate them carefully!
- ¼ cup granulated sugar: Sweetens our creamy dream.
- 1 tablespoon cornstarch: Our thickening MVP!
- 1 ½ cups whole milk: Don’t skimp on the fat here; it makes it luxurious.
- 1 teaspoon vanilla extract: The soul of any good custard.
- Pinch of salt: Again, for balance.
Step-by-Step Instructions
Alright, apron on (or not, I won’t judge your stain game), let’s get cooking! We’re breaking this down so it’s ridiculously easy.
Part 1: The Apple Pie Magic
- Prep Your Crust & Oven: Unroll one pie crust and gently fit it into a 9-inch pie plate. Don’t stretch it! Trim the edges, leaving about a ½-inch overhang. Pop it in the fridge while you get your filling ready. Now, preheat your oven to 425°F (220°C). Seriously, preheat it. It matters!
- Mix the Filling: In a large bowl, combine your sliced apples, granulated sugar, brown sugar, flour/cornstarch, cinnamon, nutmeg, and salt. Toss everything gently until the apples are nicely coated.
- Assemble the Pie: Pour the apple mixture into your chilled pie crust. Try to mound it slightly in the center, as apples will cook down. Dot the top with those small pieces of butter. Yummy fat = yummy flavor.
- Top it Off: Unroll your second pie crust. You can place it directly over the filling, or get fancy with some lattice work (if you’re feeling ambitious and not too lazy). Trim the edges to match the bottom crust’s overhang. Now, crimp the edges together to seal the pie. You can use a fork or your fingers for a pretty pattern. Cut a few slits in the top crust to allow steam to escape – this is crucial, unless you want a pie explosion.
- Egg Wash & Bake: Brush the top of the pie with your egg wash. This gives it that gorgeous golden shine. Place the pie on a baking sheet (to catch any drips – better safe than sorry!) and bake for 15 minutes at 425°F (220°C).
- Reduce & Finish: After 15 minutes, reduce the oven temperature to 375°F (190°C). Continue baking for another 35-45 minutes, or until the crust is deeply golden brown and the filling is bubbly. If the crust starts browning too quickly, loosely tent it with foil.
- Cool Down: This is the hardest part. Let the pie cool completely on a wire rack for at least 2-3 hours before slicing. Seriously, don’t cut it early! The filling needs to set, otherwise, you’ll have a runny, sad mess. Patience, grasshopper.
Part 2: The Dreamy Custard Sauce
- Warm the Milk: In a medium saucepan, gently heat the milk over medium heat until it just begins to simmer around the edges. Don’t let it boil! Remove it from the heat.
- Whisk the Yolks: In a separate bowl, whisk together the egg yolks, sugar, cornstarch, and salt until light yellow and creamy.
- Temper, Temper: Here’s the fancy part! Slowly pour about half of the warm milk into the egg yolk mixture, whisking constantly. This “tempers” the eggs, preventing them from scrambling. Now, pour the tempered egg mixture back into the saucepan with the remaining milk.
- Thicken it Up: Return the saucepan to medium-low heat. Cook, stirring constantly with a whisk or a wooden spoon, until the custard thickens enough to coat the back of the spoon (about 5-8 minutes). It will thicken more as it cools. Don’t boil it!
- Flavor & Chill: Remove from heat and stir in the vanilla extract. Pour the custard into a clean bowl, cover the surface directly with plastic wrap (this prevents a skin from forming), and chill in the refrigerator until ready to serve. You can serve it warm too, if you prefer!
Common Mistakes to Avoid
Look, we all make mistakes. It’s part of the journey. But here are a few common blunders you can totally sidestep with this recipe:
- Not preheating the oven: Rookie move! Your pie needs that initial burst of heat to set the crust properly and prevent a soggy bottom.
- Using super mushy apples: Some apples just aren’t built for pie (looking at you, Red Delicious). Stick to firm, baking-friendly varieties. Otherwise, you’ll end up with apple soup in a crust.
- Cutting the pie too soon: I know, it smells heavenly. But seriously, that filling needs time to set. Cutting into a hot pie is a recipe for a sloshy, sad disaster. Let it cool!
- Over-boiling the custard: You want a gentle simmer for the milk and a slow, steady thicken for the custard. Boiling the custard will likely lead to scrambled eggs. And while I love scrambled eggs, they don’t belong in my dessert sauce.
- Forgetting to vent the pie: Those little slits on top aren’t just for aesthetics. They let steam escape, preventing your beautiful top crust from puffing up like a balloon and then collapsing.
Alternatives & Substitutions
Feeling creative? Or just missing an ingredient? No stress, my friend. Here are a few ways to mix things up:
- Different Fruits: Not an apple fiend? This recipe would be fantastic with pears, or a mix of apples and berries! Just adjust sugar based on fruit sweetness.
- Crust Variations: If you’re feeling *really* ambitious, make your own pie crust. Or, for a shortcut, a graham cracker crust could be fun for a less traditional twist.
- Custard Kick: Want to adult-ify your custard? Add a splash of brandy, rum, or Grand Marnier at the end. Just a tablespoon will do! Or, infuse the milk with a cinnamon stick or lemon zest before heating for extra flavor.
- Dairy-Free Custard: You can absolutely make this custard with a good quality non-dairy milk (like oat or almond milk) and a plant-based butter for the pie. The texture might be slightly different, but still delicious!
FAQ (Frequently Asked Questions)
Got questions? I’ve got (casual) answers!
- Can I use any kind of apple? Well, technically yes, but why risk it? Some apples turn to total mush, and others are bland. Stick to baking apples like Granny Smith, Honeycrisp, or Fuji for the best texture and flavor balance.
- Do I really need to use store-bought pie crust? Is that cheating? Cheating? Darling, that’s called “smart cooking.” Embrace the convenience! Unless you *love* making pie crust from scratch, use the store-bought kind. No judgment here.
- My pie crust is browning too fast! Help! Chill. Just loosely cover the edges (or the whole top) of the pie with aluminum foil. This acts as a little hat to protect it from over-browning.
- My custard sauce seems too thin/thick. What gives? Custard’s a bit finicky. If it’s too thin, you can try gently heating it again over low heat, stirring constantly, for a few more minutes. If it’s too thick, thin it out with a tiny splash of warm milk. Remember, it thickens as it cools!
- Can I make the pie and custard ahead of time? Absolutely! The pie can be baked a day in advance and stored at room temperature. The custard can be made 2-3 days ahead and stored in the fridge. Just reheat gently (or serve chilled) when you’re ready!
- Leftovers? What are those? LOL! But if you magically have any, store the pie (covered) at room temp for a day, or in the fridge for up to 3-4 days. The custard needs to live in the fridge. Reheat pie gently in the oven or microwave, and custard in a saucepan or microwave.
Final Thoughts
And there you have it, folks! An apple pie that’s not just an apple pie, but an experience. With that luscious custard sauce, you’re not just serving dessert; you’re serving a moment. So, go on, get baking! You’ve got this. Now go impress someone—or more importantly, yourself—with your new culinary prowess. You’ve earned every single delicious bite!


